
Audit Your Trusted Device Lists for Greater Security
We all accumulate “trusted devices” in our Apple, Google, and password manager accounts, but it’s important to remove devices you no longer use because they could be security risks.

One of the ways companies protect critical account information is by remembering the devices you use to log in as “trusted devices” or “authorized devices.” Those logins will usually have been protected by two-factor authentication or another mechanism that guarantees the device is being used by you, its owner. Subsequent logins from those devices may be more convenient for you due to requiring only a username and password, and trusted devices may automatically receive two-factor authentication codes. That’s how Apple ensures you are who you say you are when you log in to your Apple ID on a previously unseen device.
Although trusted devices can help increase your security, they can also reduce it. If an attacker were to gain access to one of your trusted devices, they would have a better chance of breaking into your accounts or masquerading as you when setting up new accounts. As a result, it’s important to audit your trusted devices occasionally and make sure you still control all of them. The first time you do this, you may be shocked to see that a Mac you last used years ago could still be receiving Apple ID verification codes. Removing unused trusted devices from an account makes it more secure with no downside.
We can’t provide a comprehensive list of services that track trusted devices, but many of you use two high-profile ones: Apple and Google. In addition, most password managers with online accounts also rely on trusted devices—we’ll look at 1Password here, but if you use another password manager, look through its settings to see if it maintains a list of trusted devices.
Remove Trusted Apple Devices
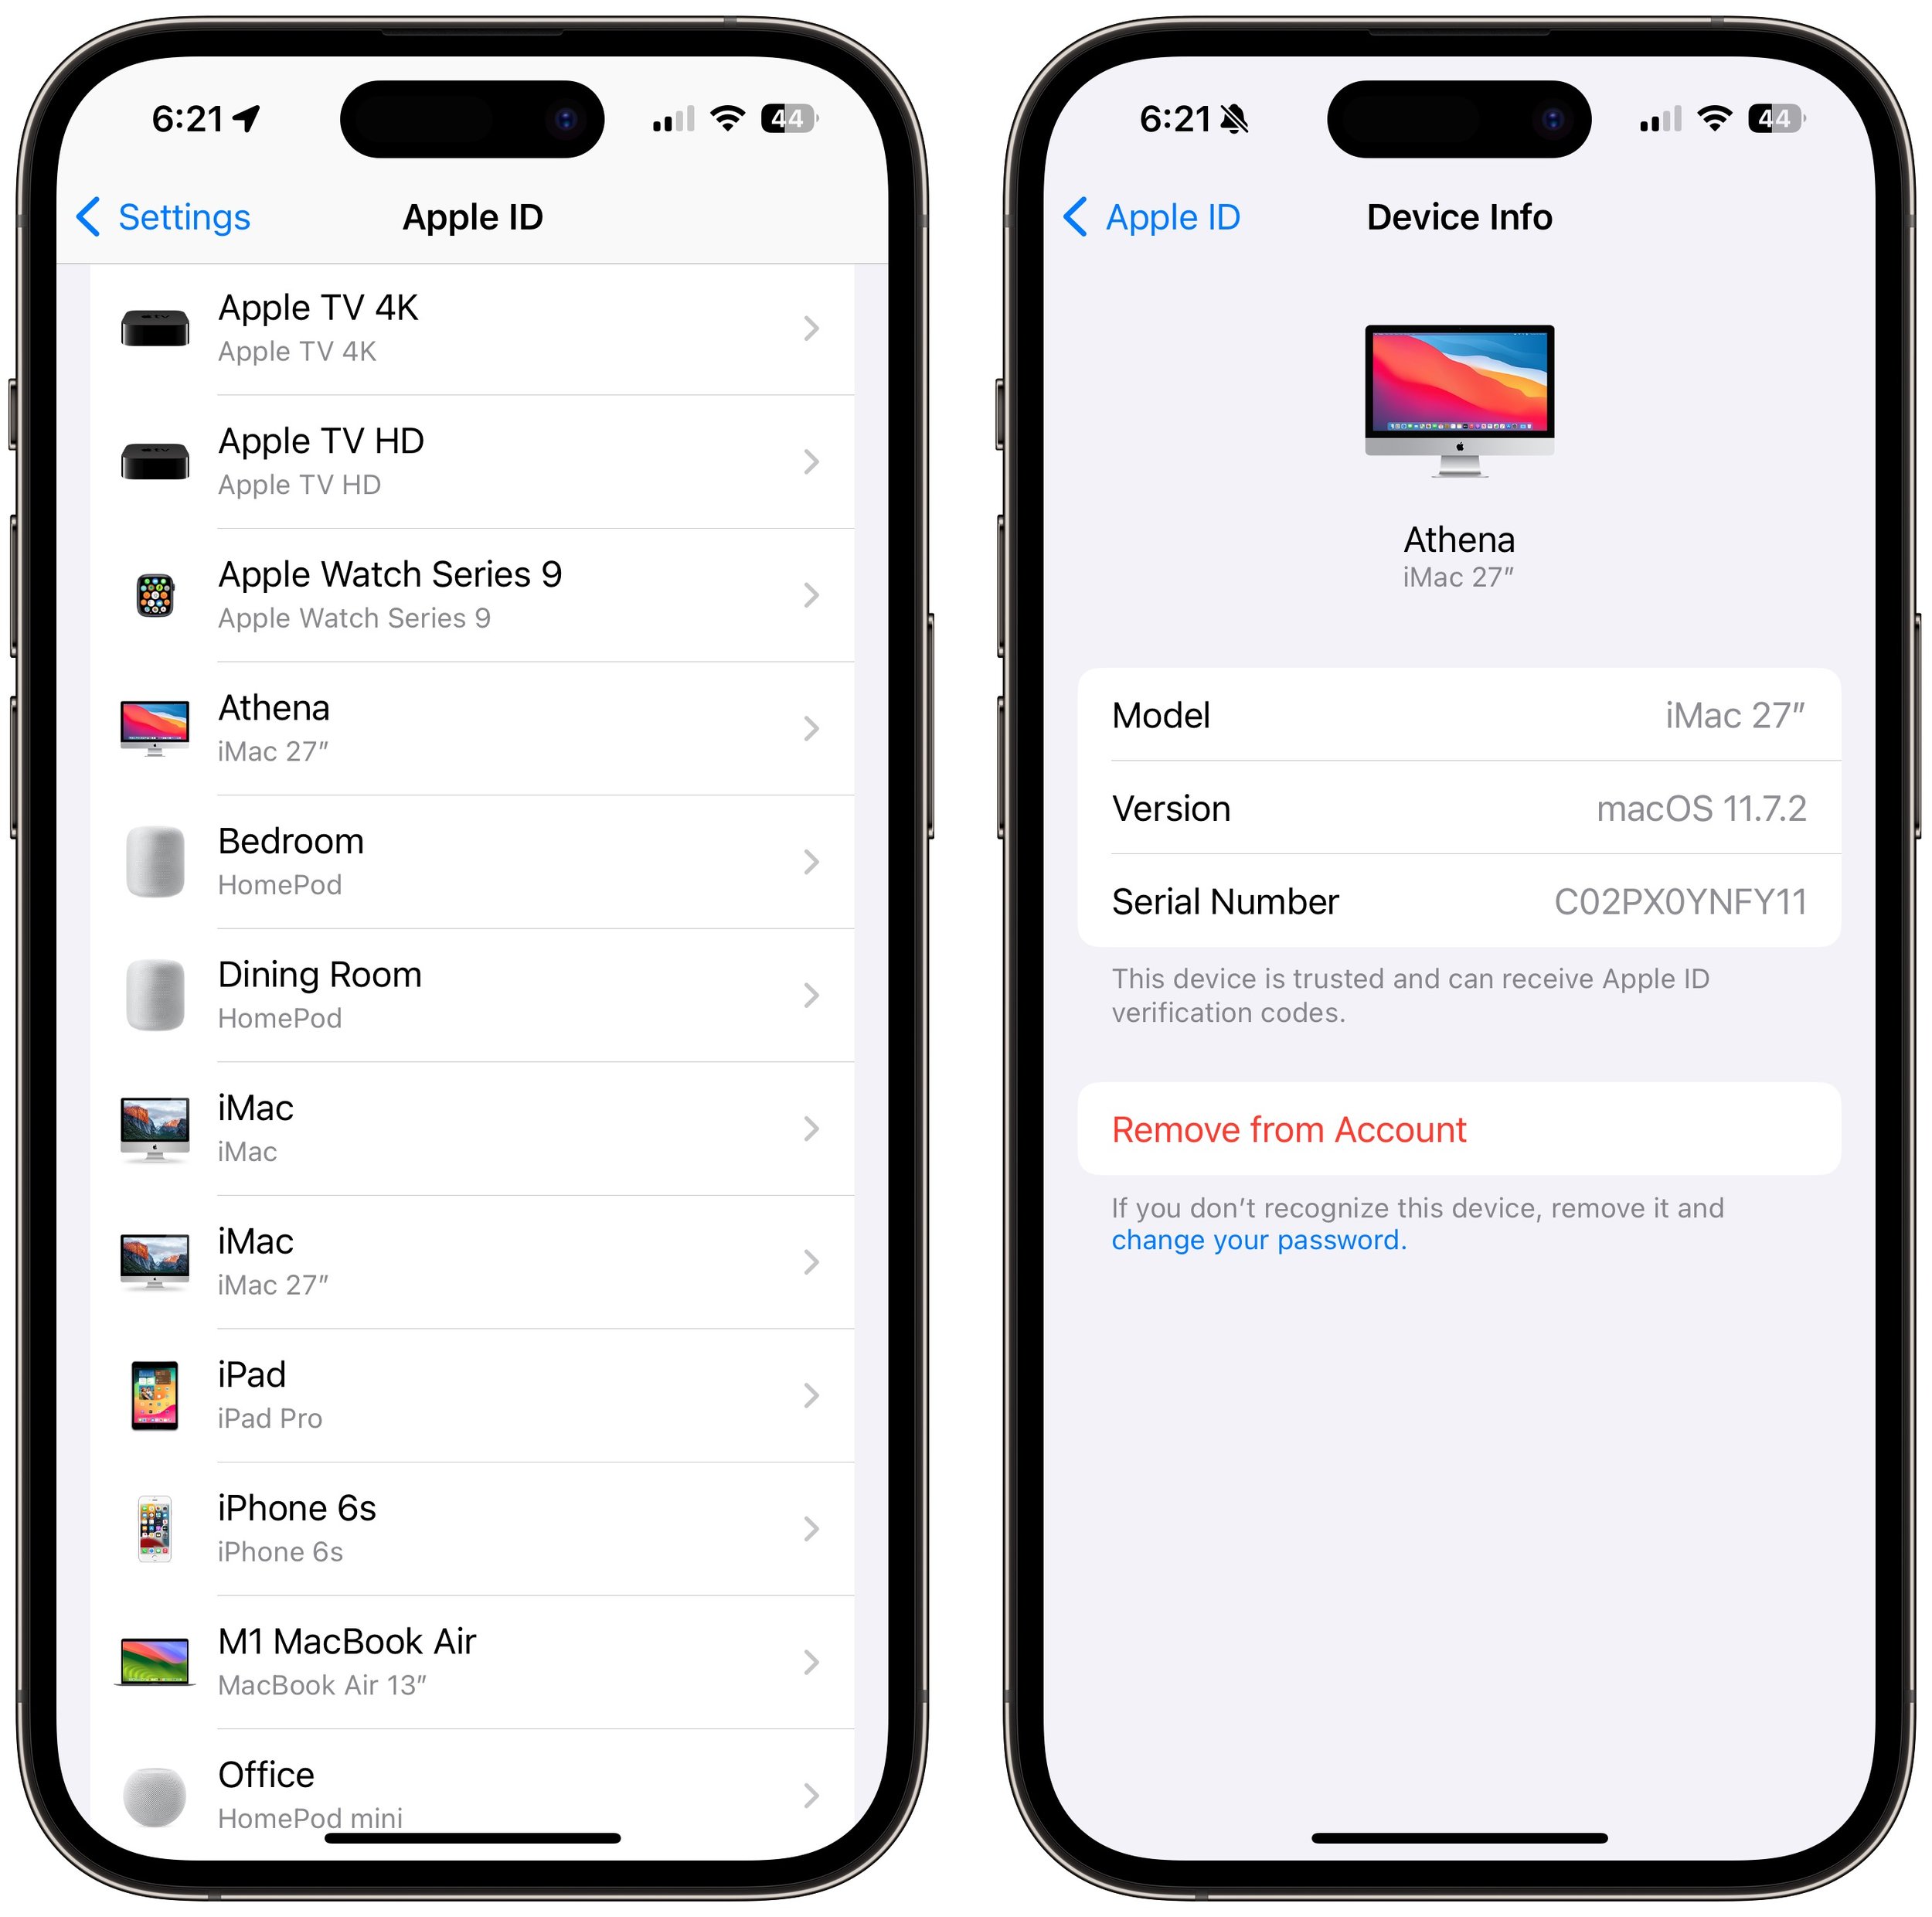
Apple gives you access to the list of all your current Apple devices in System Settings > Your Name on the Mac and in Settings > Your Name on the iPhone and iPad. (You can also log in to appleid.apple.com, click Sign-in and Security in the sidebar, and click Account Security.) Some of the devices shown may not be trusted devices—there isn’t much to worry about with a HomePod, and some old Macs may not be logged in. Click or tap any device to learn more about it—the 27-inch iMac in the screenshot below is trusted and can receive Apple ID verification codes.
Unfortunately, Apple doesn’t display the date the device was last used, which can help identify ancient devices. So look for any devices that you don’t immediately recognize as being in use—particularly Macs, iPhones, and iPads—and remove them from your account. Don’t worry about inadvertently removing a device you do use—at worst, you’ll have to log in to your Apple ID again the next time you use it.
Remove Trusted Google Devices
You can quickly load Google’s list of trusted devices by logging in to your Google account at myaccount.google.com/device-activity. To navigate there manually, go to your Google Account at myaccount.google.com, click Security in the sidebar, scroll down to find the Your Devices tile, and click Manage All Devices. Google says it keeps track of sessions (whenever you sign in) on trusted devices for only 28 days, but the sessions shown on “unknown device(s)” below are far older than that. Google helps by displaying the location and date of most sessions.
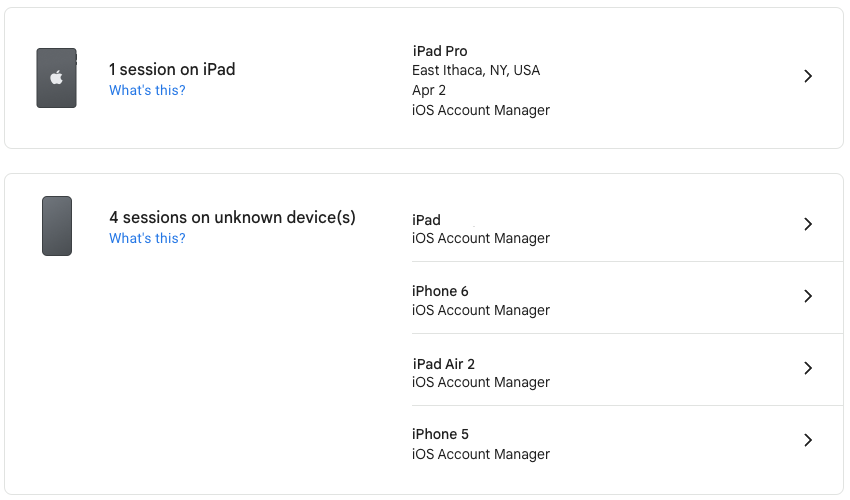
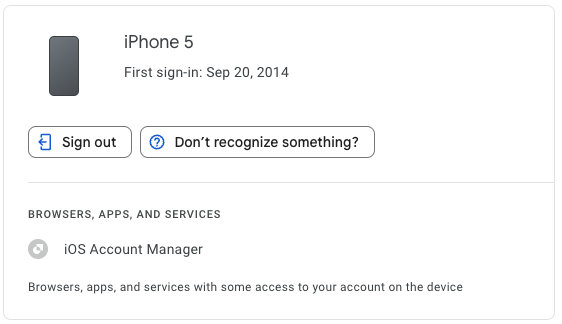
Click a session to learn more about it, including the date you first signed in on that device. For devices you no longer use, click Sign Out to remove access to your Google Account.
Remove Trusted 1Password Devices
To remove old trusted devices from 1Password, start by logging in to 1Password.com, clicking your name at the top right, and choosing My Profile—you can also navigate directly to my.1password.com/profile. As you can see, 1Password provides information about each trusted device and browser, showing its IP address, location, operating system version, and last access time.
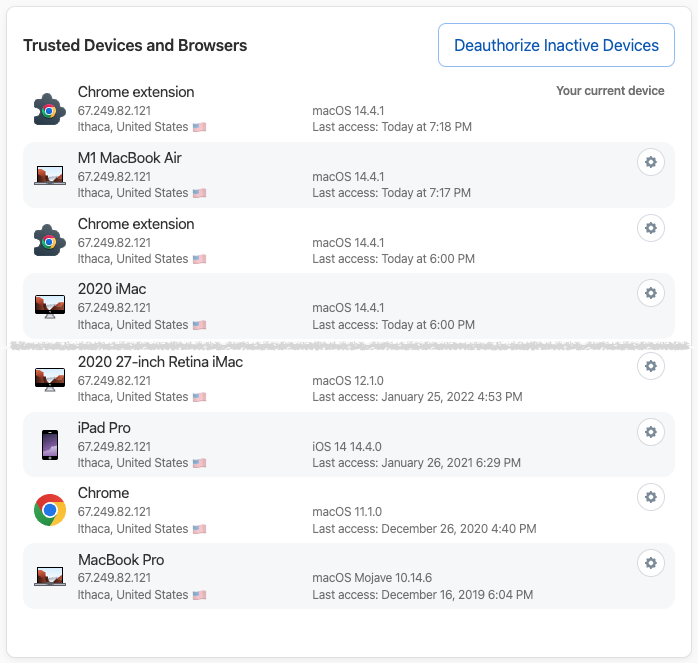
It’s easiest to click Deauthorize Inactive Devices, at which point 1Password will ask if you want to deauthorize all devices that haven’t been used in the last 60 days. If you prefer a more targeted approach, click the gear next to a device or browser you want to remove and click Deauthorize Device in the dialog that appears.
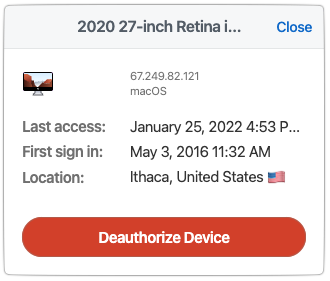
Again, the only harm that could come from deauthorizing a device you still use is that you will have to log in to 1Password again.
After you’ve audited your Apple, Google, and password-manager trusted devices—and any other accounts you may have that maintain such lists—there’s no need to check again right away. Once a month or once a quarter would be sufficient for most people.
That said, if you ever notice any unusual account activity, look at your trusted device lists to ensure you recognize everything. If there’s a device you don’t recognize or one that was used at an unfamiliar place or at a time when you were otherwise occupied, immediately remove it and change that service’s password.
(Featured image by iStock.com/Ildo Frazao)
Apple’s iCloud Keychain Password Management Is All Many People Need
Apple’s iCloud Keychain password manager keeps improving, and we now recommend it, especially for those not already using a third-party password manager. Here’s how to use iCloud Keychain to store and enter secure passwords.

We constantly recommend using a password manager like 1Password, BitWarden, or Dashlane. But many people resist committing to yet another app or paying for yet another service. Isn’t Apple’s built-in iCloud Keychain password management good enough?
The answer now is yes, thanks to two recent changes:
In iOS 17.3, Apple added Stolen Device Protection, which leverages biometric authentication—Face ID or Touch ID—to protect users against thieves who would surreptitiously learn someone’s passcode, steal their iPhone, and then take over their digital lives. One of the worst aspects of that attack was that the iPhone passcode was sufficient to access the user’s stored passwords, so the thief could get into everything.
Until mid-2023, Apple’s built-in password management worked only in Safari, which was problematic for users who rely on other browsers. Then Apple updated its iCloud Passwords extension for Google Chrome to work not just in Windows, but also in Mac browsers based on Google Chrome running in macOS 14 Sonoma. There’s also now an iCloud Passwords add-on for Firefox.
If you aren’t yet using a password manager, try iCloud Keychain.
Passwords Basics
Apple integrated iCloud Keychain into macOS, iOS, and iPadOS at a low level, so you mostly interact with your passwords in Safari. But first, make sure to enable iCloud Keychain so your passwords sync between your devices. On the Mac, you do that in System Settings > Your Name > iCloud > Passwords & Keychain. On an iPhone or iPad, it’s in Settings > Your Name > iCloud > Passwords and Keychain.
If you’re using a browser other than Safari, install the iCloud Passwords extension or add-on and activate it by clicking it in the toolbar and entering the verification code when prompted.
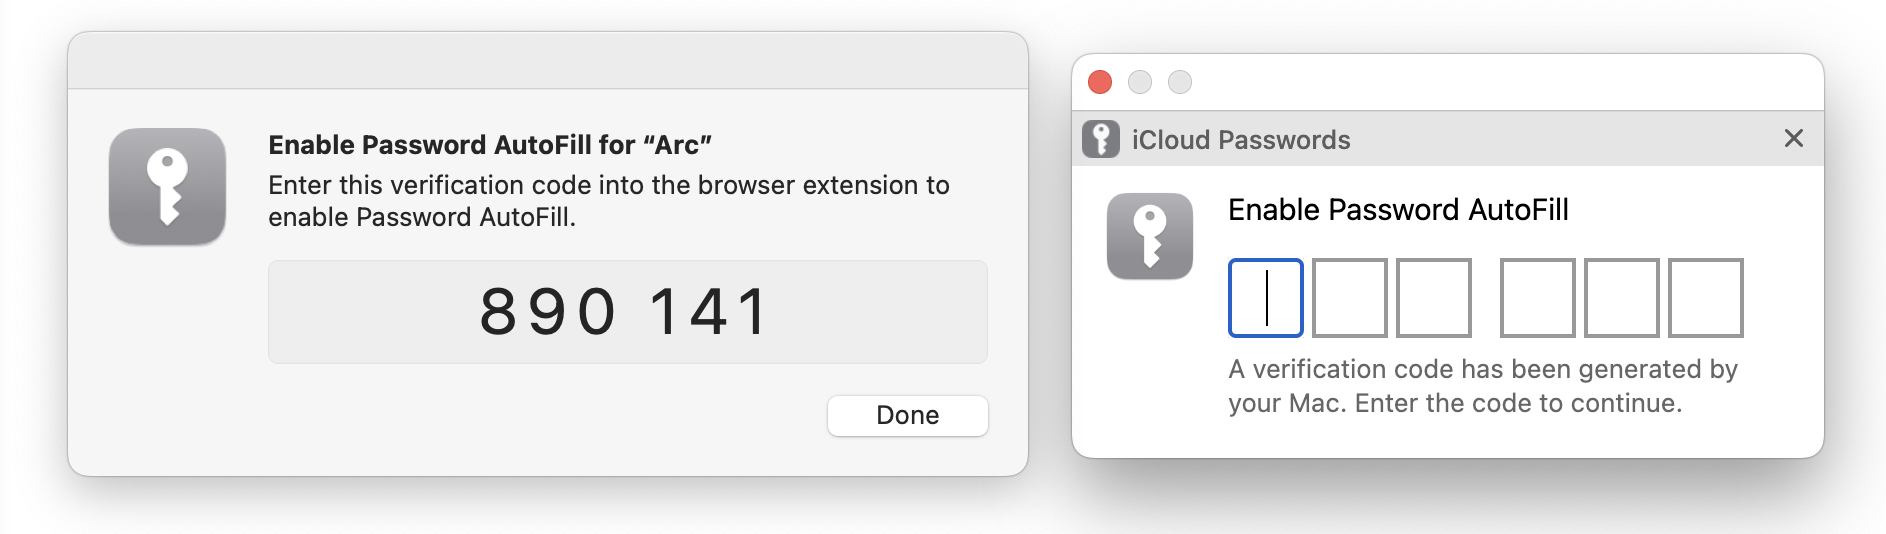
When it comes to website accounts, there are two main actions: creating a login and logging in to a site:
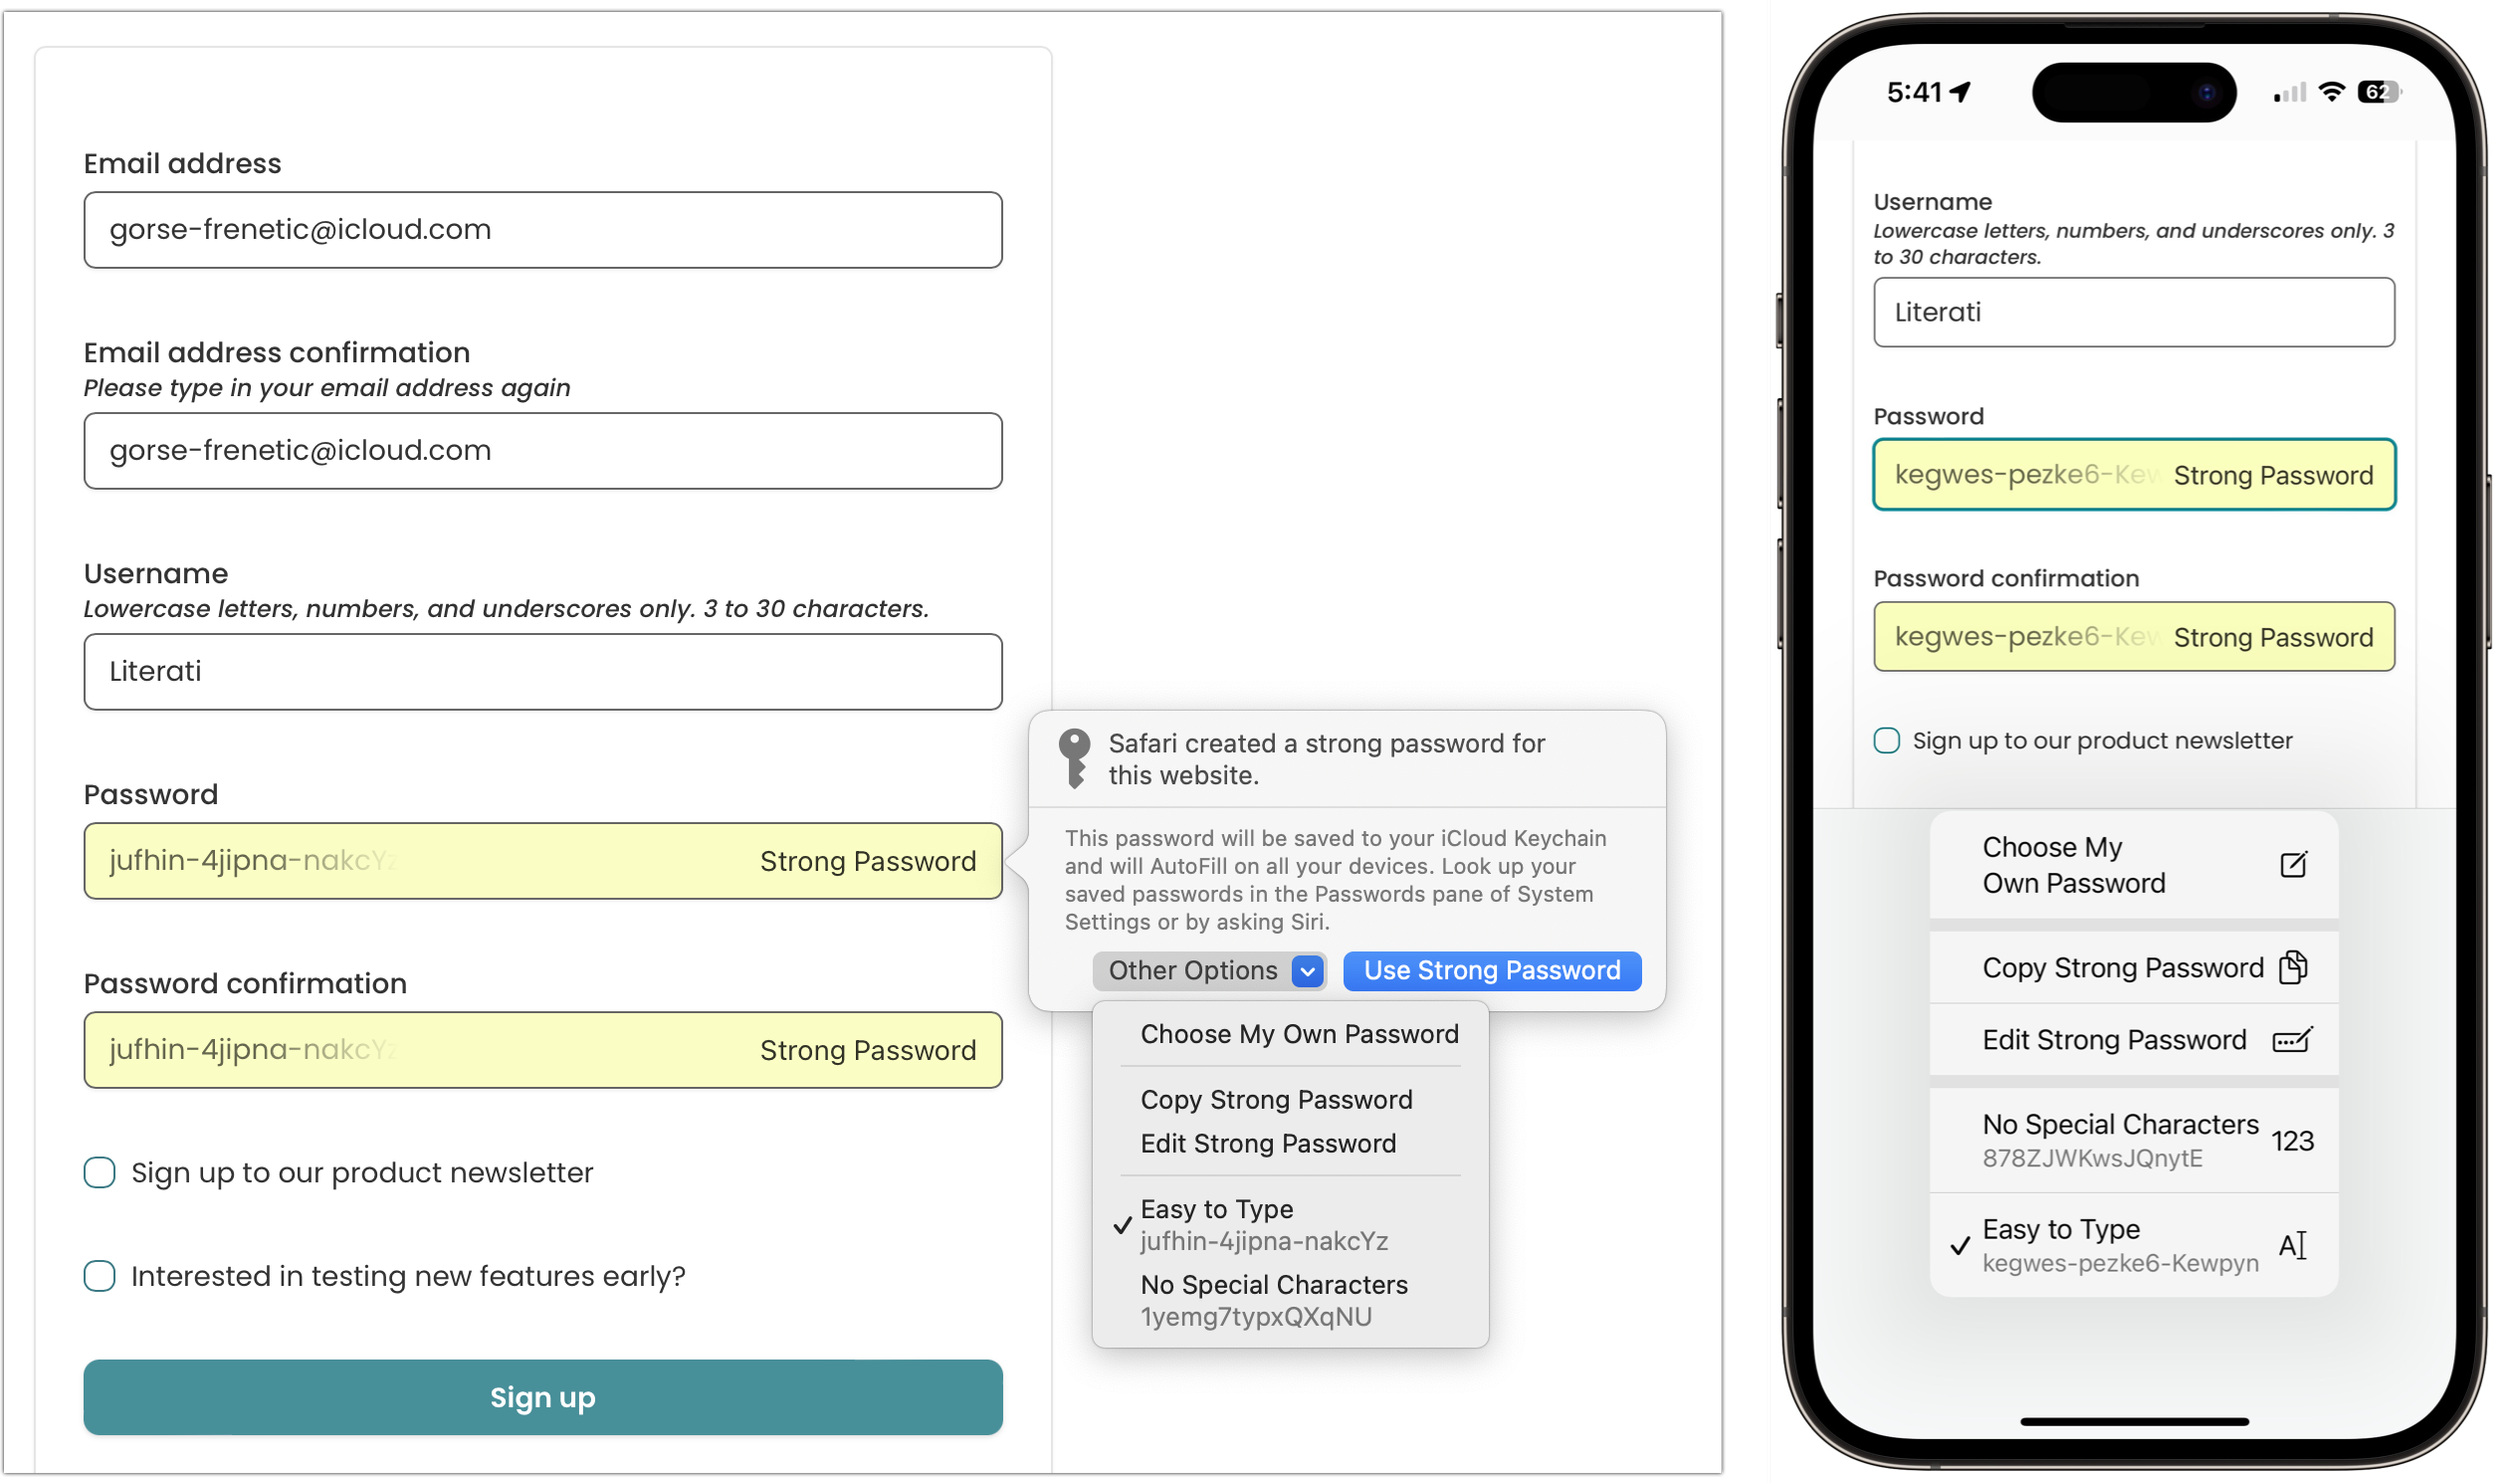
Create a new login: When you need to create an account on a new website, after you enter whatever it wants for email or username, Safari creates a strong password for you. Unfortunately, the iCloud Passwords extension or add-on on the Mac can’t generate passwords—you can either create a strong password manually or switch to Safari temporarily to let it create one. When you submit your credentials, you’ll be prompted to save them.
Autofill an existing login: The next time you want to log in to a site for which you’ve saved credentials, Safari or your other browser on the Mac displays a pop-up with logins matching the domain of the site you’re on. On the iPhone or iPad, you might get an alert at the bottom of the screen or have to pick a choice in the QuickType bar above the keyboard.
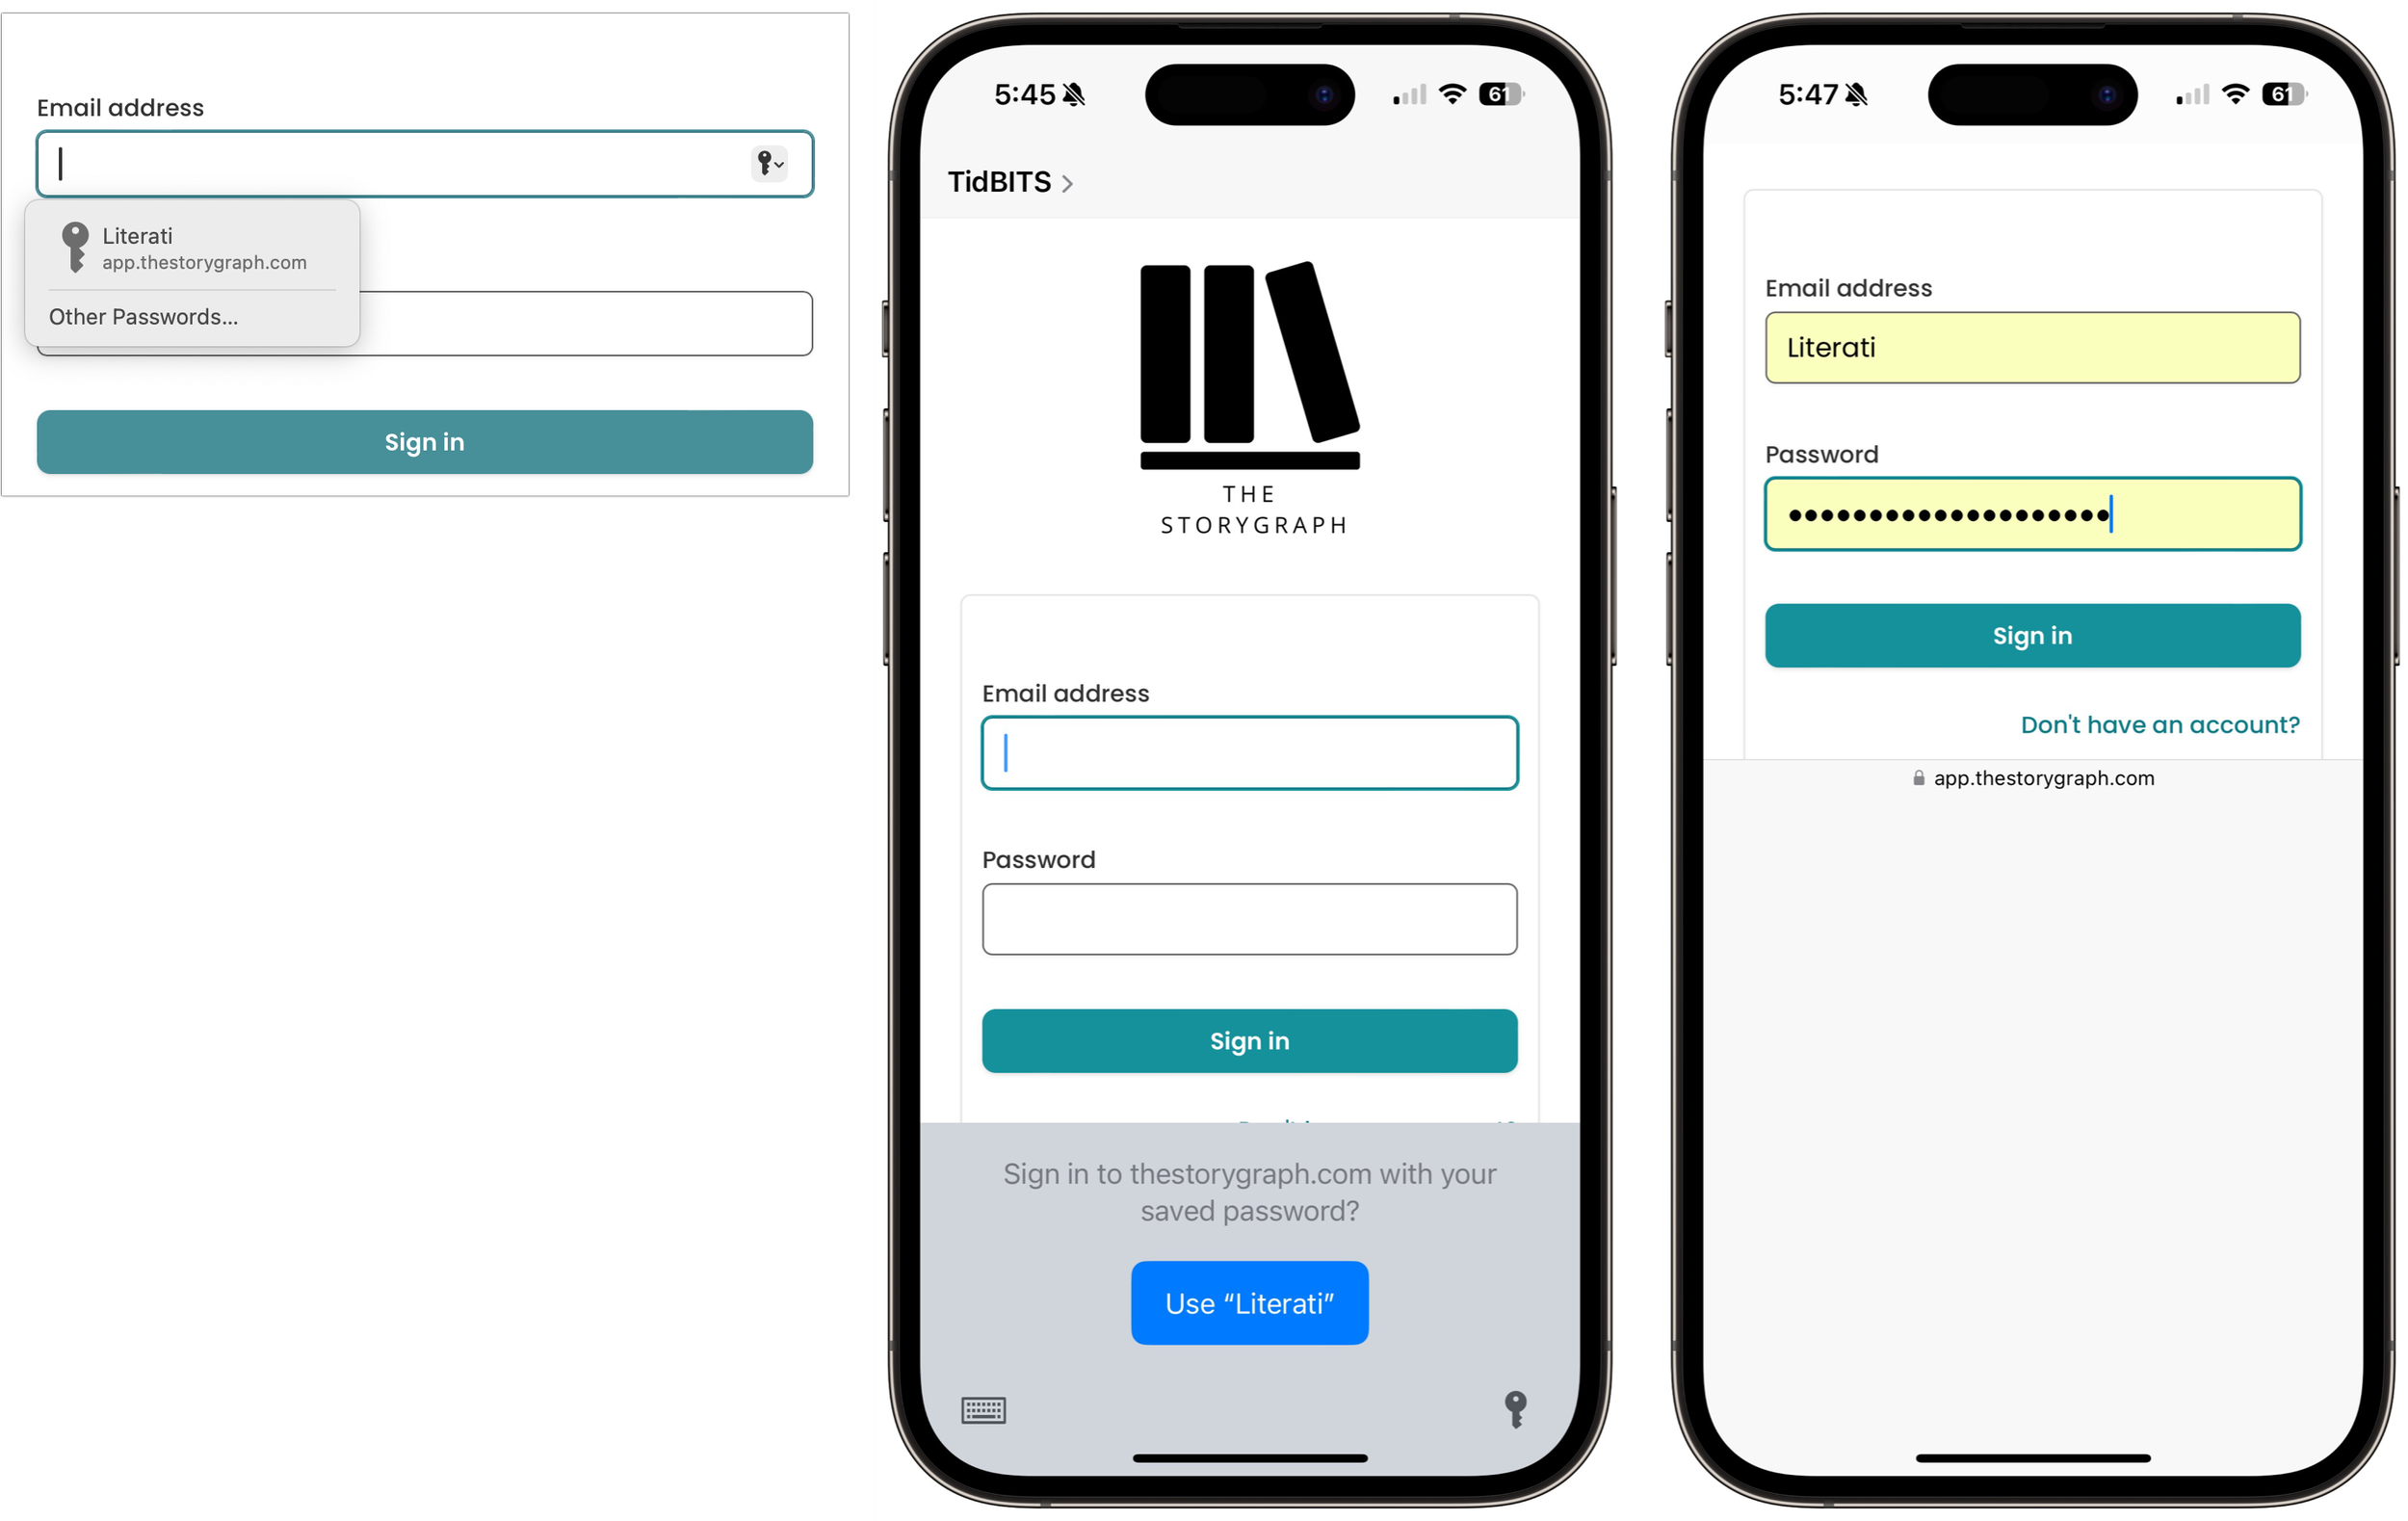
For basic usage, that’s it! However, iCloud Keychain can make mistakes. The site shown above asks for both an email address and a username and wants the email address for logging in, but iCloud Keychain remembered the username instead. Happily, Apple makes it easy to fix such unusual missteps. On the Mac, open System Settings > Passwords, or on the iPhone or iPad, open Settings > Passwords. Here’s where you find and edit your saved logins.
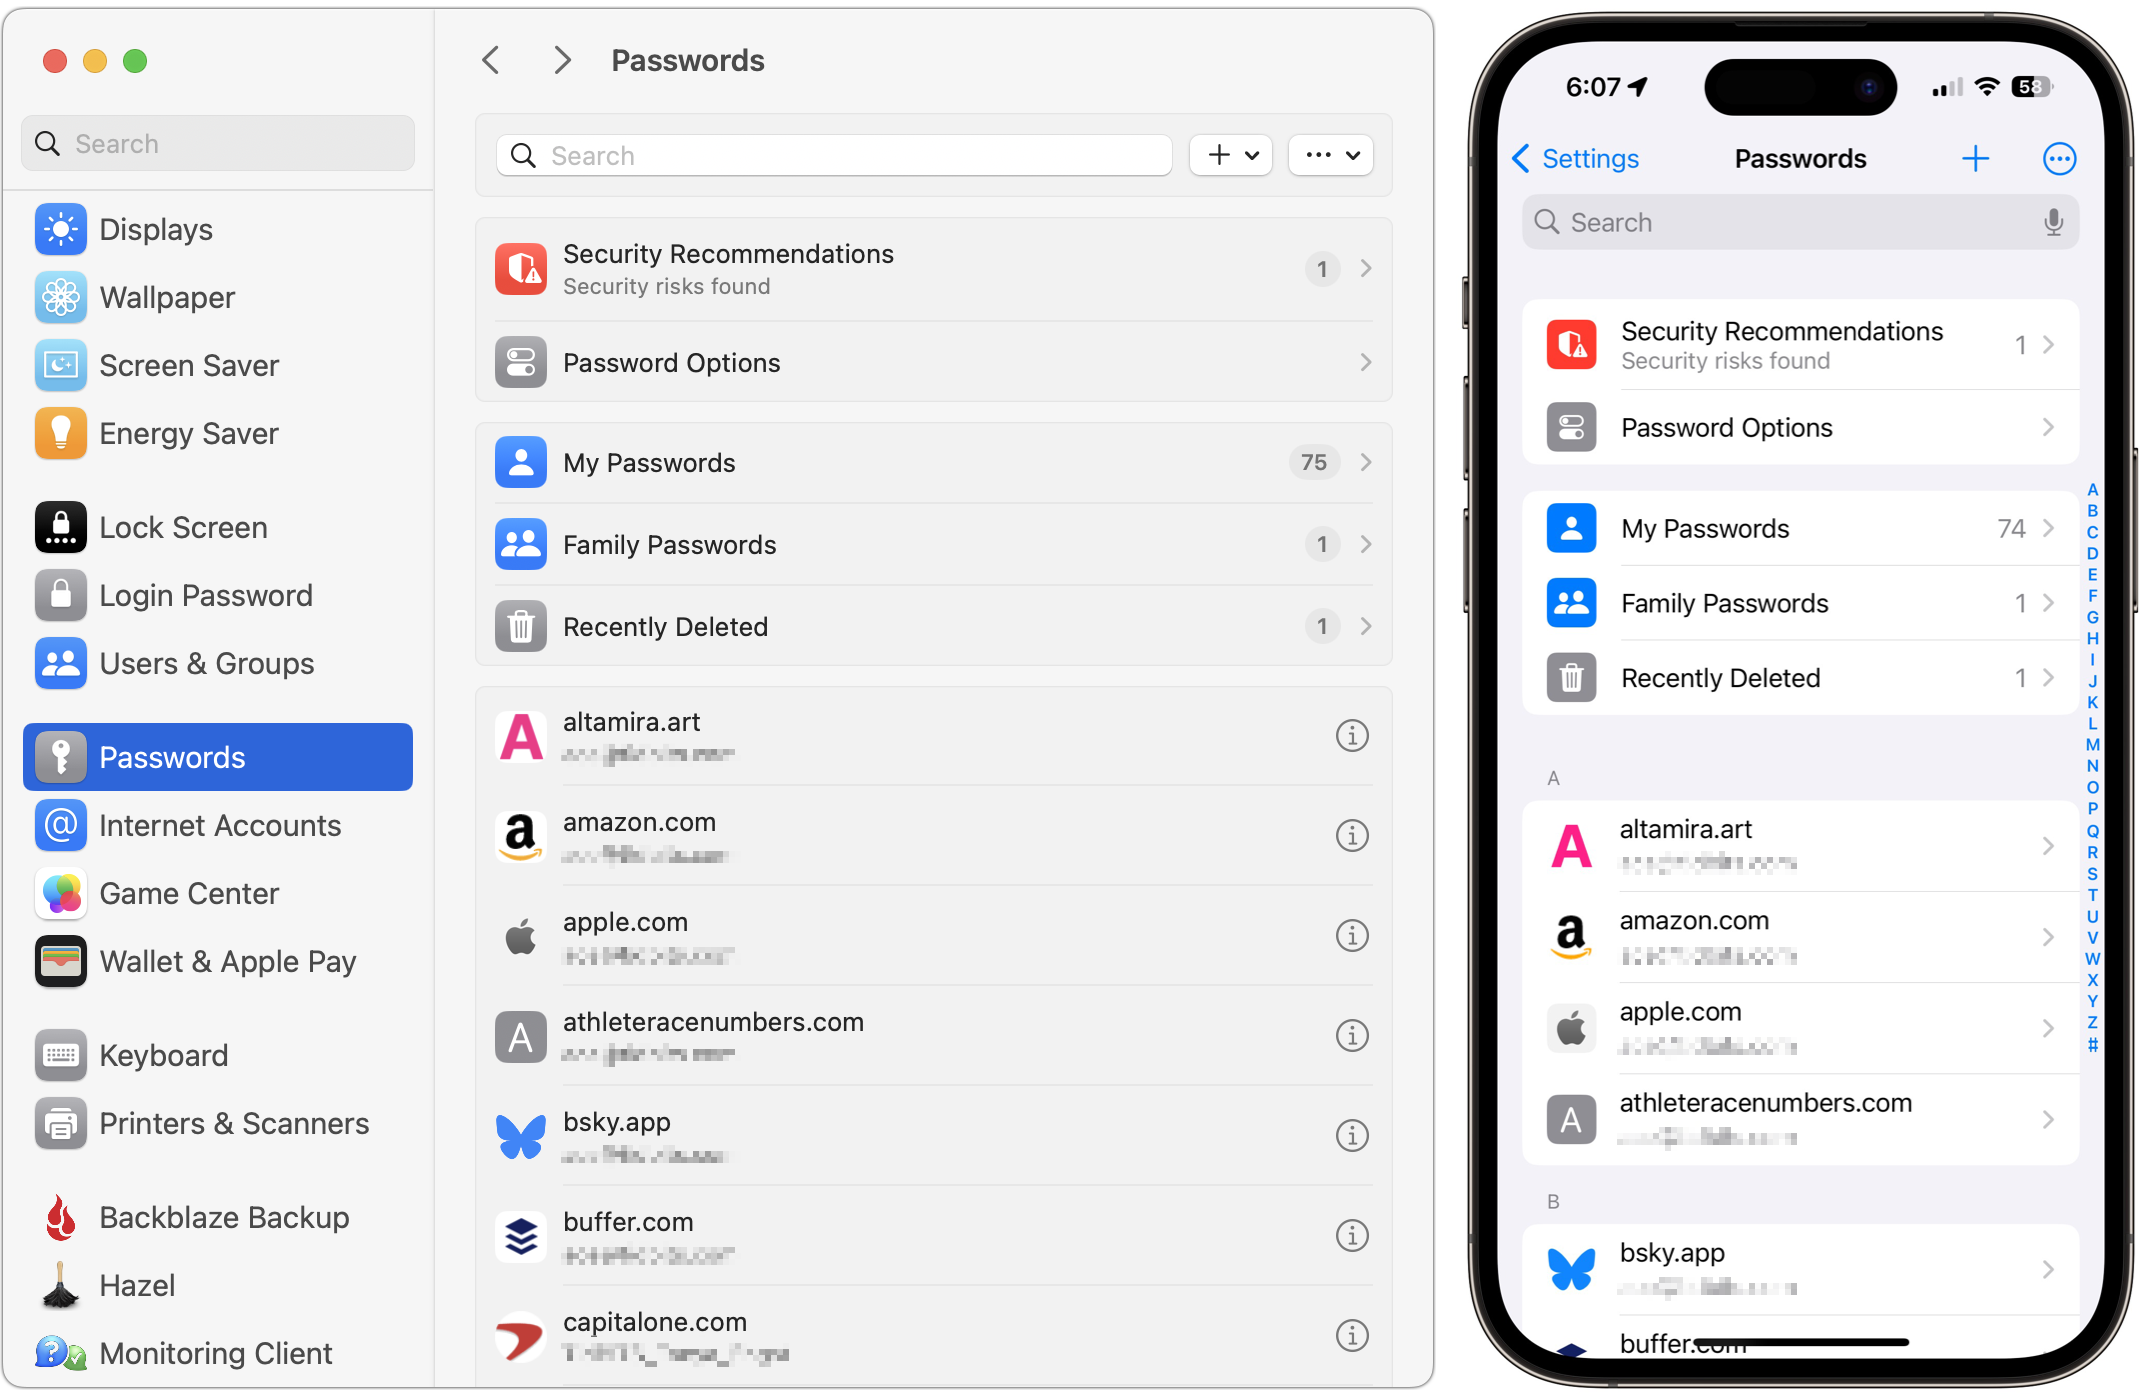
Open the desired login by double-clicking it on the Mac or tapping it on the iPhone or iPad, then click or tap Edit and make any desired changes.
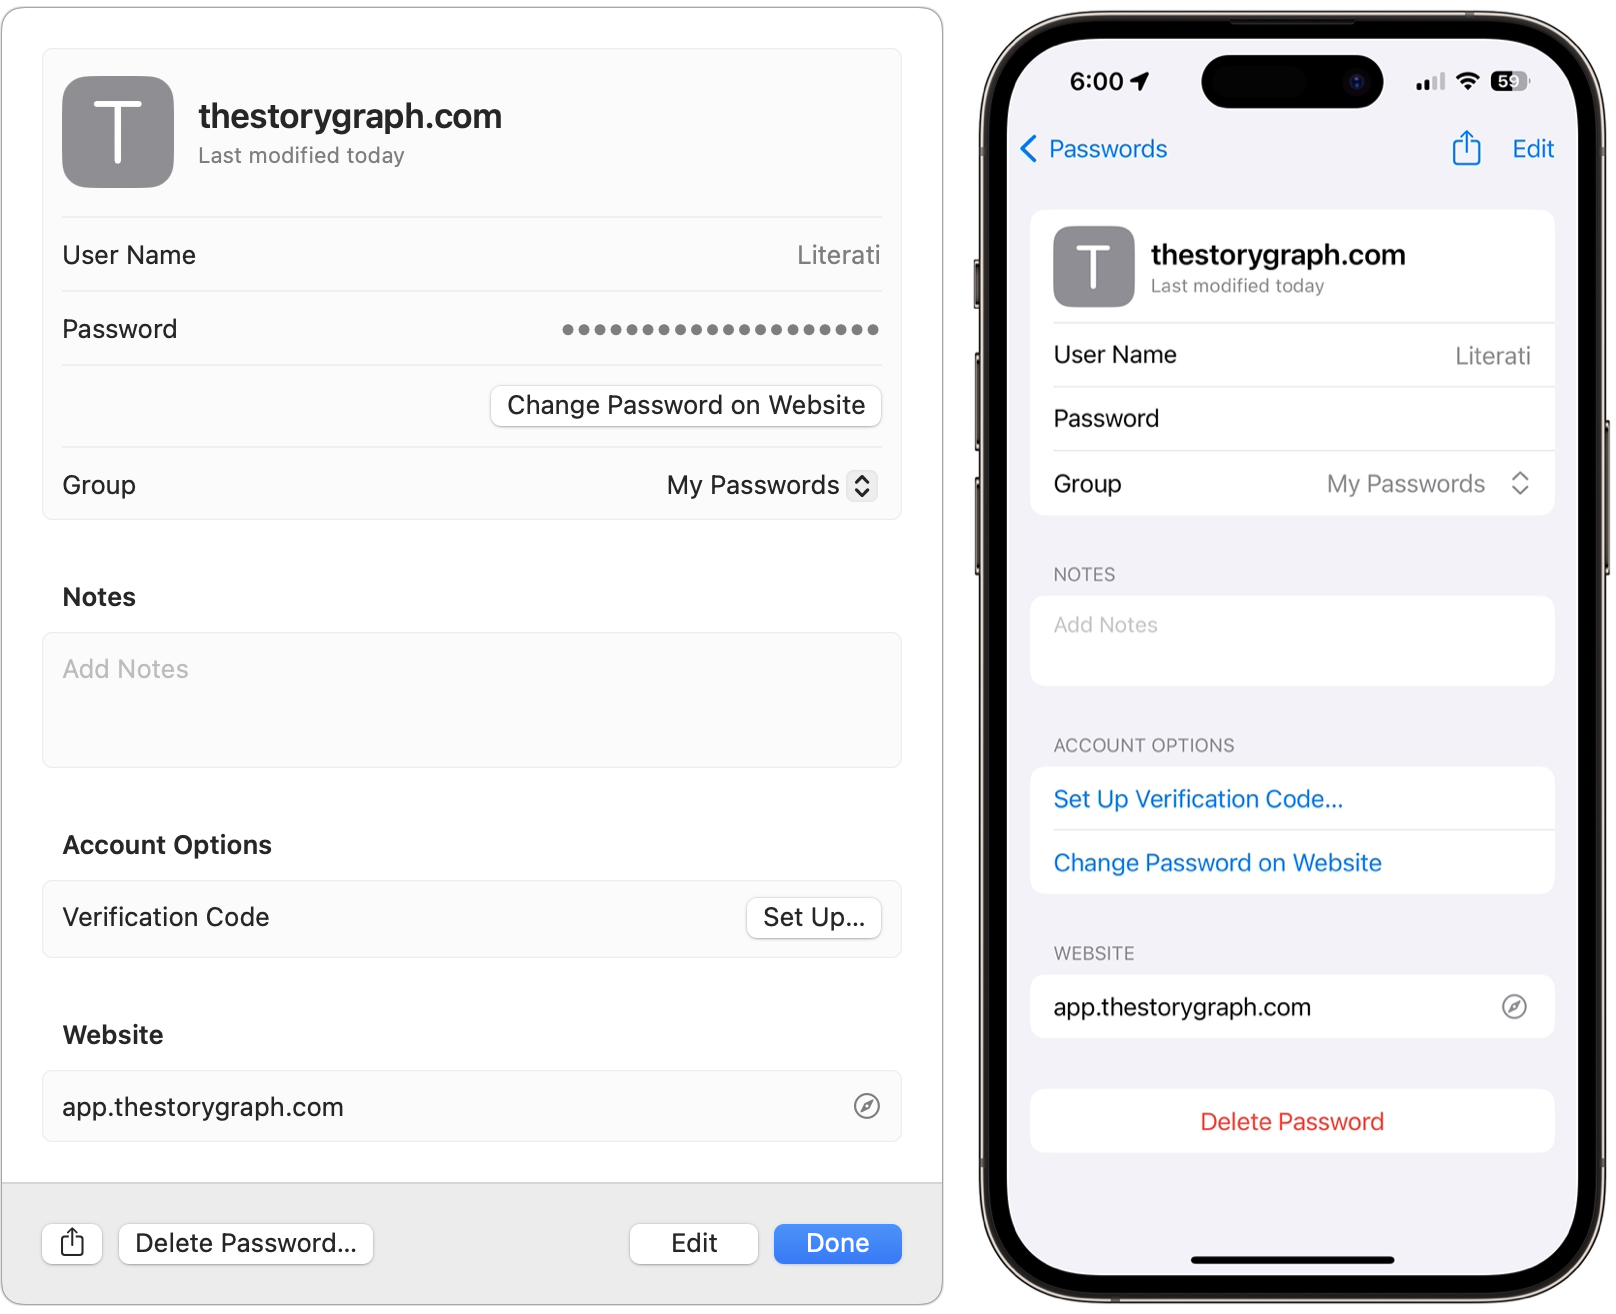
iCloud Keychain provides additional features and options:
A search field at the top of the Passwords window or screen helps you find logins if scanning the full list is frustrating.
You can use commands in the + menu to create new passwords and shared groups. On the Mac, commands in the ••• menu let you import and export passwords; the iPhone and iPad use that menu to bulk-select passwords for deletion and show generated passwords.
Shared groups let you share a subset of passwords with family or colleagues. Choosing New Shared Group triggers an assistant that walks you through naming the group, adding people from Contacts, and choosing which passwords to share. You can move passwords between groups at any time.
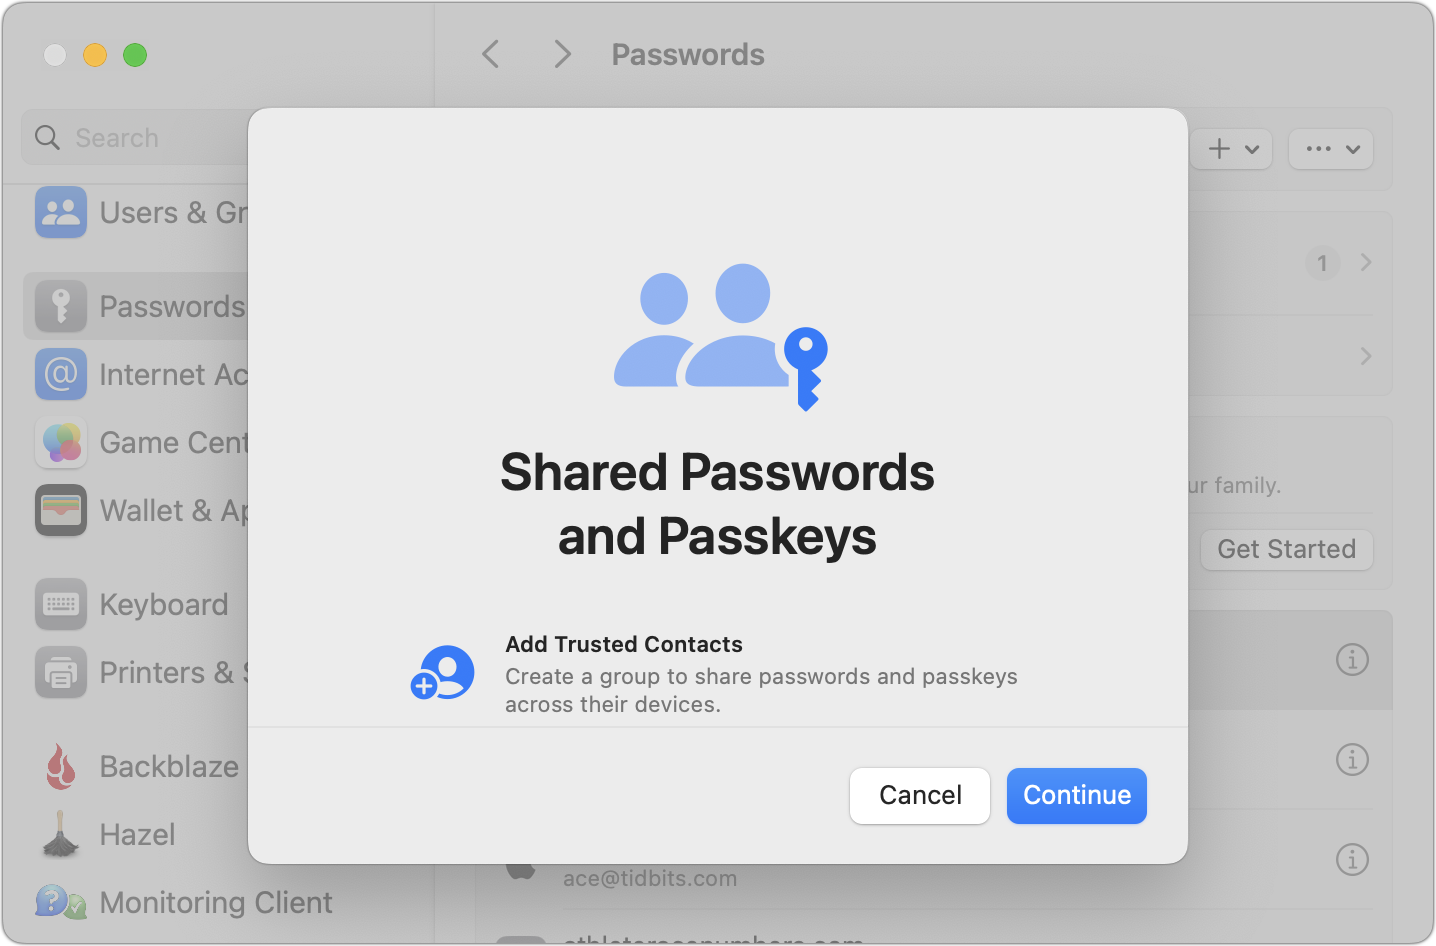
The Security Recommendations screen displays logins exposed in known breaches and points out logins with weak passwords. Check those and update them as necessary.
In Password Options, you can turn off autofill, but why would you? Another option automatically deletes verification codes you receive in Messages after it inserts them with autofill.
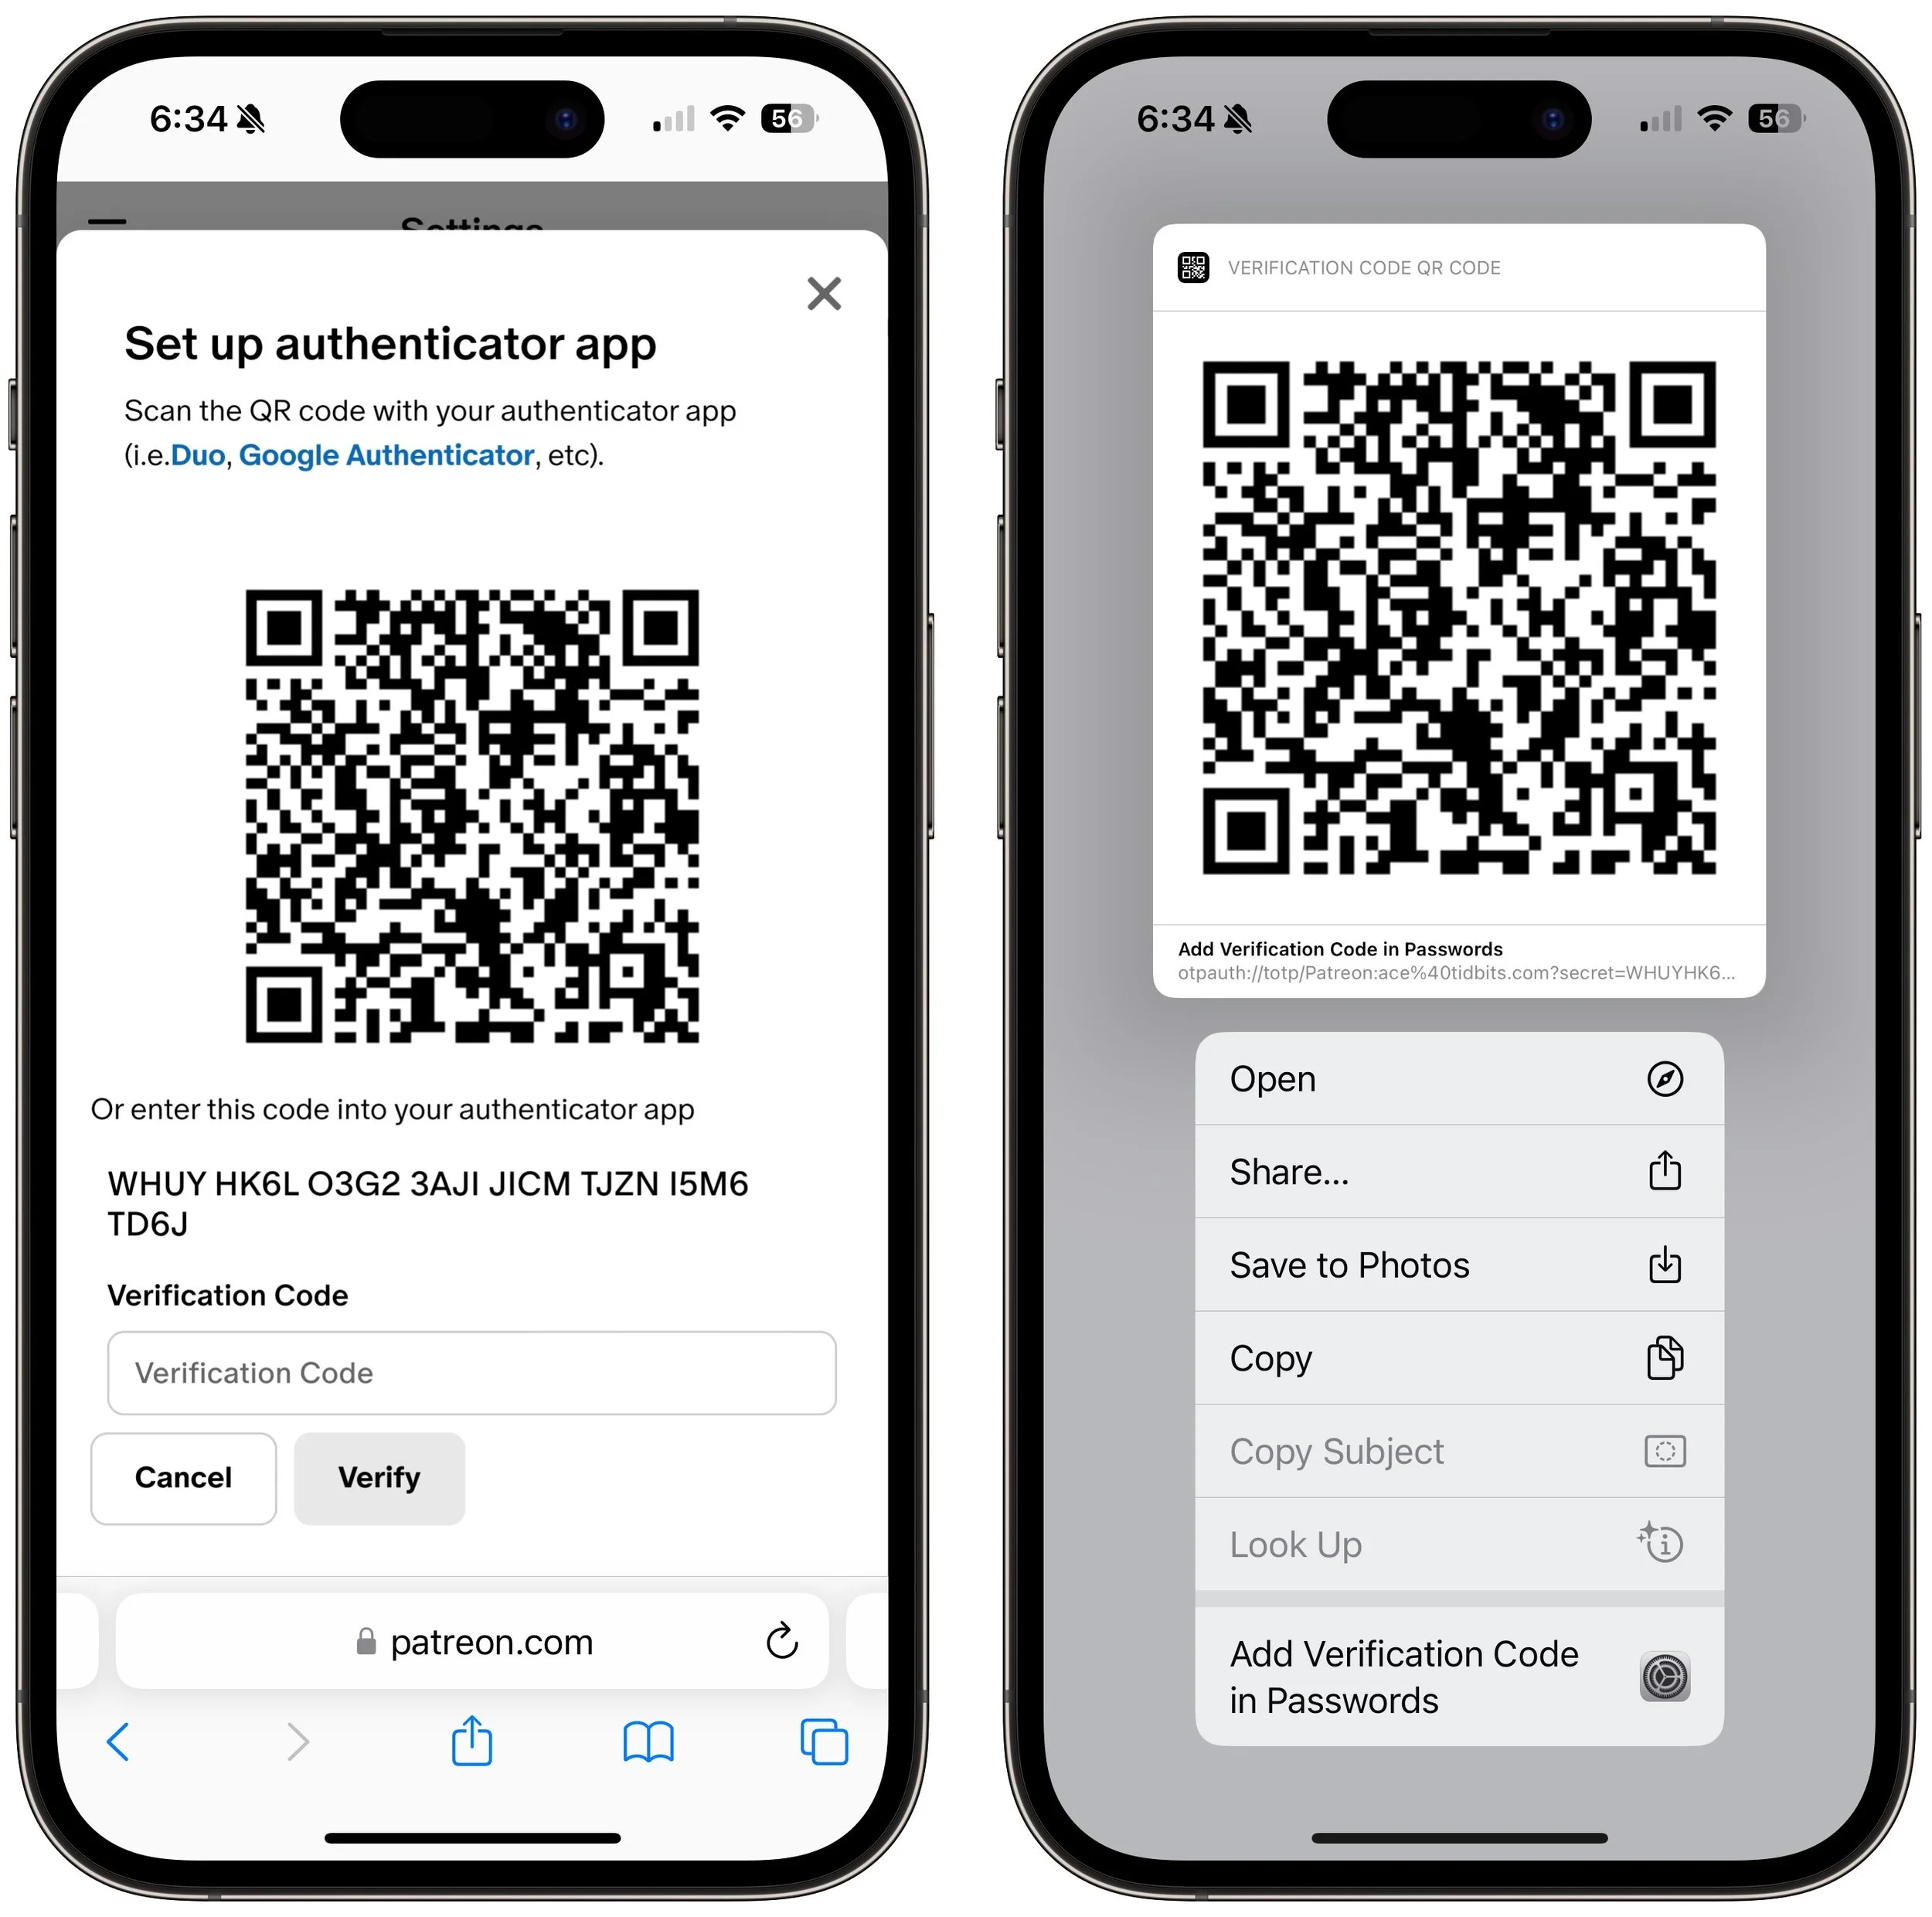
On websites that support two-factor authentication, you can set up a login to autofill the verification code. During setup on the site, you’ll get a QR code you can scan with an iPhone or iPad if you’re using a Mac; if you’re using an iPhone or iPad, touch and hold the QR code and choose Add Verification Code in Passwords. Once you finish configuring the login, you’ll have to enter the six-digit verification code on the site to link it with the login.
Overall, iCloud Keychain provides the password management features that most people need, and it’s a massive security improvement over keeping a document of your passwords on your desktop.
(Featured image by iStock.com/loooby)
How to Sync Your Text Messages across All Your Apple Devices
One of the best parts of Apple’s tight platform integration is that you can view your text messages on all your devices. Or at least you can if you get everything set correctly.

Although many of us think of Messages as an iPhone app, Apple’s platform integration lets you read and reply to conversations in Messages on other Apple devices, including the Mac and iPad. All your devices must have the correct settings to make this work reliably. We regularly hear from users who don’t see all their messages on all their devices. If that’s you, check these settings:
Same Apple ID: Your devices all know they’re yours when they’re logged in to the same Apple ID. That’s not a problem for most people, but couples who share an Apple ID, for instance, can run into trouble here. To verify this, open Settings > Your Name in iOS and iPadOS, or System Settings > Your Name in macOS. The email address under your picture at the top of each of those screens should match. If it doesn’t, scroll to the bottom, tap or click Sign Out, and sign in again with the correct Apple ID.
Two-factor authentication: As with so many Apple services now, your Apple ID must be set up for two-factor authentication, which causes certain logins to be queried a second time on another device. Most people have two-factor authentication set up by now, but if not, turn it on using Apple’s instructions.
iCloud Keychain: Your devices must have iCloud Keychain turned on to share your Messages account information. It’s probably already on, but you can enable it if not. Turn it on for an iPhone or iPad in Settings > Your Name > iCloud > Passwords and Keychain > Sync this iPhone. On a Mac, the switch is in System Settings > Your Name > iCloud > Passwords & Keychain > Sync this Mac.
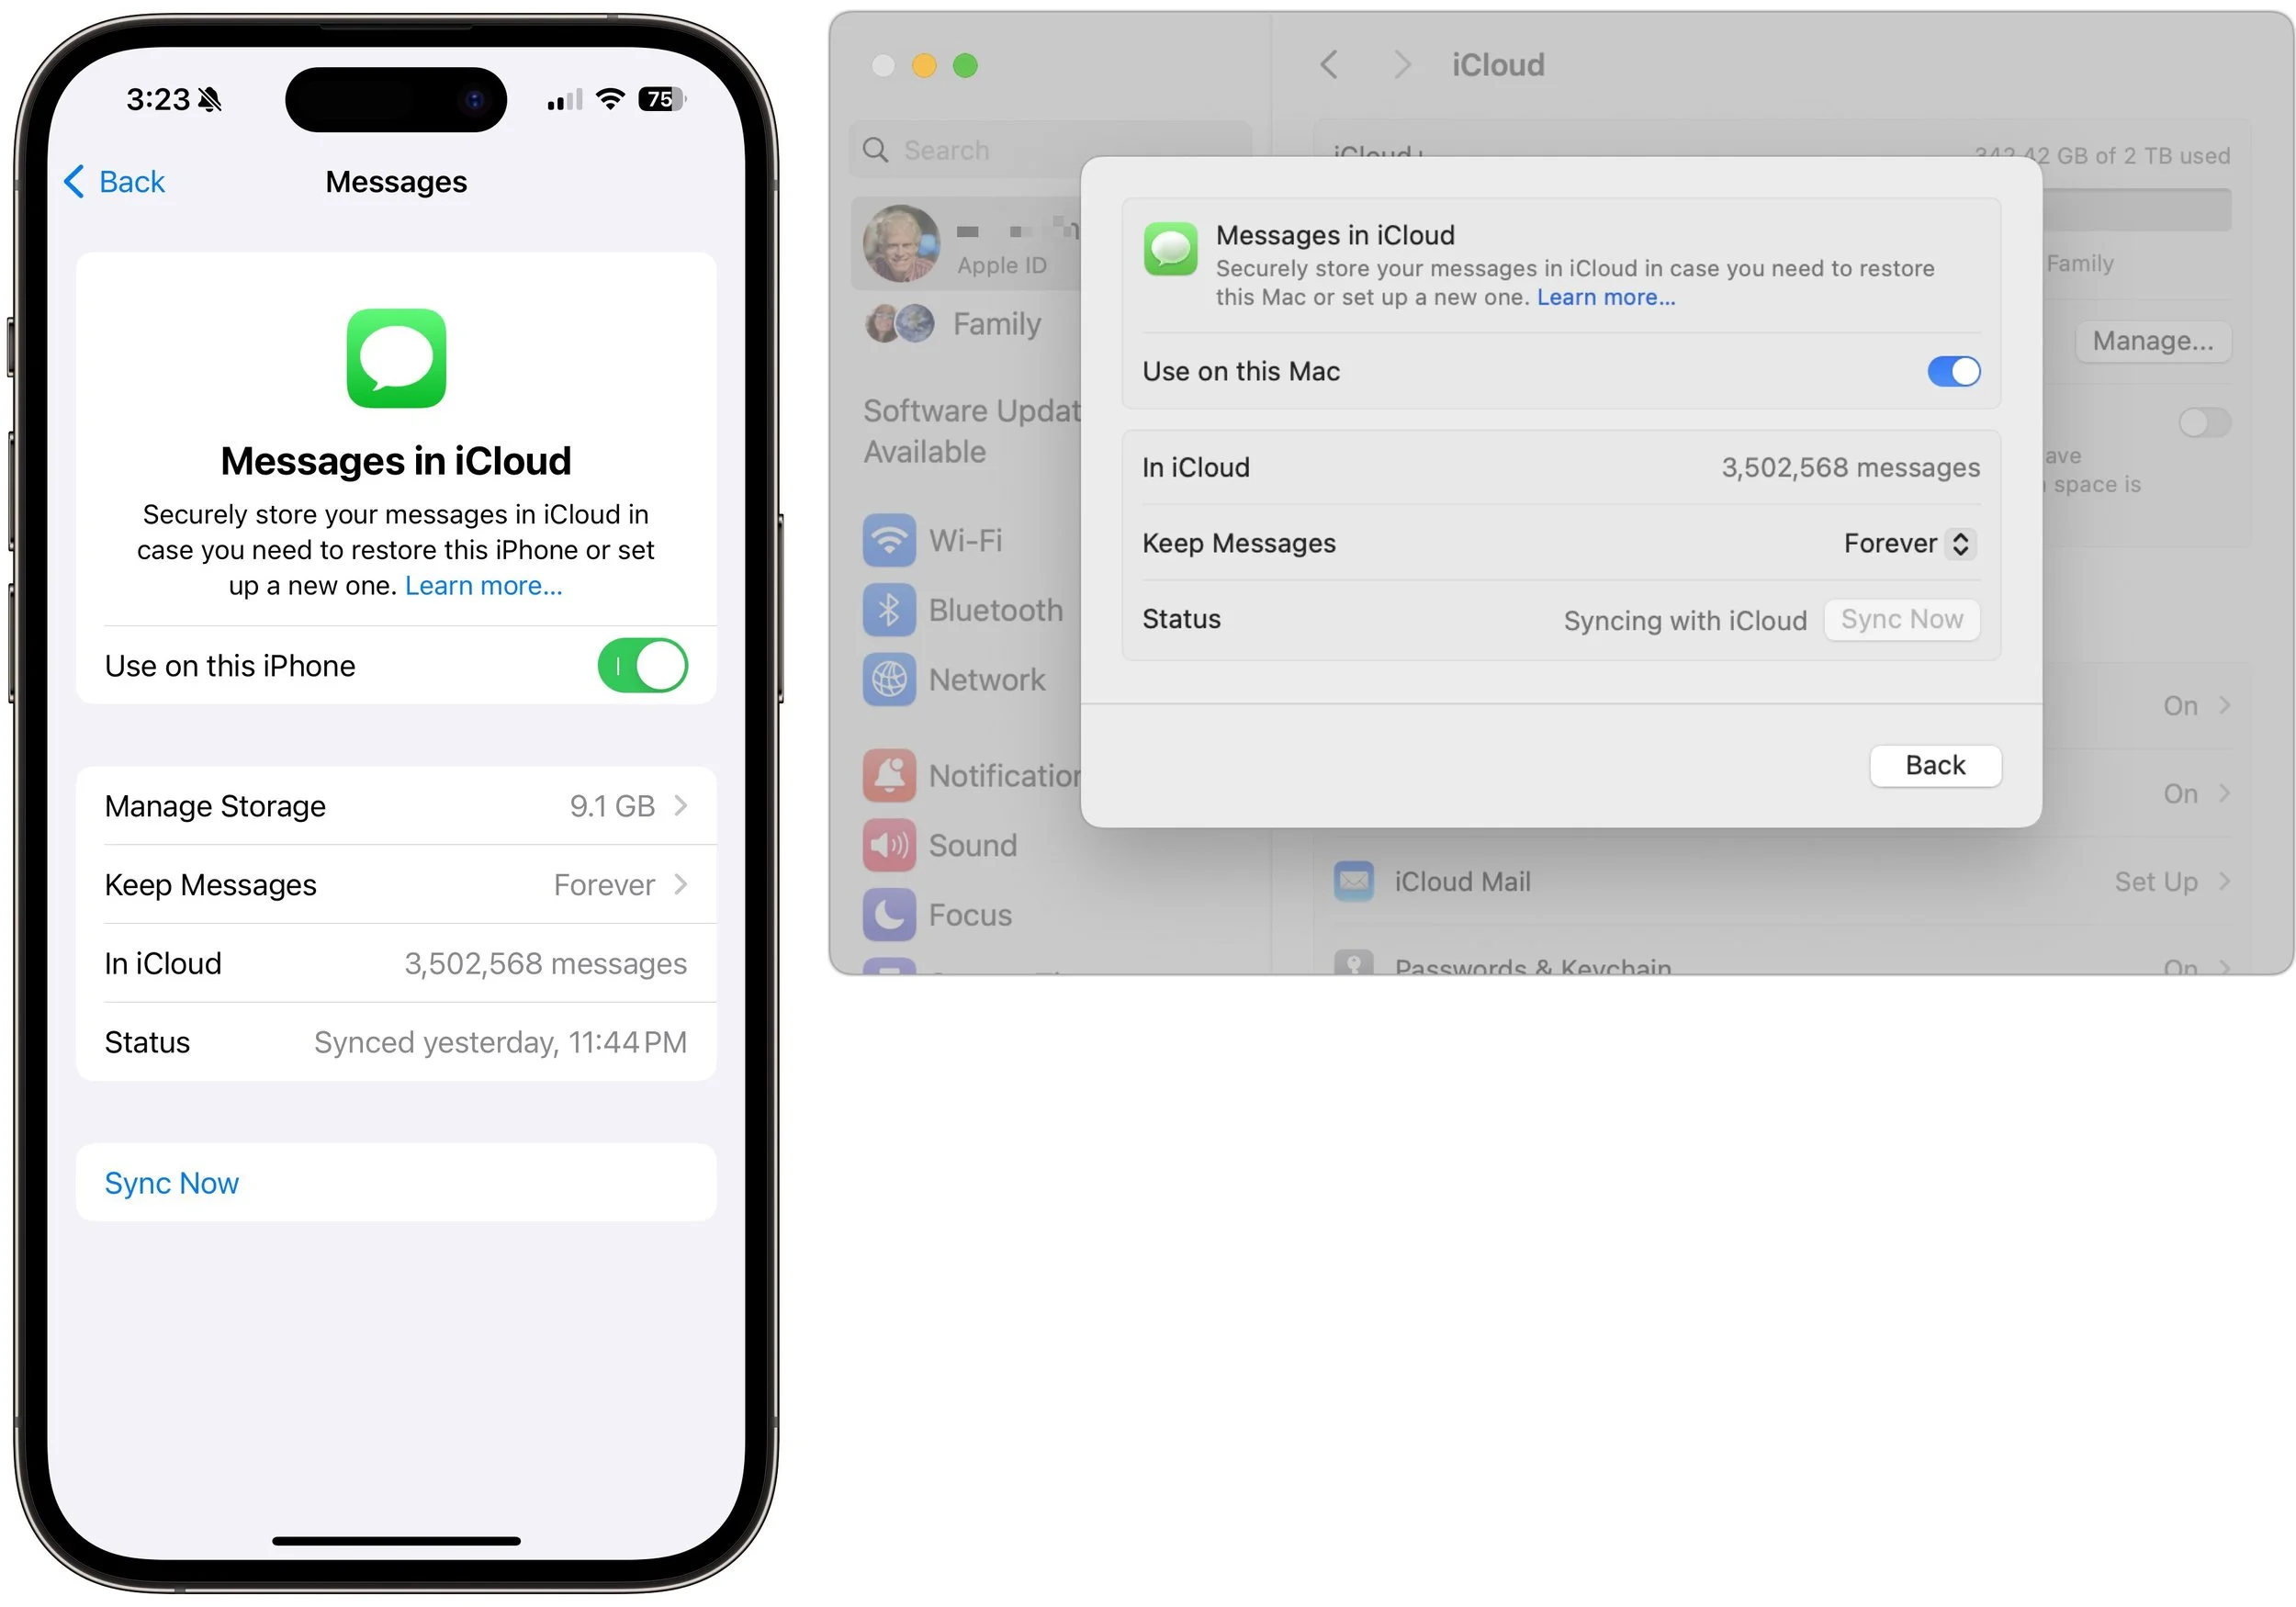
Messages in iCloud: This is the key setting—the previous three are just foundational requirements. Enable it for an iPhone or iPad in Settings > Your Name > iCloud > Show All > Messages in iCloud > Use on this iPhone. On the Mac, look in System Settings > Your Name > iCloud > Show More Apps > Messages in iCloud > Use on this Mac.
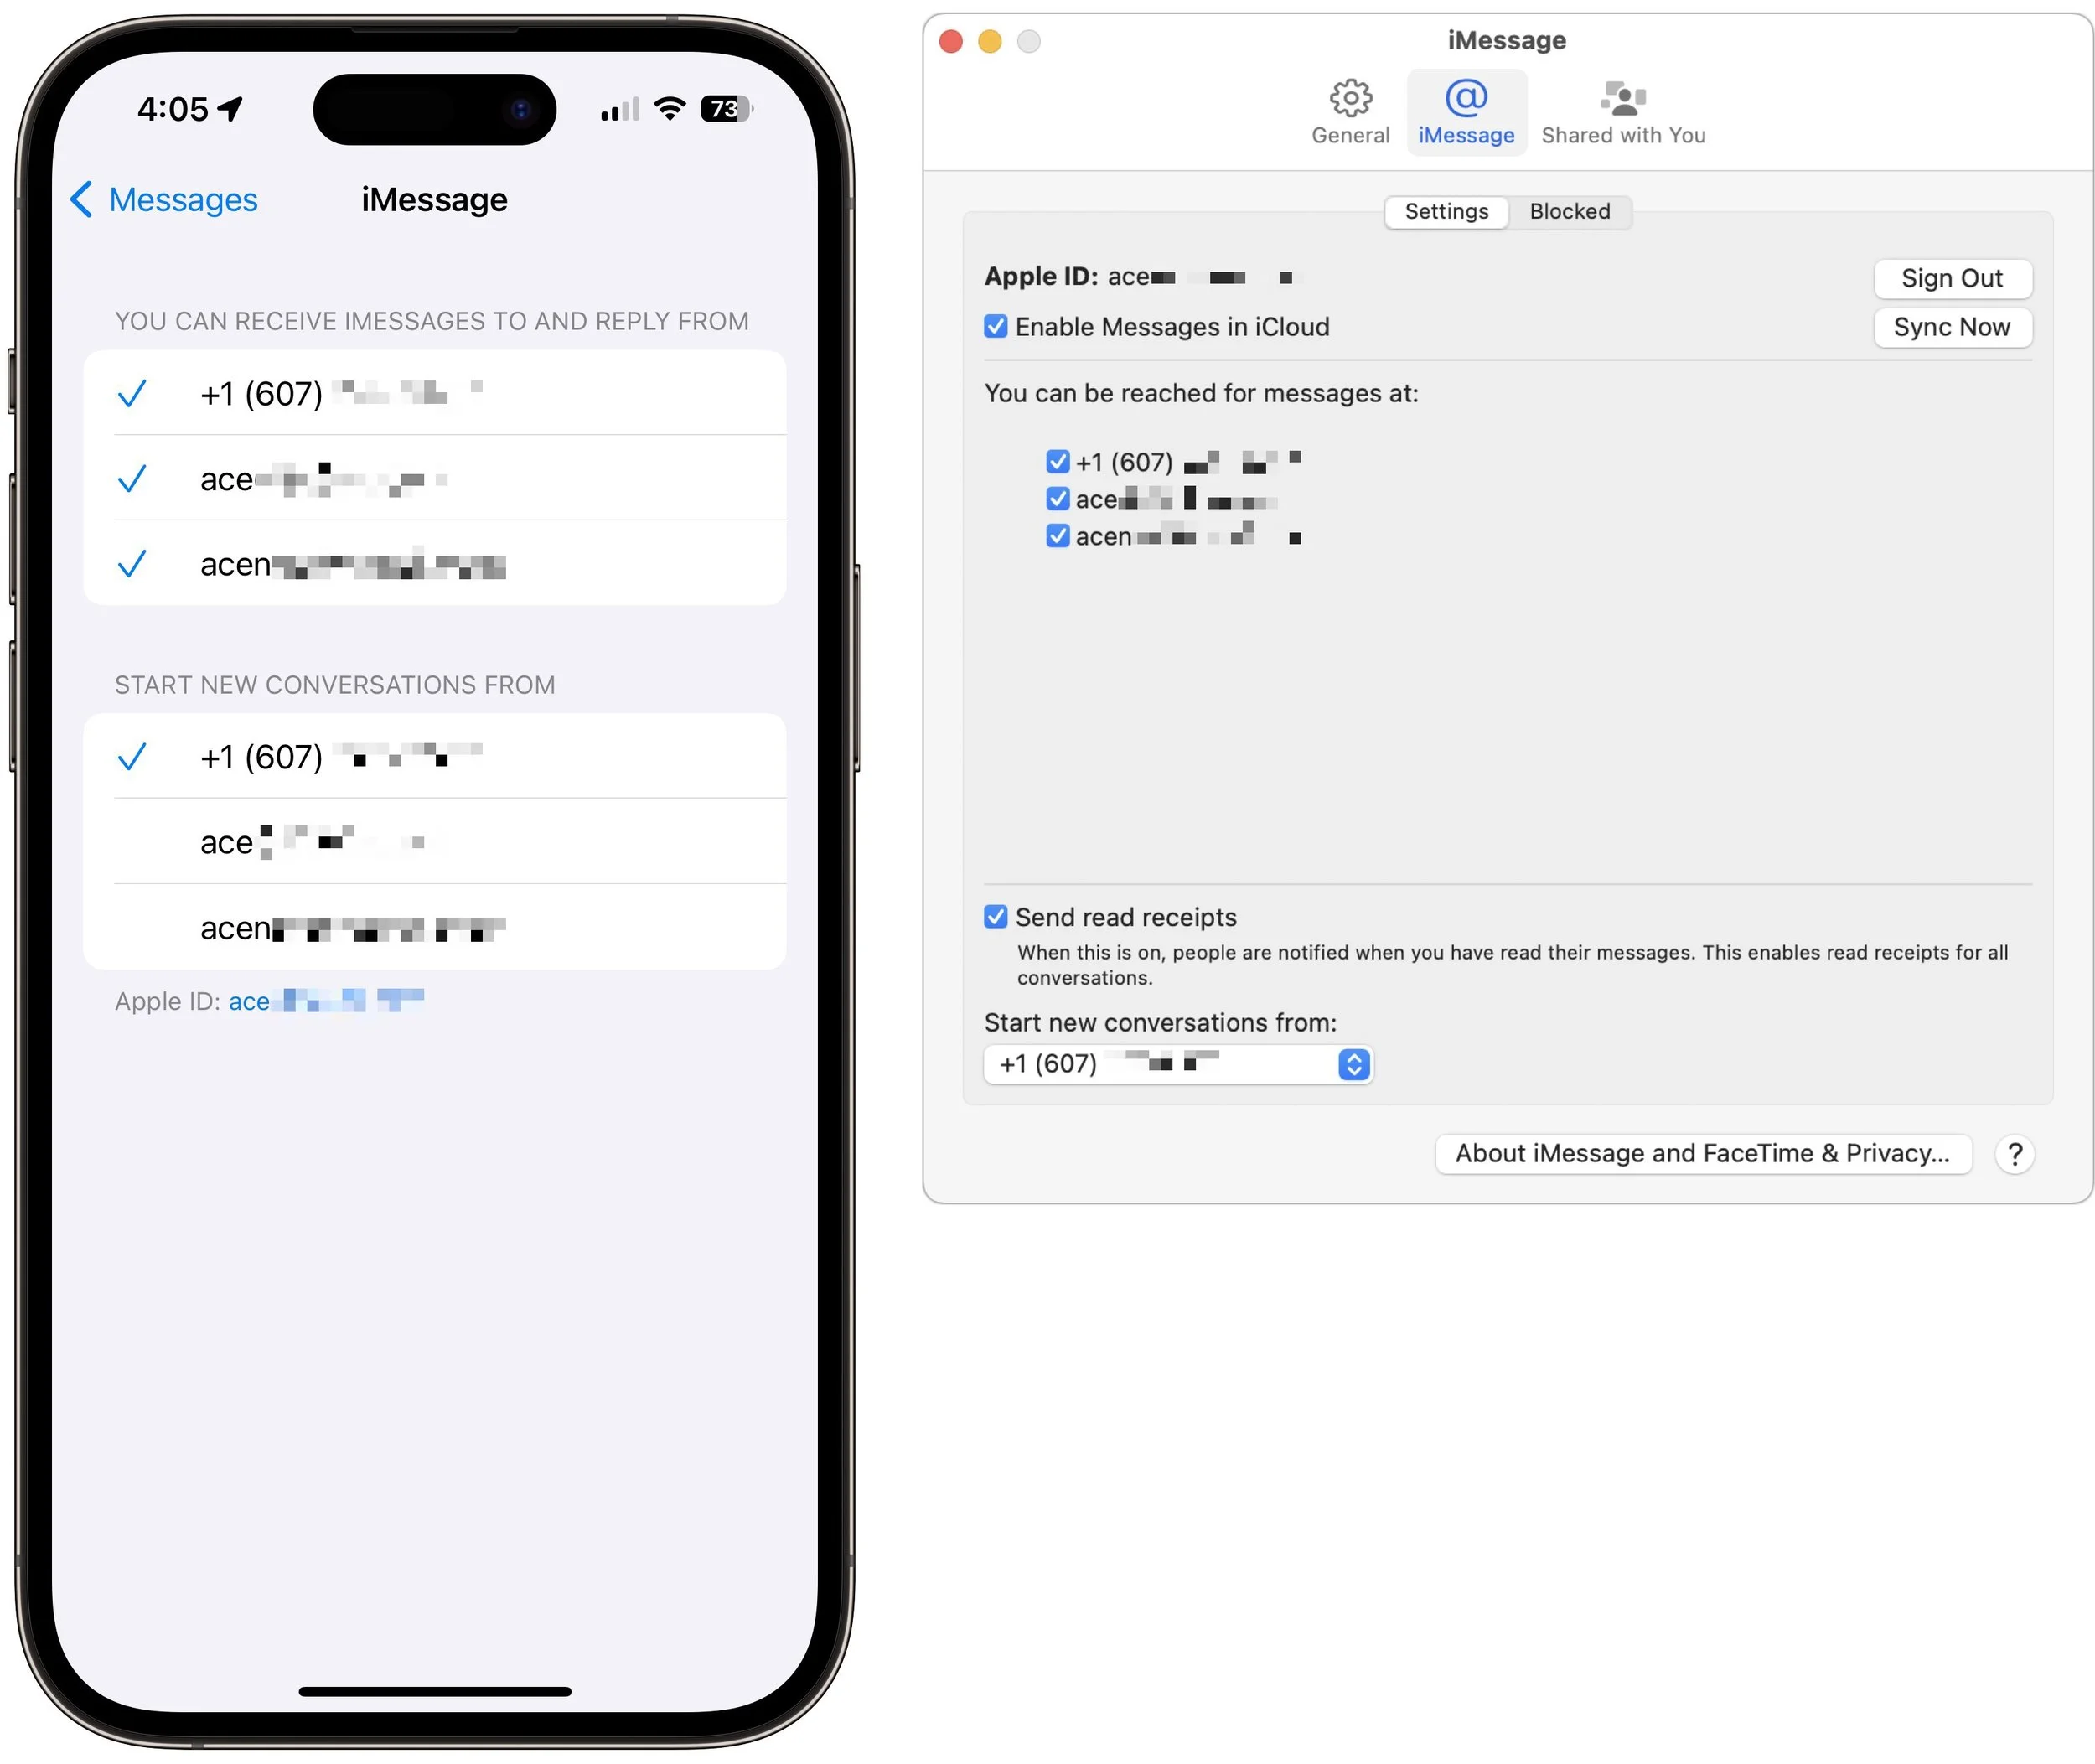
iMessage account: You’ve checked that you’re using the same Apple ID everywhere, but there’s a similar setting that’s also important. On your iPhone or iPad, go to Settings > Messages > Send & Receive and make sure you’re signed into iMessage with the same Apple ID—look at the bottom of the screen. Also, ensure you’re set to send and receive from your phone number and appropriate email addresses. It’s safest to send and receive from all the possibilities and start new messages from your phone number. On the Mac, verify that you have the same settings in Messages > Settings > iCloud.
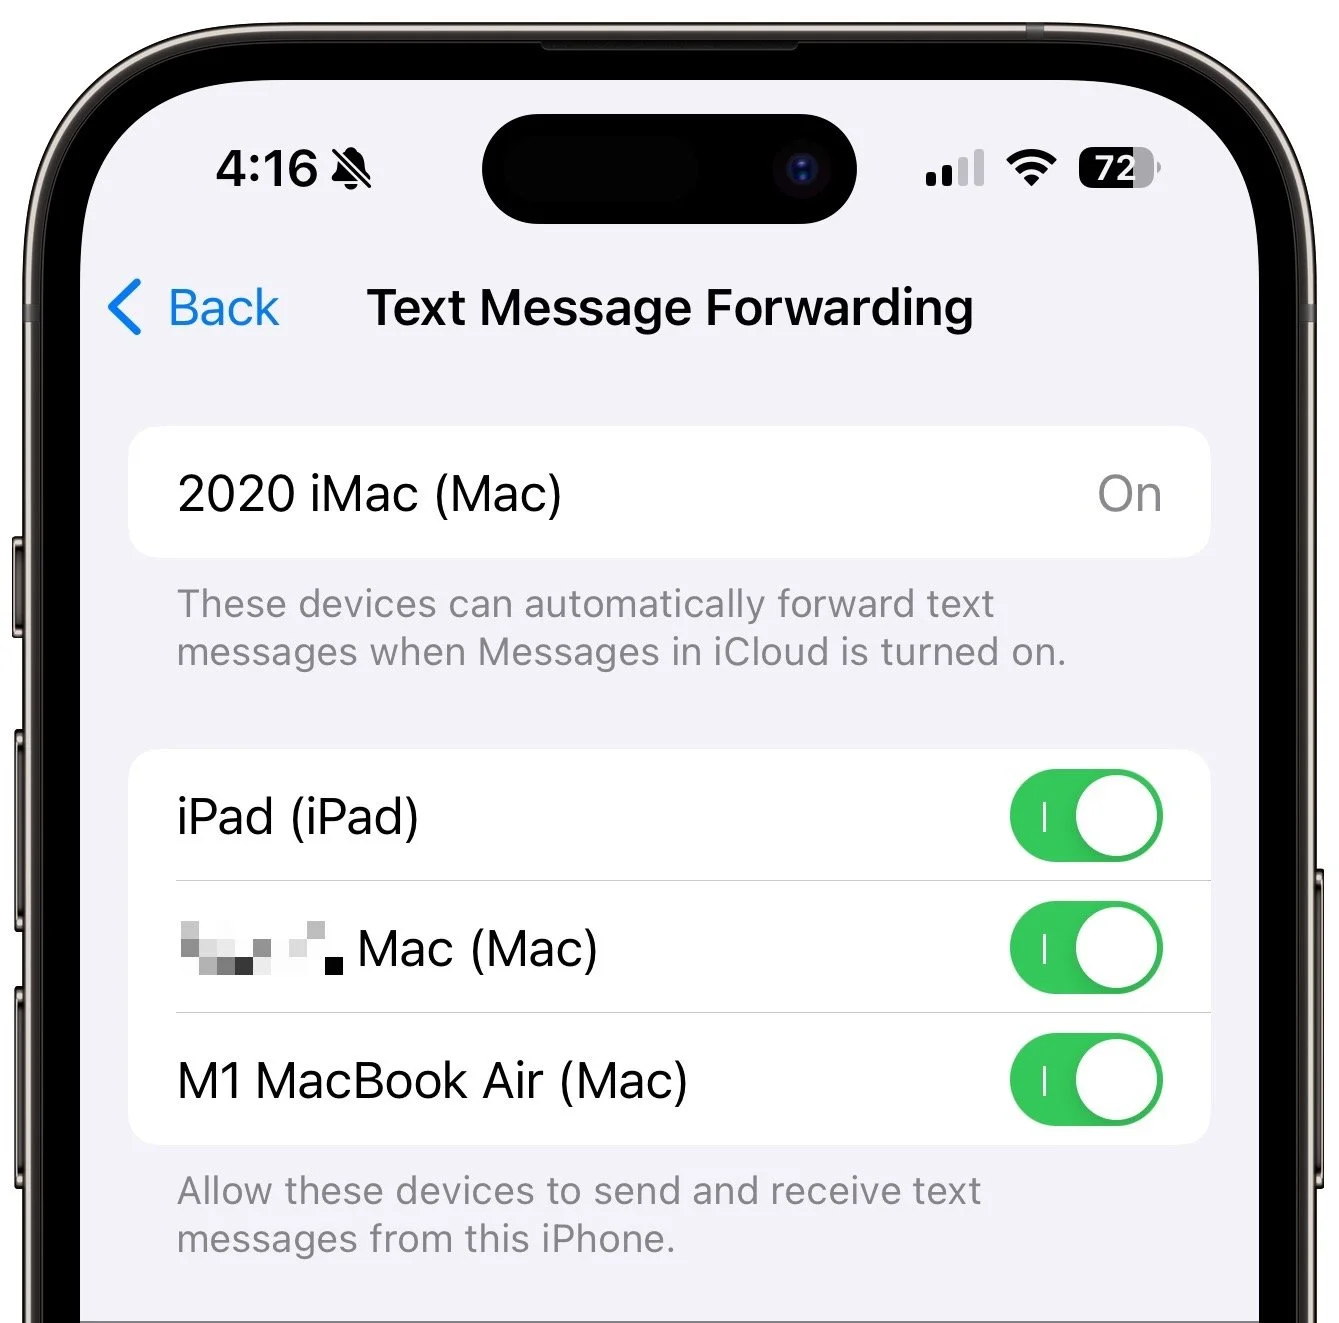
Text Message Forwarding: Turning on Messages in iCloud should keep message history synced across all your devices, including green bubble SMS/MMS text messages. However, it’s worth verifying that SMS/MMS messages are being sent to all your devices. On your iPhone, in Settings > Messages > Text Message Forwarding, select all the devices you want to receive text messages.
Although all the above settings may seem like a lot, most should already be set up correctly. We listed them all because when people have trouble with their messages syncing across all their devices, one or more of these are usually set wrong.
Even with everything configured correctly, there can be hiccups—nothing’s perfect. If messages fail to sync consistently, try these troubleshooting steps:
Use the Sync Now button in the Messages in iCloud settings on any device that hasn’t caught up. That likely won’t help instantly, but syncing should eventually catch up.
Restart the device—it’s always worth trying. On an iPhone or iPad, choose Settings > General > Shut Down (at the bottom), slide to power off, and then press and hold the side (iPhone) or top (iPad) button to turn the device back on. On a Mac, just choose Restart from the Apple menu.
When Messages in iCloud is working properly, though, you can carry on text message conversations using any of your devices at any time. It’s especially nice to switch to the Mac for easier typing when you’re in an involved conversation.
(Featured image by iStock.com/anyaberkut)
SPF, DKIM, and DMARC: What They Are and Why You Need Them
To ensure phishers don’t forge email from your domain to use in their attacks on your organization and others, you must implement SPF, DKIM, and DMARC. We explain the basics, and we’re happy to help with the setup.

The ease of sending and receiving email makes it an attractive way to run scams like phishing attacks. One telltale mark of a phishing attack is the sender’s address not matching their purported domain; attacks that appear to come from legitimate email addresses are much more likely to fool the victim.
You can protect your organization’s email accounts from being compromised and used in phishing attacks by training your users to identify forged emails and use password managers, which won’t autofill a password on a malicious site. But how do you prevent bad guys from forging email that looks like it comes from inside your organization? You can’t, but you can reduce the chances that other email servers will accept it. In the process, you’ll enhance the deliverability of legitimate email from your domain.
The rest of this article is aimed at two types of readers. The first is the IT professional who needs an overview of email authentication technologies and pointers to helpful tools. For other readers, this article will give you an idea of what’s involved so you can talk more knowledgeably with your IT staff or better appreciate what they manage for you.
Whether your email is hosted at Microsoft 365 or Google Workspace, or managed by your Internet service provider or IT department, if your organization has its own domain for email addresses—yourname@yourcompany.com—you need to know about and set up three authentication technologies: SPF, DKIM, and DMARC:
SPF, which stands for Sender Policy Framework, lets you specify which servers and domains are allowed to send email for your organization. It allows receiving mail servers to verify that incoming messages from your organization are actually from you.
DKIM, or DomainKeys Internet Mail, adds a digital signature to every message sent from your organization. Receiving mail servers can use your public key to verify that messages actually came from you and were not changed in transit.
DMARC, which expands to Domain-based Message Authentication, Reporting, and Conformance, leverages SPF and DKIM to publish policies that tell receiving mail servers what to do with messages that fail authentication: deliver, quarantine, or reject them. A message fails DMARC authentication only if it fails both SPF and DKIM—only one is necessary for the message to pass DMARC’s checks.
These three authentication technologies exist inside DNS (Domain Name System) records. The primary use of DNS is to link your human-usable domain name with the underlying IP addresses of the servers that manage your Internet presence; for example, matching www.yourcompany.com with an IP address like 192.168.1.23. However, DNS can also contain TXT records with additional information about your domain—you configure SPF, DKIM, and DMARC using TXT records.
These TXT records must be carefully constructed to work correctly—an incorrect configuration could cause email failures. You could build them manually, but it’s safer to use a tool that asks you questions and spits out a correctly formatted TXT record for you to add to your DNS configuration. If all that sounds intimidating, work with your ISP or email service provider, or ask us for help. But here are the basics.
Tools abound for creating SPF, DKIM, and DMARC records, but we recommend those from DMARCLY and EasyDMARC. We’ll use DMARCLY for the examples here, and it provides a comprehensive explanation that’s worth reading if you want more depth.
SPF
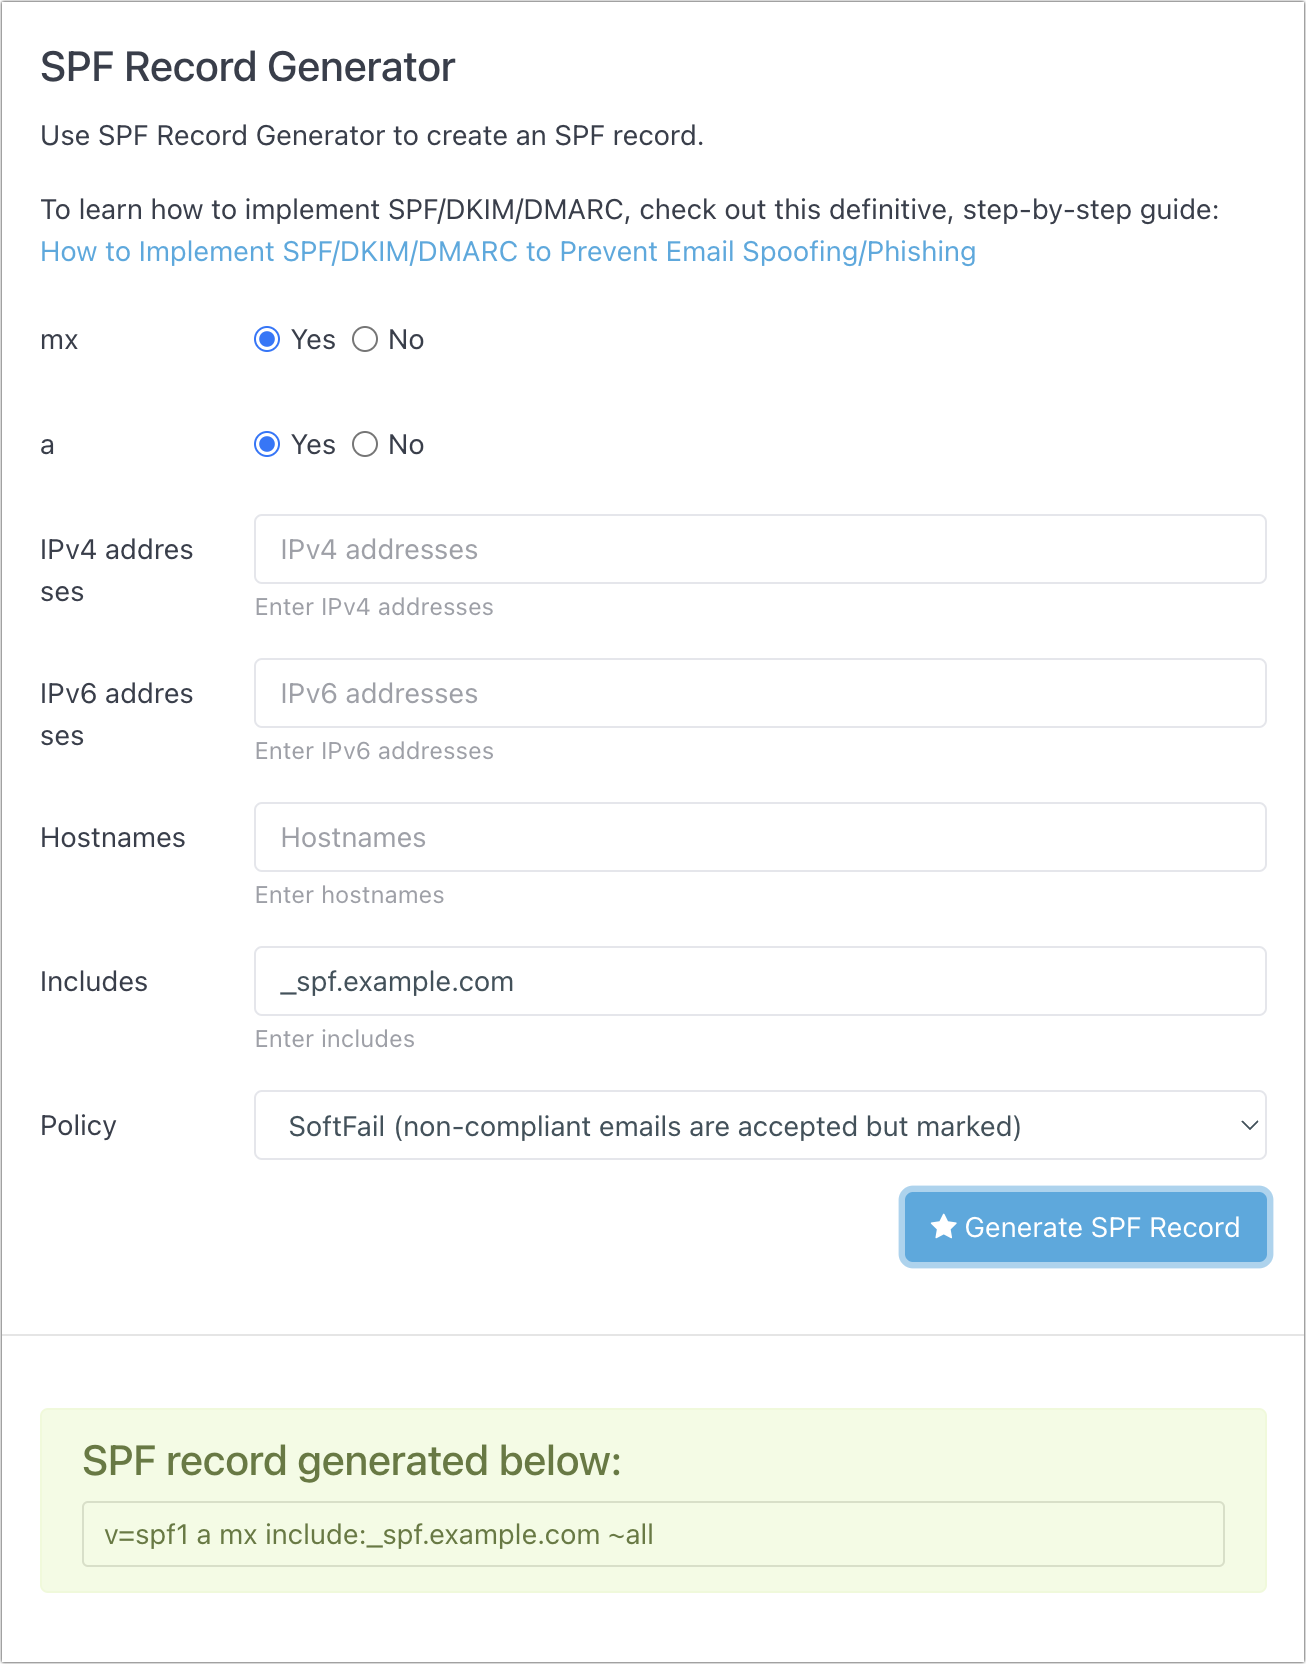
SPF is the oldest of these technologies. To get started, all you need to do in DMARCLY’s SPF Generator tool is specify the names or IP addresses of servers that are allowed to send email from your domain. The mx (mail exchanger) and a radio buttons automatically add the servers listed in your DNS records, and anything you put in the Includes field will allow email sent from anything allowed by a third party that sends email on your behalf. It’s common to put Google, Amazon SES, SendGrid, or other systems there. The IPv4, IPv6, and Hostnames fields let you specify other allowed servers, but aren’t necessary.
The Policy menu is important—you can choose from Fail, SoftFail, and Neutral. Start with Neutral, which should allow messages to be accepted (it prefixes all in the TXT record with a ?). Then bump up to SoftFail (a tilde ~ prefix) to have messages accepted but marked. When you’re confident everything is working correctly, move to Fail, which uses a - prefix.
DKIM
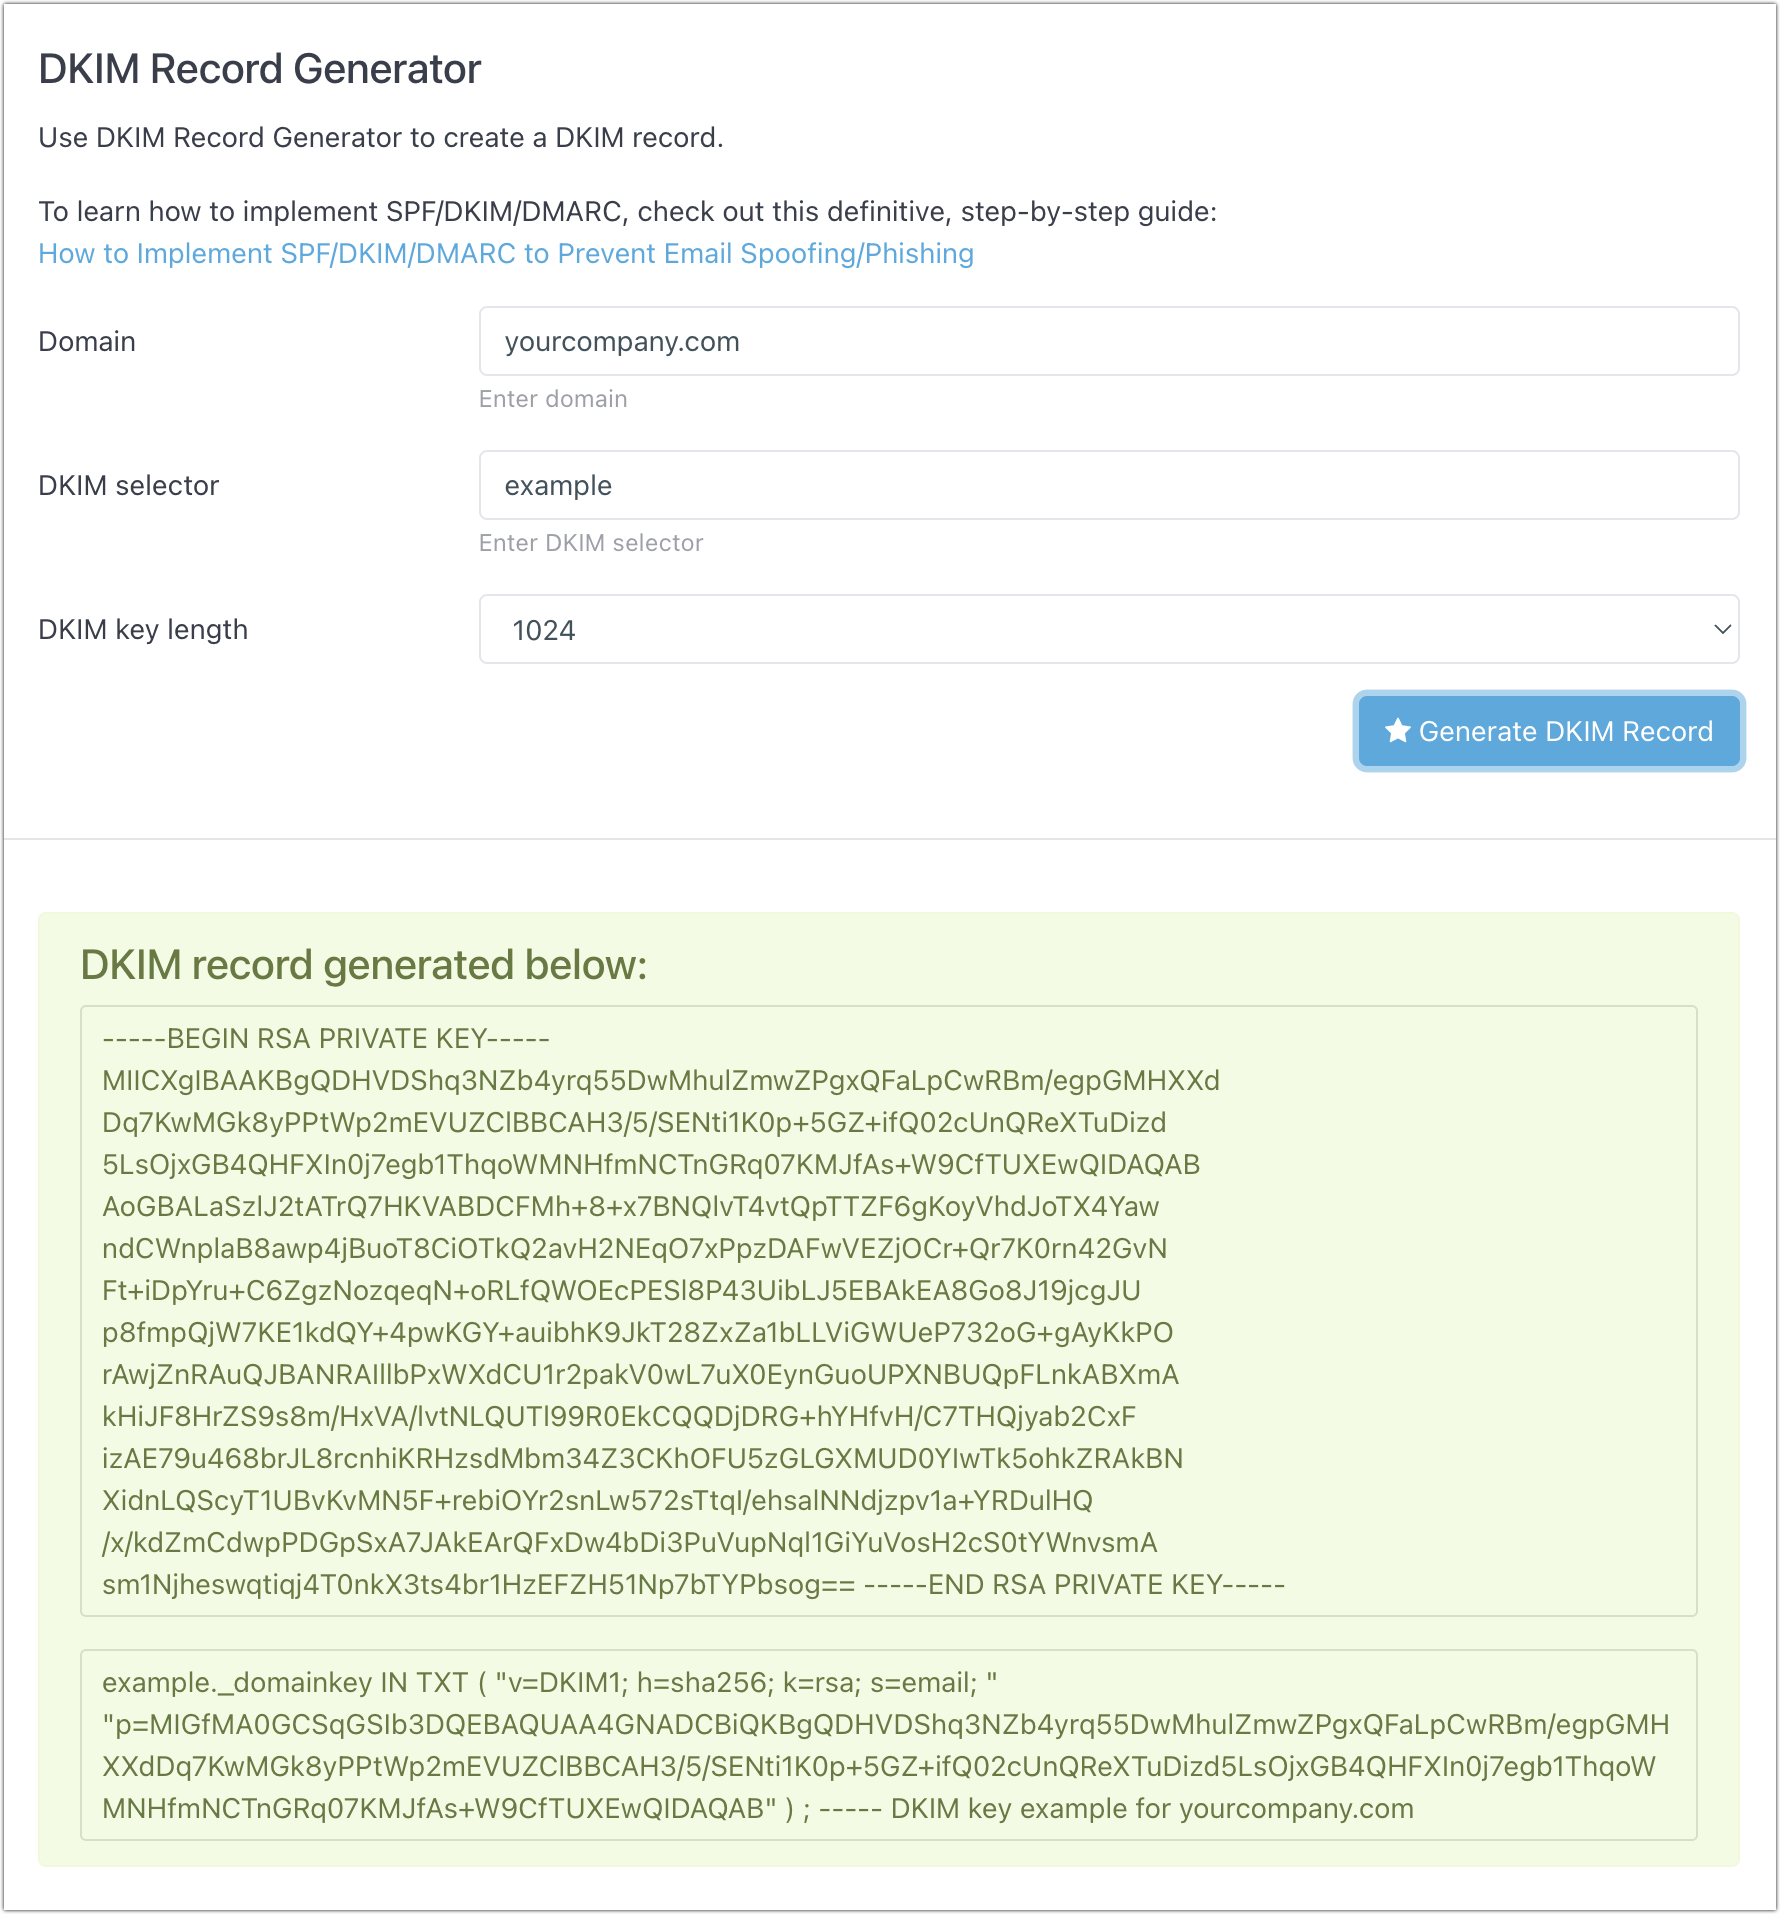
Because it relies on public key cryptography, DKIM is significantly more complicated. Although DMARCLY’s DKIM Generator tool will generate the necessary public and private keys, that’s not helpful unless you have full control over your email server and know how to install the private key to sign all your outgoing email. It’s much more likely that you’ll use a tool managed by the company that hosts your email to create your keys. That tool will automatically install the private key and give you the necessary details to add to a TXT record in your DNS settings.
DMARC
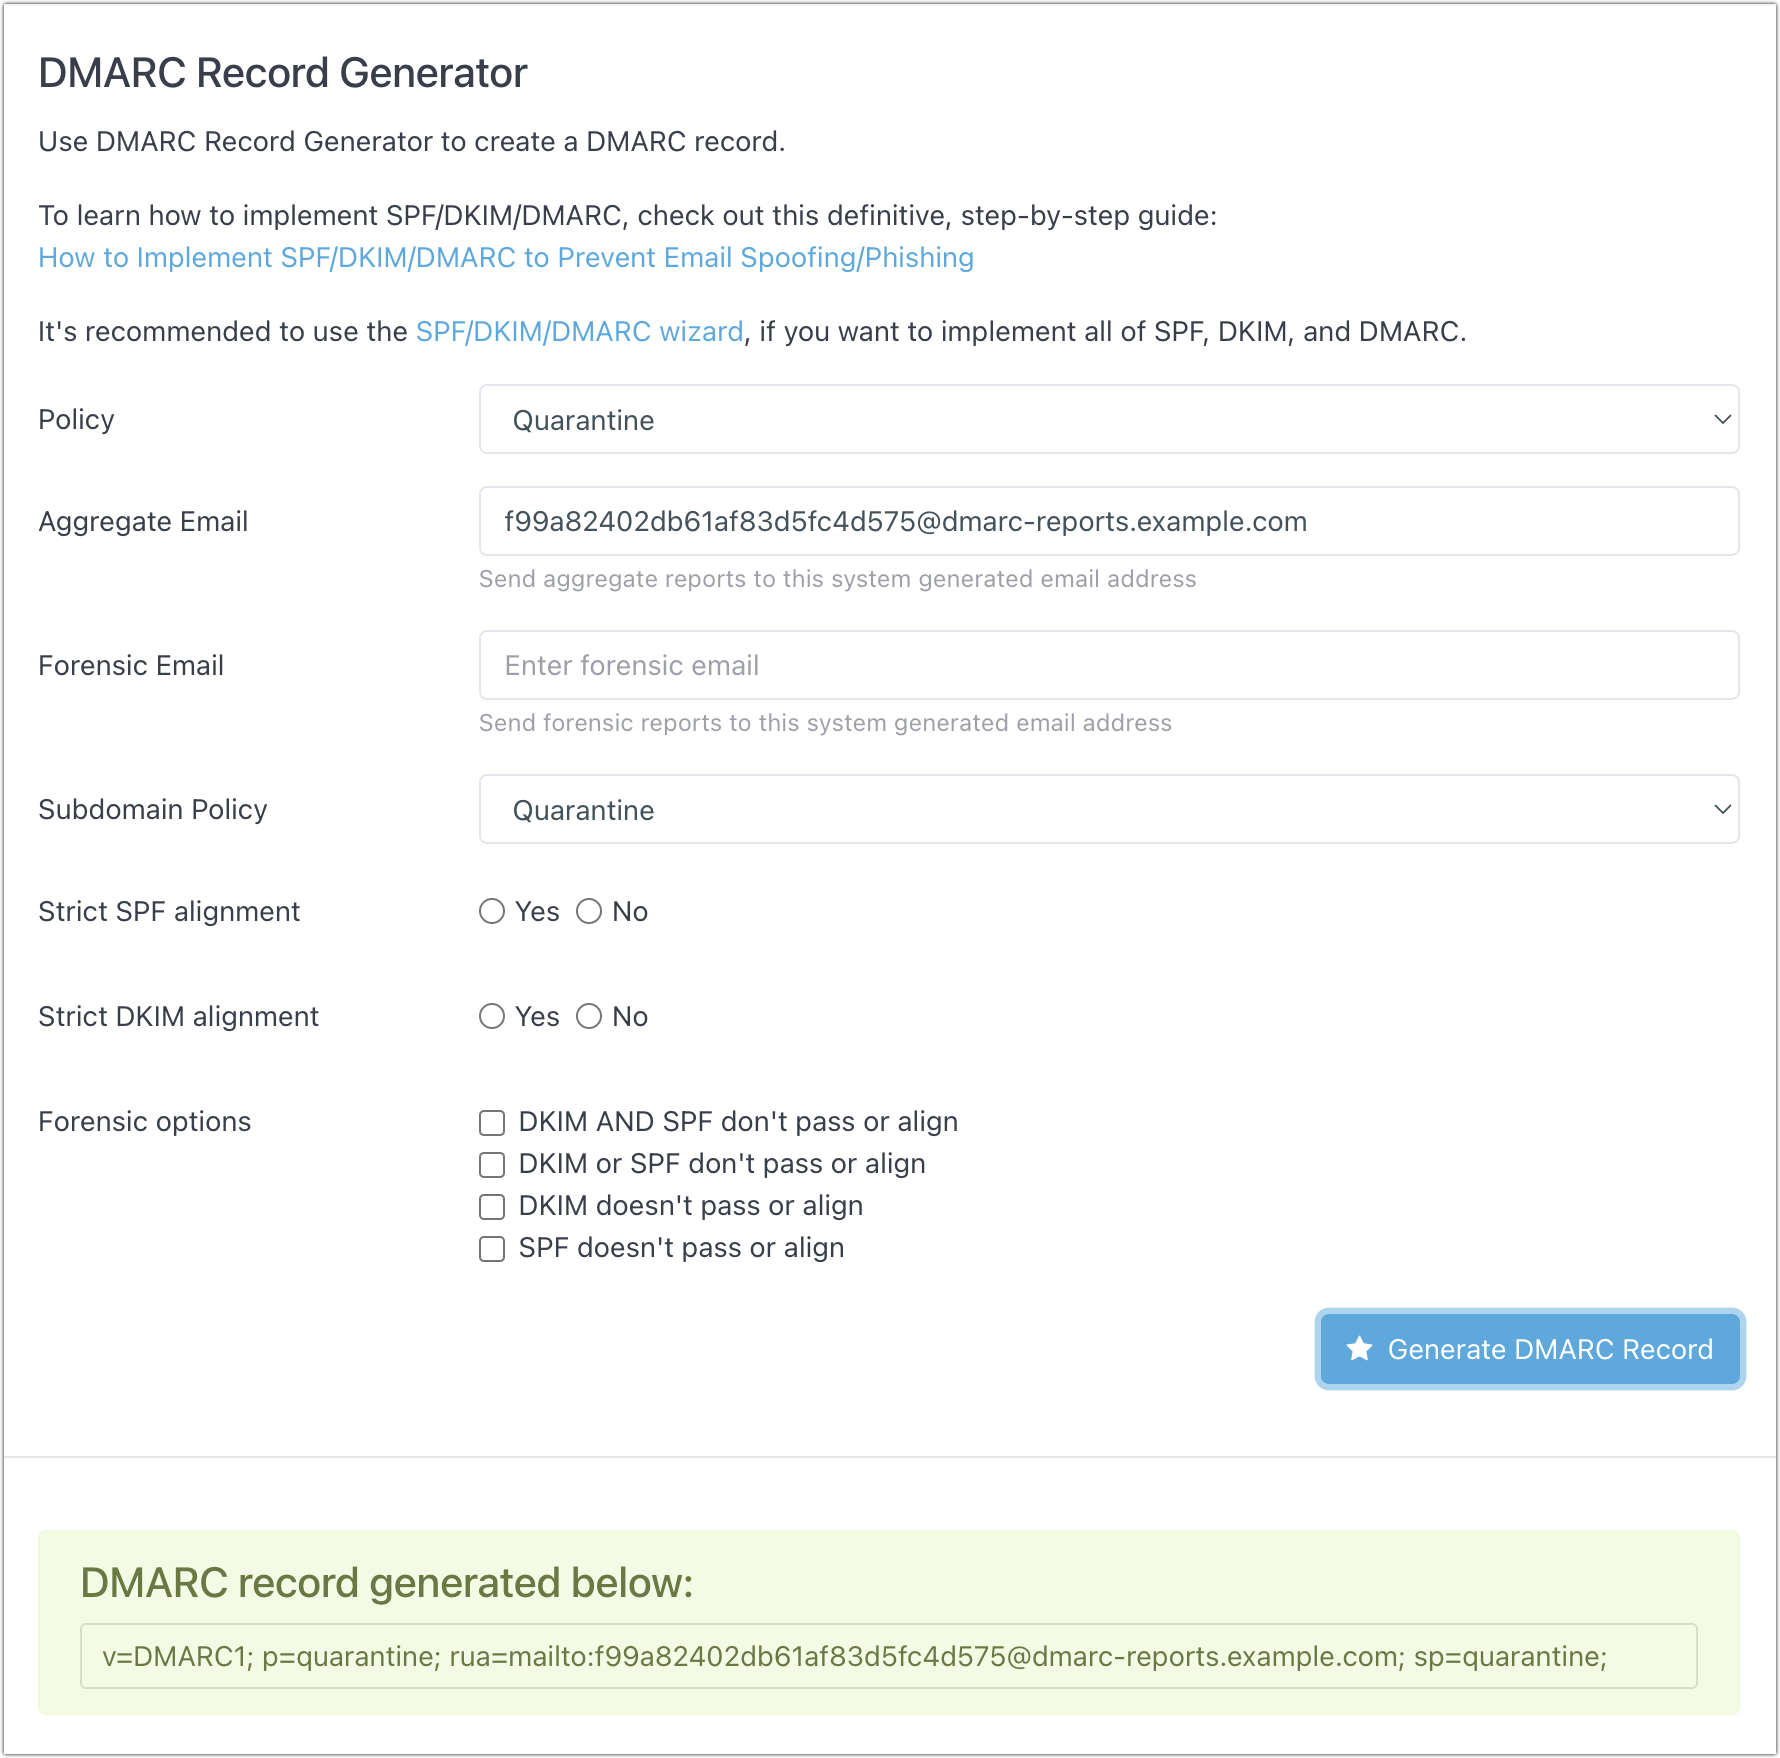
Where SPF and DKIM are all about authenticating email messages, DMARC lets you say what happens when authentication fails. DMARCLY’s DMARC Generator tool makes it easy to generate your DMARC record. For Policy and Subdomain Policy, you can choose None, Quarantine, or Reject—those specify what will happen to messages that fail both SPF and DKIM authentication. Start with None to see what happens in your reporting, move to Quarantine, and if everything seems OK, end up at Reject.
To set up reporting, enter an email address in the Aggregate Email field, but don’t put a personal address there. DMARC reports are daily XML digests that aren’t human-readable, so they should be sent to a service that will parse them and provide you with a dashboard for exploring the problems. DMARCLY and EasyDMARC both offer dashboards, as does the Cloudflare service if you use it for DNS or other tasks. To start, you can leave DMARC’s Strict Alignment and Forensic Options blank.
Configuring DNS
Once you’ve generated your SPF, DKIM, and DMARC records, you have to configure them in your DNS settings. How you do that depends on your DNS host; we’ll show what it looks like Cloudflare. Other DNS hosts should be similar.
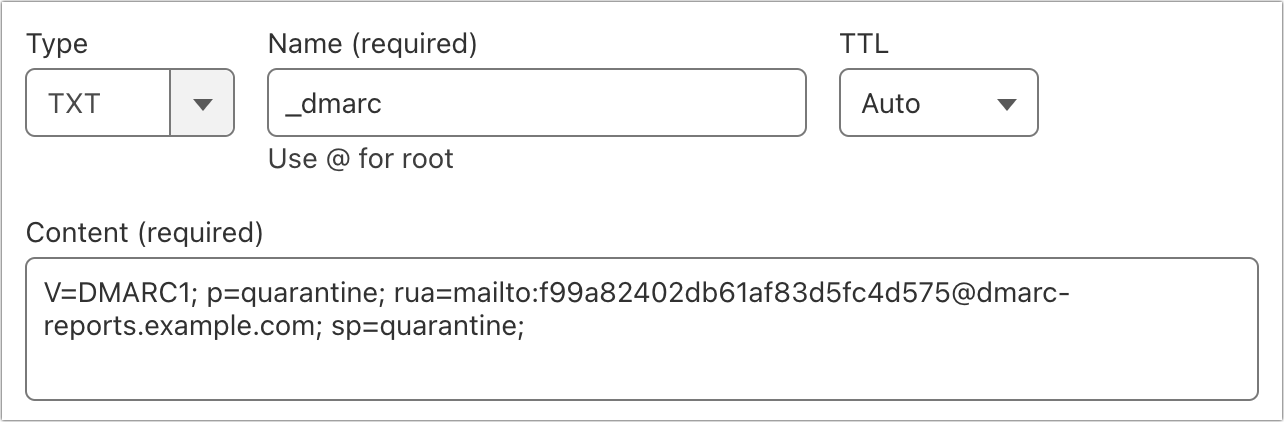
For each case, you’re creating a TXT record, but what goes in the Name and Content fields varies:
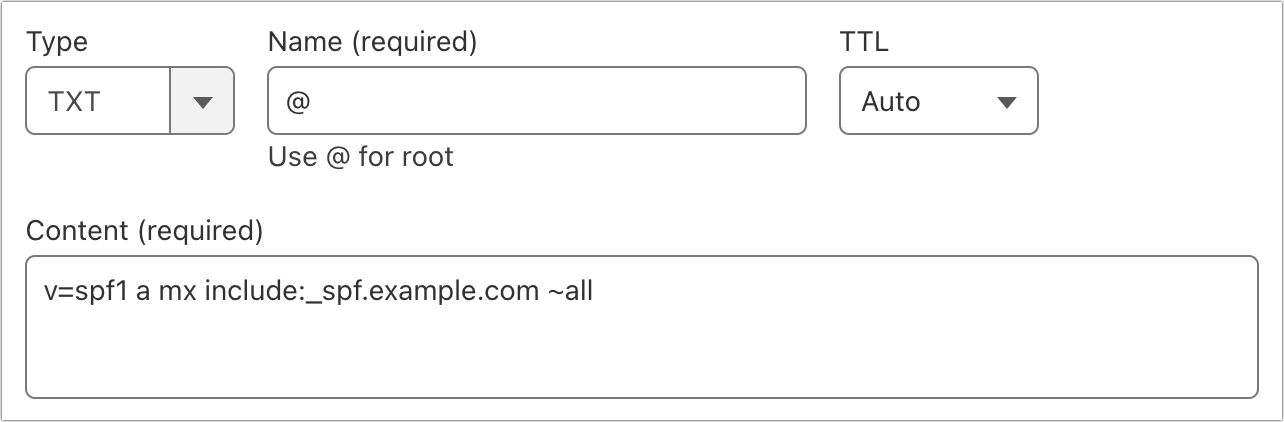
SPF: The name for an SPF record should be the @ character, signifying the root level of your domain. Paste the text that the SPF Generator tool created in the Content field. You can have only one SPF record for each domain, although you can set up separate SPF records for subdomains.
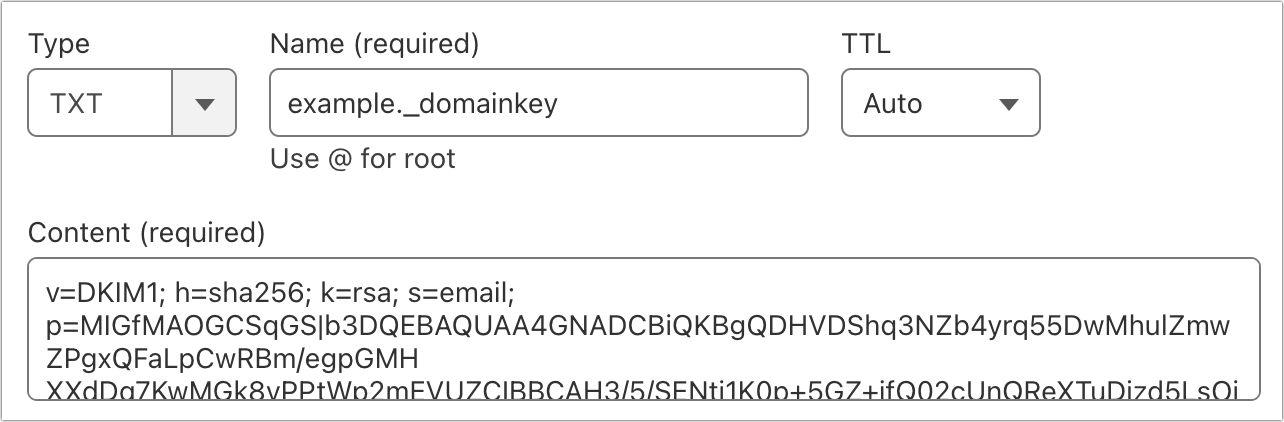
DKIM: You can have as many DKIM records as services that send email on your behalf, so the first part of the name can vary—we show example below. However, the ._domainkey part is required for each DKIM record. For the content, paste the text given to you by the email-sending service. Note that some email services may require you to create one or more CNAME records instead of a TXT record—just follow their instructions.
DMARC: For DMARC, the name must be _dmarc. Once again, you’ll paste the text given to you by the DMARC Generator tool in the Content field.
Reporting and Evaluation
After you set up SPF, DKIM, and DMARC, it’s essential to keep an eye on your email. If you’ve started with SPF in Neutral mode and DMARC in None, nothing should go wrong. You can look through the headers of test messages you send to verify. This DMARCLY article explains what to look for. If you’ve signed up for an aggregate reporting service, you’ll be able to see reports like this one from Cloudflare that show the percentage of email that passes each of the authentication technologies.
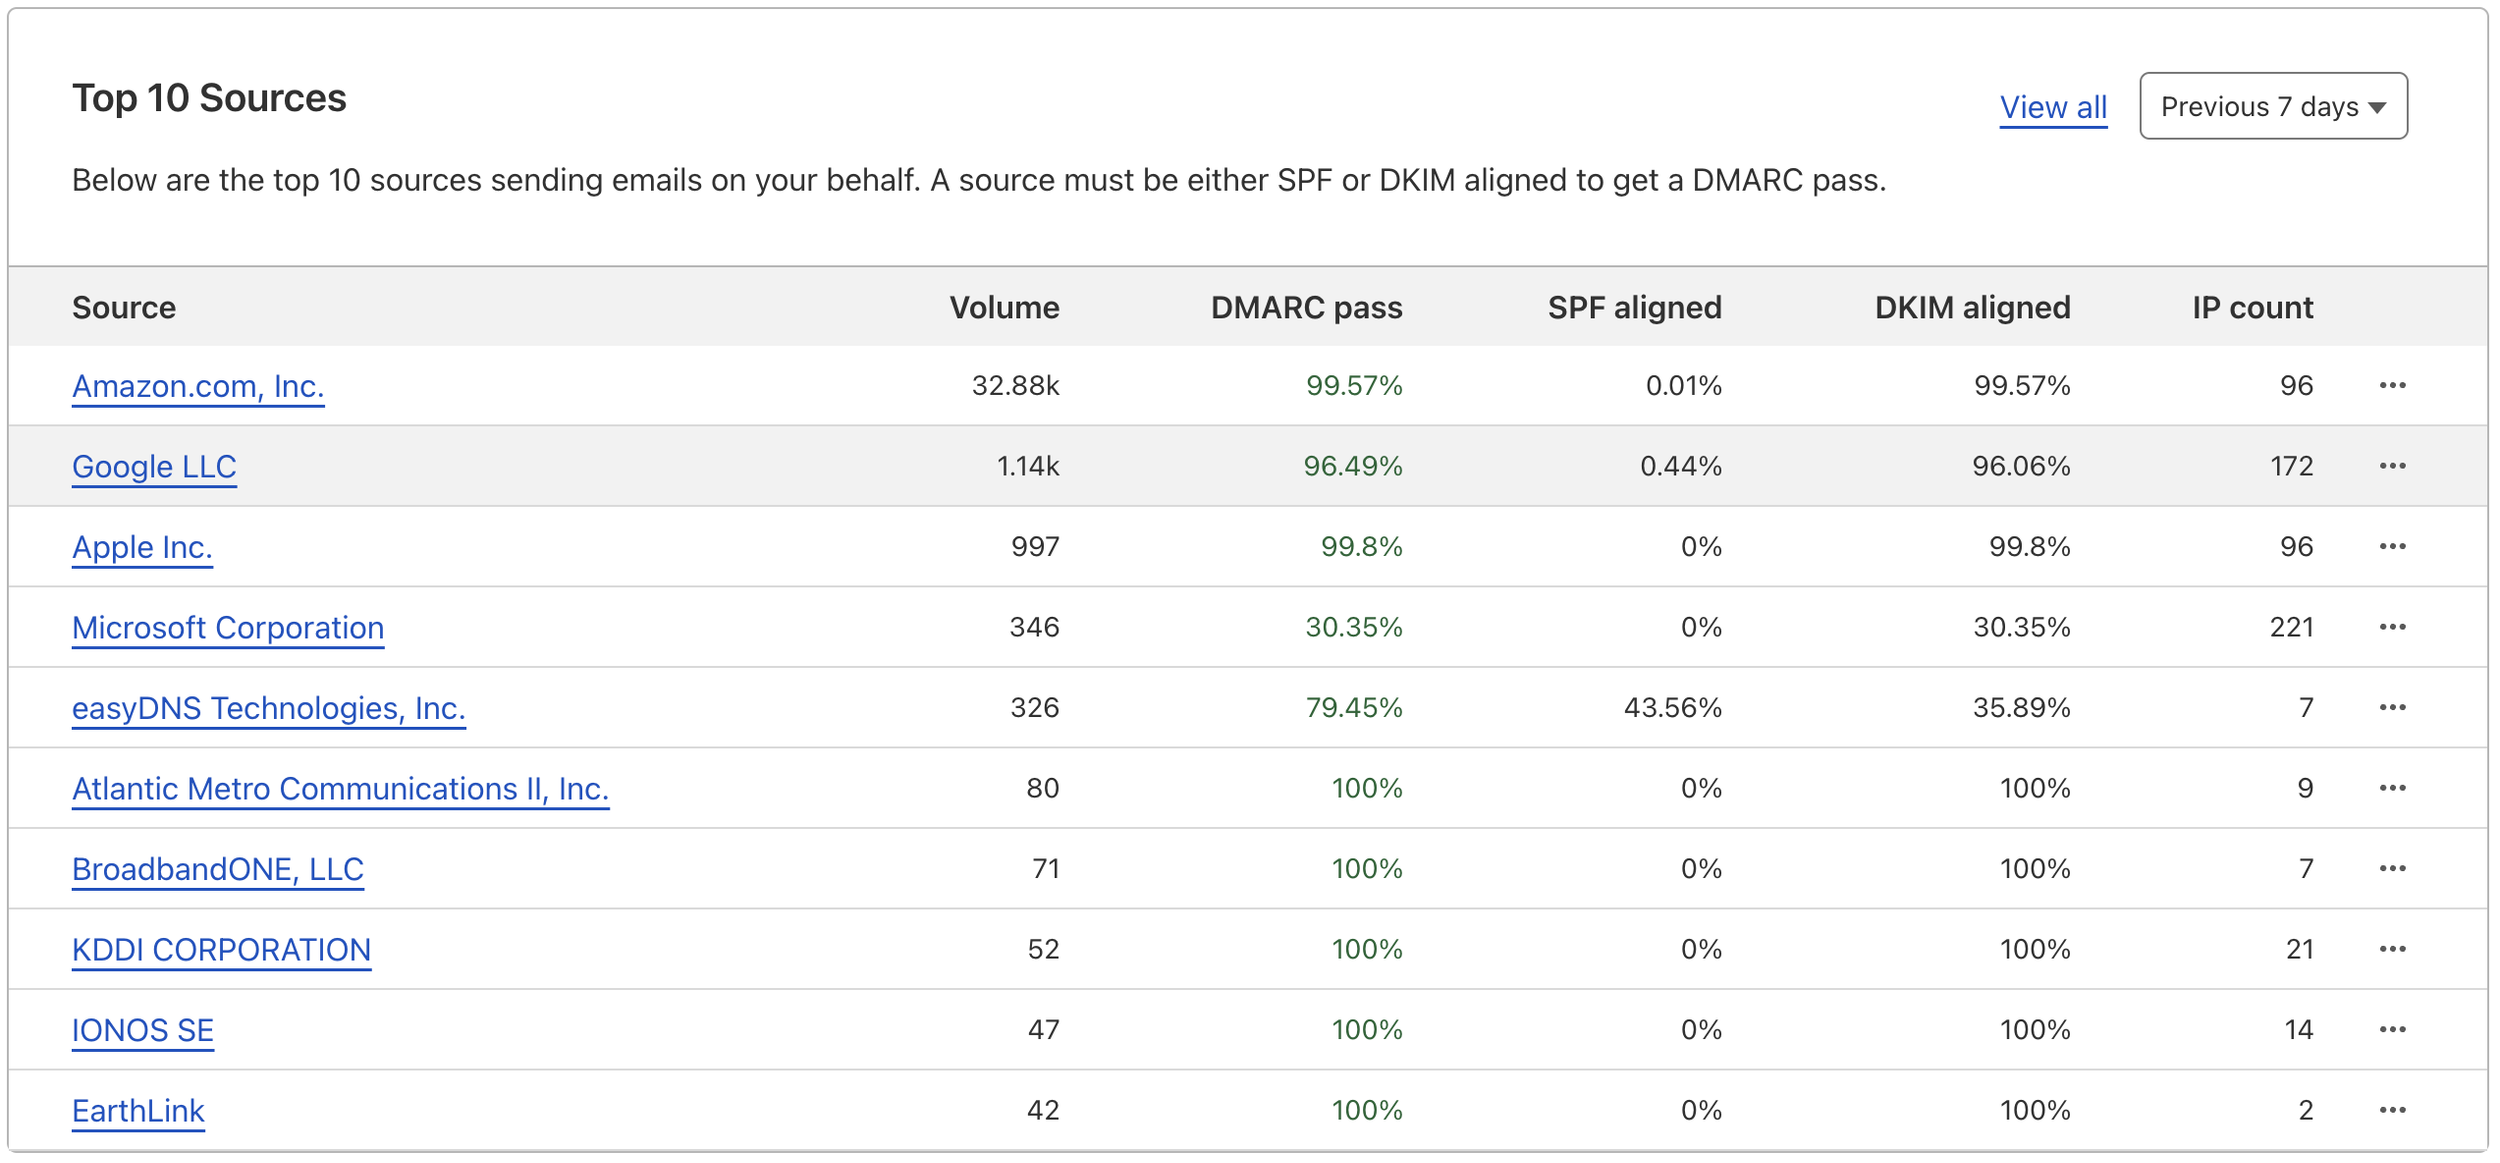
If everything looks good and most email passes, change SPF to SoftFail and DMARC to Quarantine. Make sure you can send email to some known personal addresses on Gmail, Yahoo, or iCloud. Also, tell people who send email from your domain to be on the alert if they don’t hear back from someone who typically replies quickly—if a misconfiguration is causing your email to be marked as spam, you want to know about that quickly. If you’re using a DMARC reporting service, look at those reports to see if any email services are sending a lot of messages that fail DMARC.
After you’ve run with those settings for a month or two, bump SPF up to Fail and DMARC to Reject. Continue to monitor your DMARC reporting and pay attention to any complaints from users about the messages they send not arriving.
That’s a lot, we know. Feel free to contact us if you need help with any step of the process.
(Featured image based on an original by iStock.com/Ole_CNX)
Six Reasons Why You Should Restart Your Mac Periodically
You can go for weeks or months without restarting your Mac, but it’s a good idea to restart more frequently to increase security, avoid or resolve problems, get updates, and generally clear your Mac’s decks.
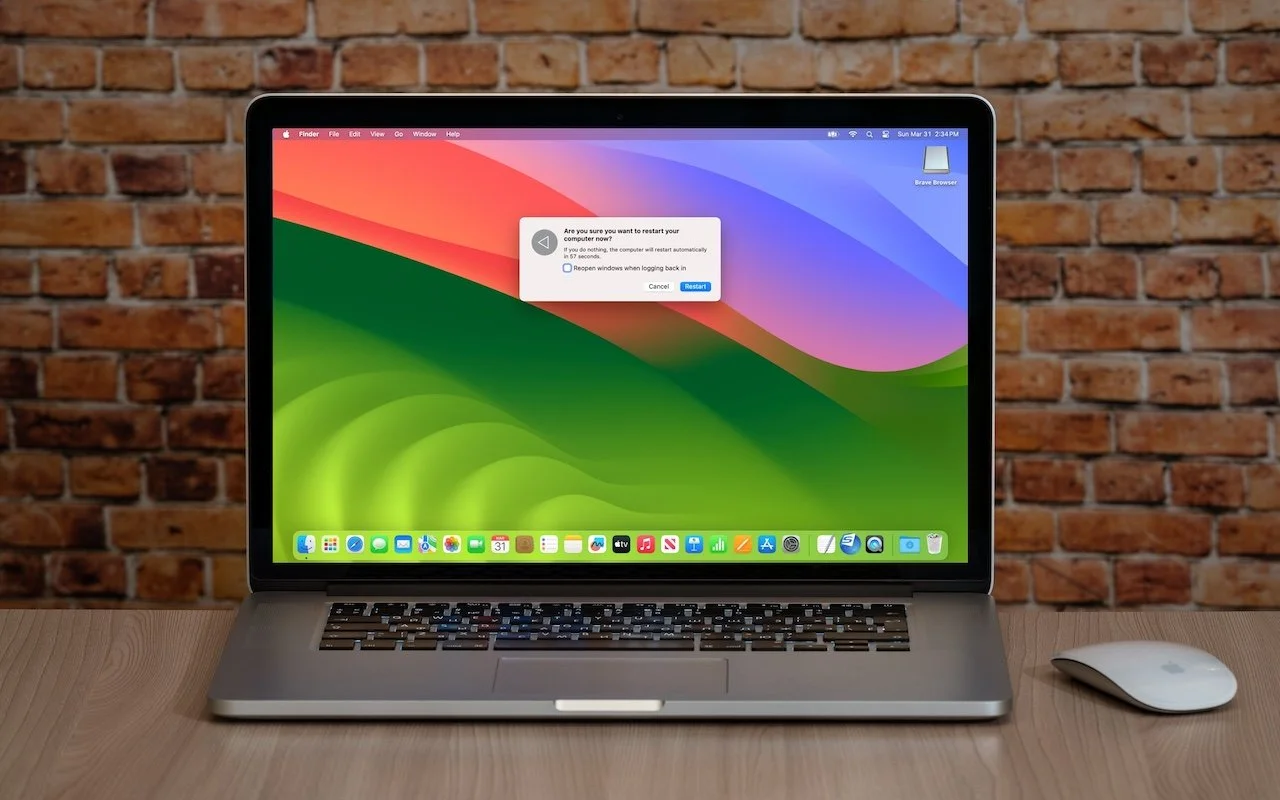
Long ago, before macOS was as stable as it is today, Mac users restarted their Macs regularly. Back then, Macs couldn’t sleep, either, so it was common for users to shut down at the end of the day and start up the next morning, effectively restarting daily.
With modern Macs using the barest trickle of power in sleep and both apps and macOS almost never crashing, many Mac users have gone to the opposite extreme, letting their Macs run for months between restarts. However, such an approach brings with it new problems, and as with so many things, there’s a happy medium.
Why are we banging this particular drum? As an off-the-cuff estimate, about a quarter of the problems reported to us can be solved by a restart. Really! Just click the Apple menu and choose Restart. As long as you save your work first or when prompted, nothing bad will happen.
Here are our top six reasons you should restart periodically:
Improved security: Restarting itself doesn’t generally improve security (although it could theoretically clear malicious code running in memory). However, installing macOS updates requires a restart, and we strongly recommend installing security-focused updates shortly after they’re released. If you resist installing updates because of the need to restart, you’re increasing your risk significantly.
Resolve problems: Modern Macs may be more stable than ever, but things can still get funky. If apps are crashing, peripherals aren’t connecting, you’re seeing visual glitches, or anything else seems wrong, the first troubleshooting step is a restart.
Better performance: We all have a feel for how long different tasks on our Macs take. If icons for launching apps bounce longer than usual, windows draw slowly, or you see the spinning pinwheel repeatedly, restart. Performance problems are often caused by a poorly coded app or out-of-control process causing your Mac to run out of physical memory and switch to slower virtual memory. Restarting clears such issues.
Recover drive space: Another memory-related bonus of restarting is that it can free up drive space. When macOS starts to rely on virtual memory, it creates swap files that can consume gigabytes of space. Restart, and all that space is returned, at least until your app usage requires it again.
Get updates: Most apps notify you of updates at launch, and some automatically download their updates but install them only when you quit. Either way, a restart results in all your apps quitting and relaunching, which ensures they either in-stall or at least notify you of important updates.
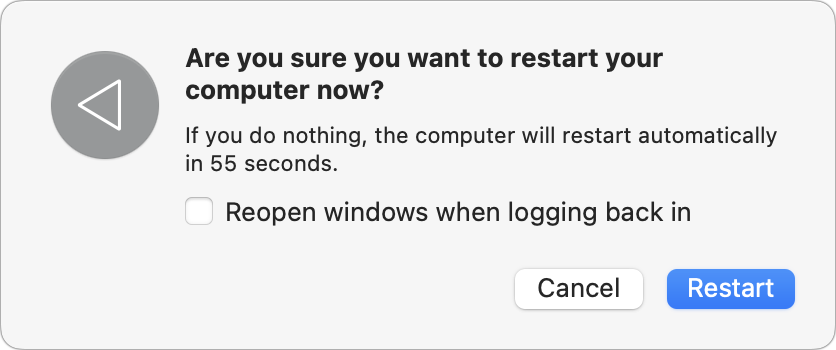
Start fresh: Even if having 20 or more apps open isn’t affecting your Mac’s performance, a clean slate can help you focus on your work better. A simple restart quits everything and lets you start over with just those apps set to launch at log-in. For a completely fresh start, make sure to deselect “Reopen windows when logging back in” in the restart dialog. Of course, if you have a lot of documents open and need to return to them, leave that checkbox selected to pick up exactly where you left off.
There’s no set schedule on which you should restart, but if you use a Mac at work and like routines, it wouldn’t be problematic to restart on Friday evening as you wind down to leave for the weekend. That way, you’d return to a clean slate on Monday morning. It’s also totally fine to restart whenever it might be helpful.
Just don’t fear the restart—modern Macs, especially those with Apple silicon, restart quickly, and the benefits far outweigh the few minutes of downtime.
(Featured image based on an original by iStock.com/Armastas)
Take Advantage of the Reference Library in Your Mac
When you’re reading on your Mac, there’s no excuse for not knowing what a word means, even when it’s in another language. Apple provides several shortcuts for looking up any word in macOS’s reference books.

You may be used to Mac apps using red underlines to mark misspelled words, but did you know that macOS has also long included a fully featured Dictionary app? It provides quick access to definitions and synonyms in the New Oxford American Dictionary and the Oxford American Writer’s Thesaurus, along with definitions of Apple-specific words like AirDrop and Apple ProRes RAW. But that’s far from all it can do.
Getting on the Same Page
First, some basics. Open the Dictionary app from your Applications folder and type a word or phrase into the Search field. As you type, Dictionary starts looking up words that match what you’ve typed—you don’t even have to press Return. It’s a great way to look up a word when you aren’t quite sure of the complete spelling. If more than one word matches what you’ve typed, click the desired word in the sidebar.
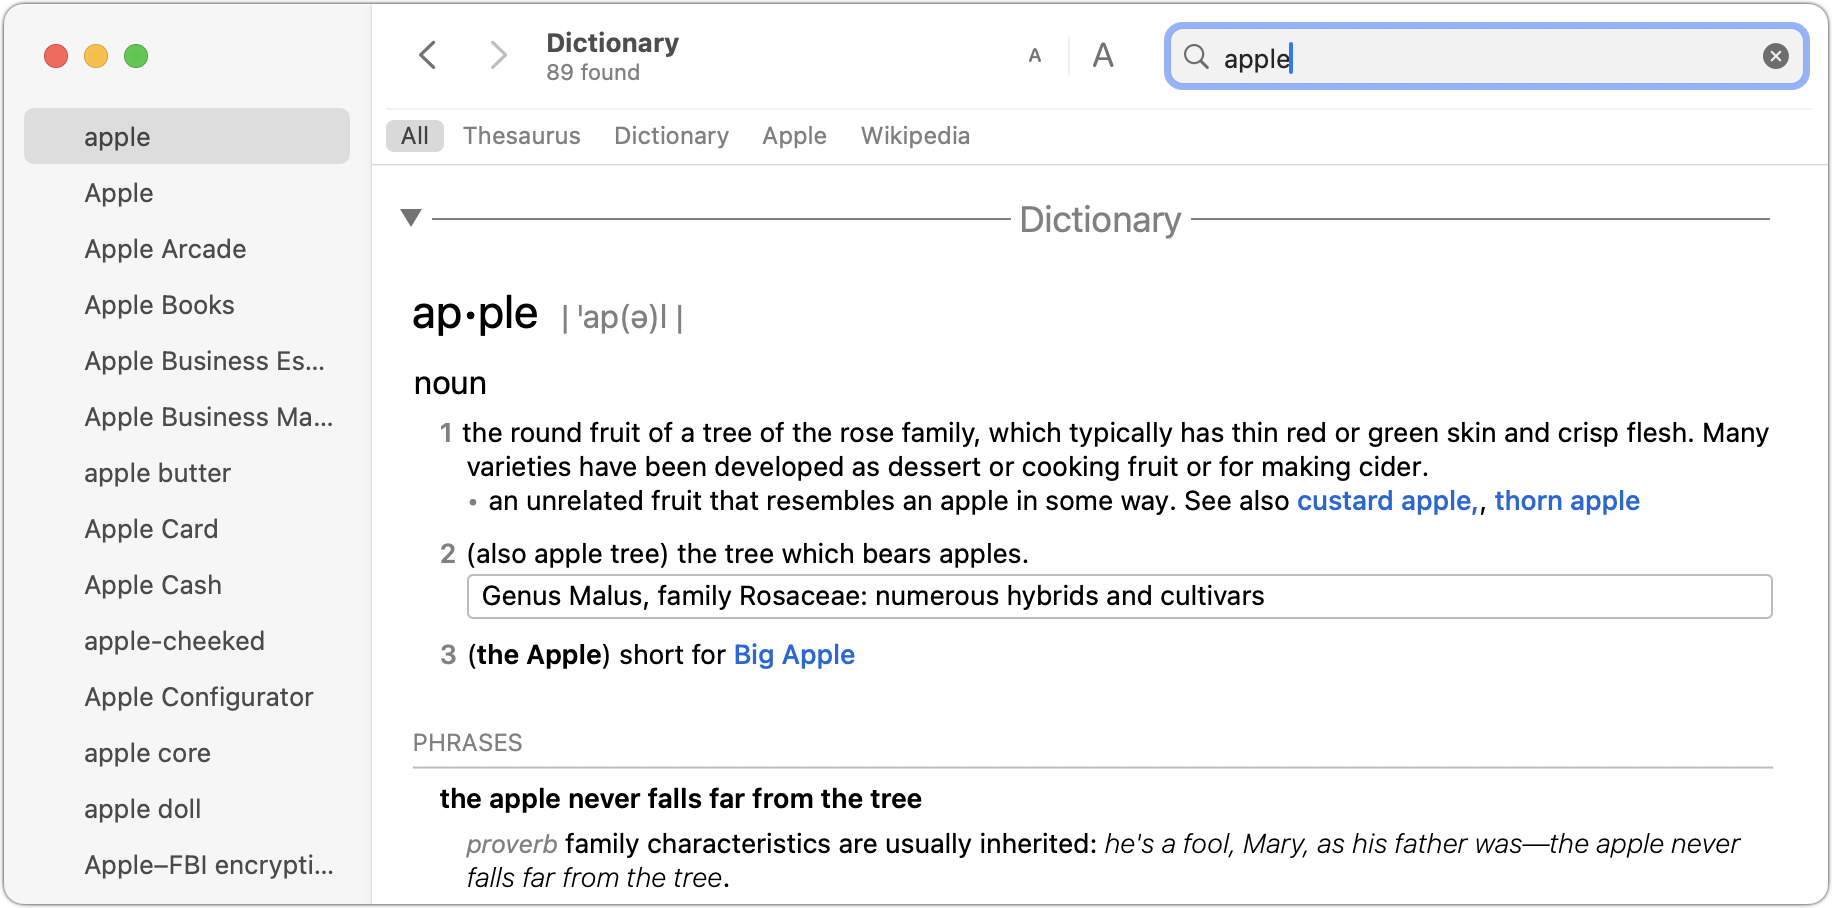
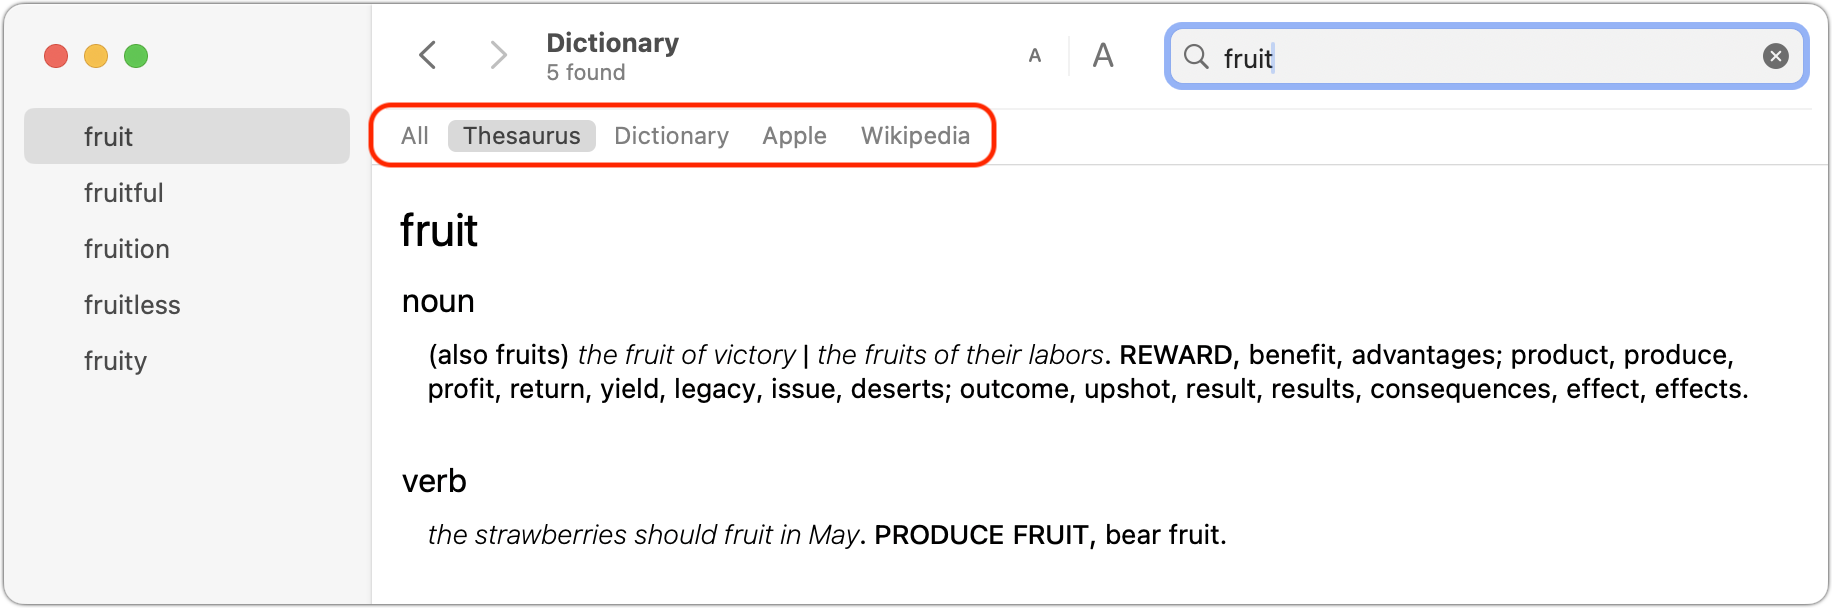
Notice the gray buttons below the toolbar, which represent the references Dictionary will consult for every search, including Wikipedia if your Mac has an Internet connection. In short, Dictionary gives you instant access to a dictionary, a thesaurus, and an encyclopedia containing over 6.8 million articles in English. Click a reference to limit your search to that source, or click All to scan all of them.
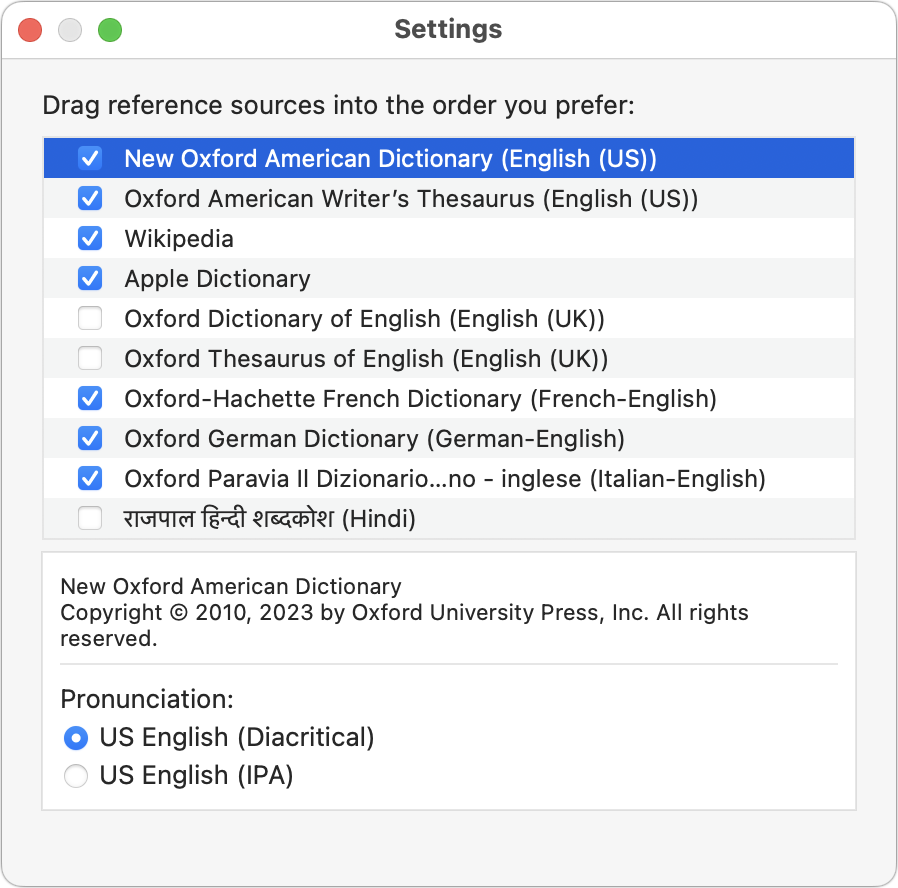
If you want to look up words in another language and get an English definition, Dictionary even provides translation dictionaries alongside a long list of other reference works. Choose Dictionary > Settings and select the ones you’d like to use. Then, drag the selected entries into the order you want them to appear below the toolbar.
Once you’re in a definition, note that you can copy formatted text for use in other apps—always helpful when wading into grammar and usage arguments on the Internet. More generally, you can click nearly any word in Dictionary’s main pane to look it up instantly. If dictionaries had been this much fun in school, we’d all have larger vocabularies! Use the Back and Forward arrow buttons to navigate among your recently looked-up words.
Alternative Lookup Methods
As helpful as the Dictionary app is, you probably don’t want to leave it open all the time. Happily, Apple has provided several shortcuts for looking up words:
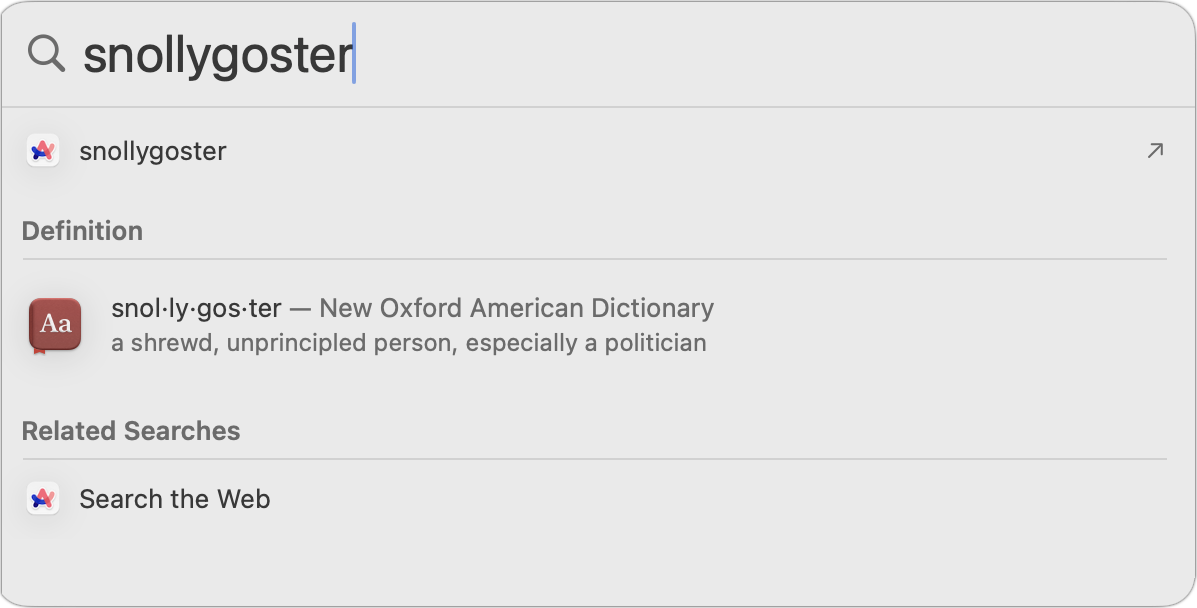
Spotlight: Press Command-Space to invoke Spotlight, and enter your search term. If you get too many unhelpful results from Spotlight, deselect unnecessary categories from System Settings > Siri & Spotlight.
Lookup: Even better, hover over a word or phrase with the pointer and press Command-Control-D—you can also Control-click the word and choose Look Up “word.” If the app supports it, macOS displays a popover with the definition. If you use a trackpad, you can also do a three-finger tap on the selected word—make sure the “Look up & data detectors” checkbox is selected in System Settings > Trackpad > Point & Click.
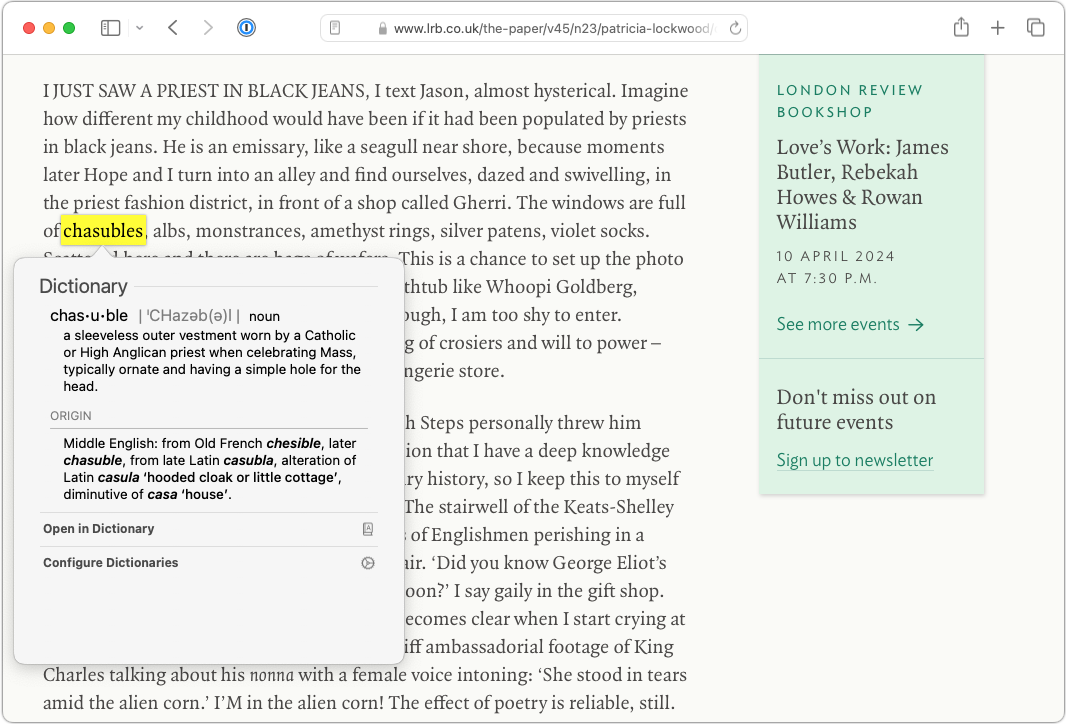
Now that you know how to take full advantage of the reference works Apple has built into macOS, it’s time to get in touch with your inner logophile—look it up.
(Featured image by iStock.com/Chinnapong)
For the Best Mac Webcam, Use Your iPhone
Many of us spend significant chunks of the workday on video calls, and the best way to improve your onscreen look is with a better webcam, which you can probably find in your pocket. Learn how to use your iPhone as your Mac’s webcam here.
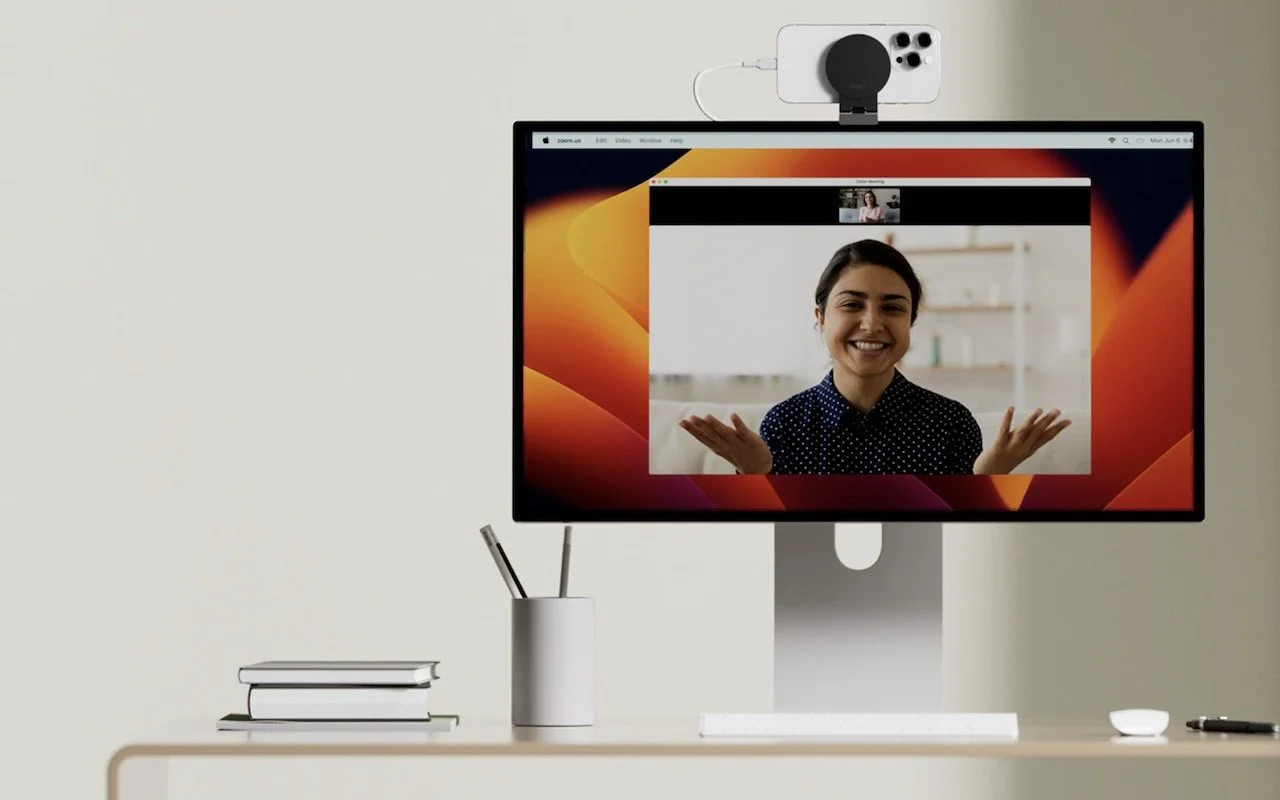
The near-ubiquity of videoconferencing is a lasting effect of the pandemic. The ease of gathering a group virtually usually more than makes up for the downsides. Despite that, many people still appear in video calls with low-resolution, poorly lit video that makes the call less effective.
A better webcam is an easy way to improve your video, and the best readily available webcam may already be in your pocket. That’s because you can use your iPhone and its high-quality cameras as a wired or wireless Mac webcam, thanks to Apple’s Continuity Camera technology.
Your Apple gear likely meets the Continuity Camera system requirements. You need an iPhone XR or later (all iPhones introduced in 2018 or later) running at least iOS 16 and a Mac running macOS 13 Ventura or later. Both must be signed in to the same Apple ID.
You’ll want a mount that holds your iPhone in landscape orientation (horizontally) at the top of your Mac’s screen, with its rear cameras facing you. The first such mounts for laptops and desktops came from Belkin, but numerous manufacturers now sell inexpensive alternatives that have different industrial designs and support iPhones that can’t use MagSafe. Continuity Camera can drain your battery, so it’s worth plugging in a charger cable or getting a screen mount that also holds a MagSafe charger; look on Etsy for options, such as this one.
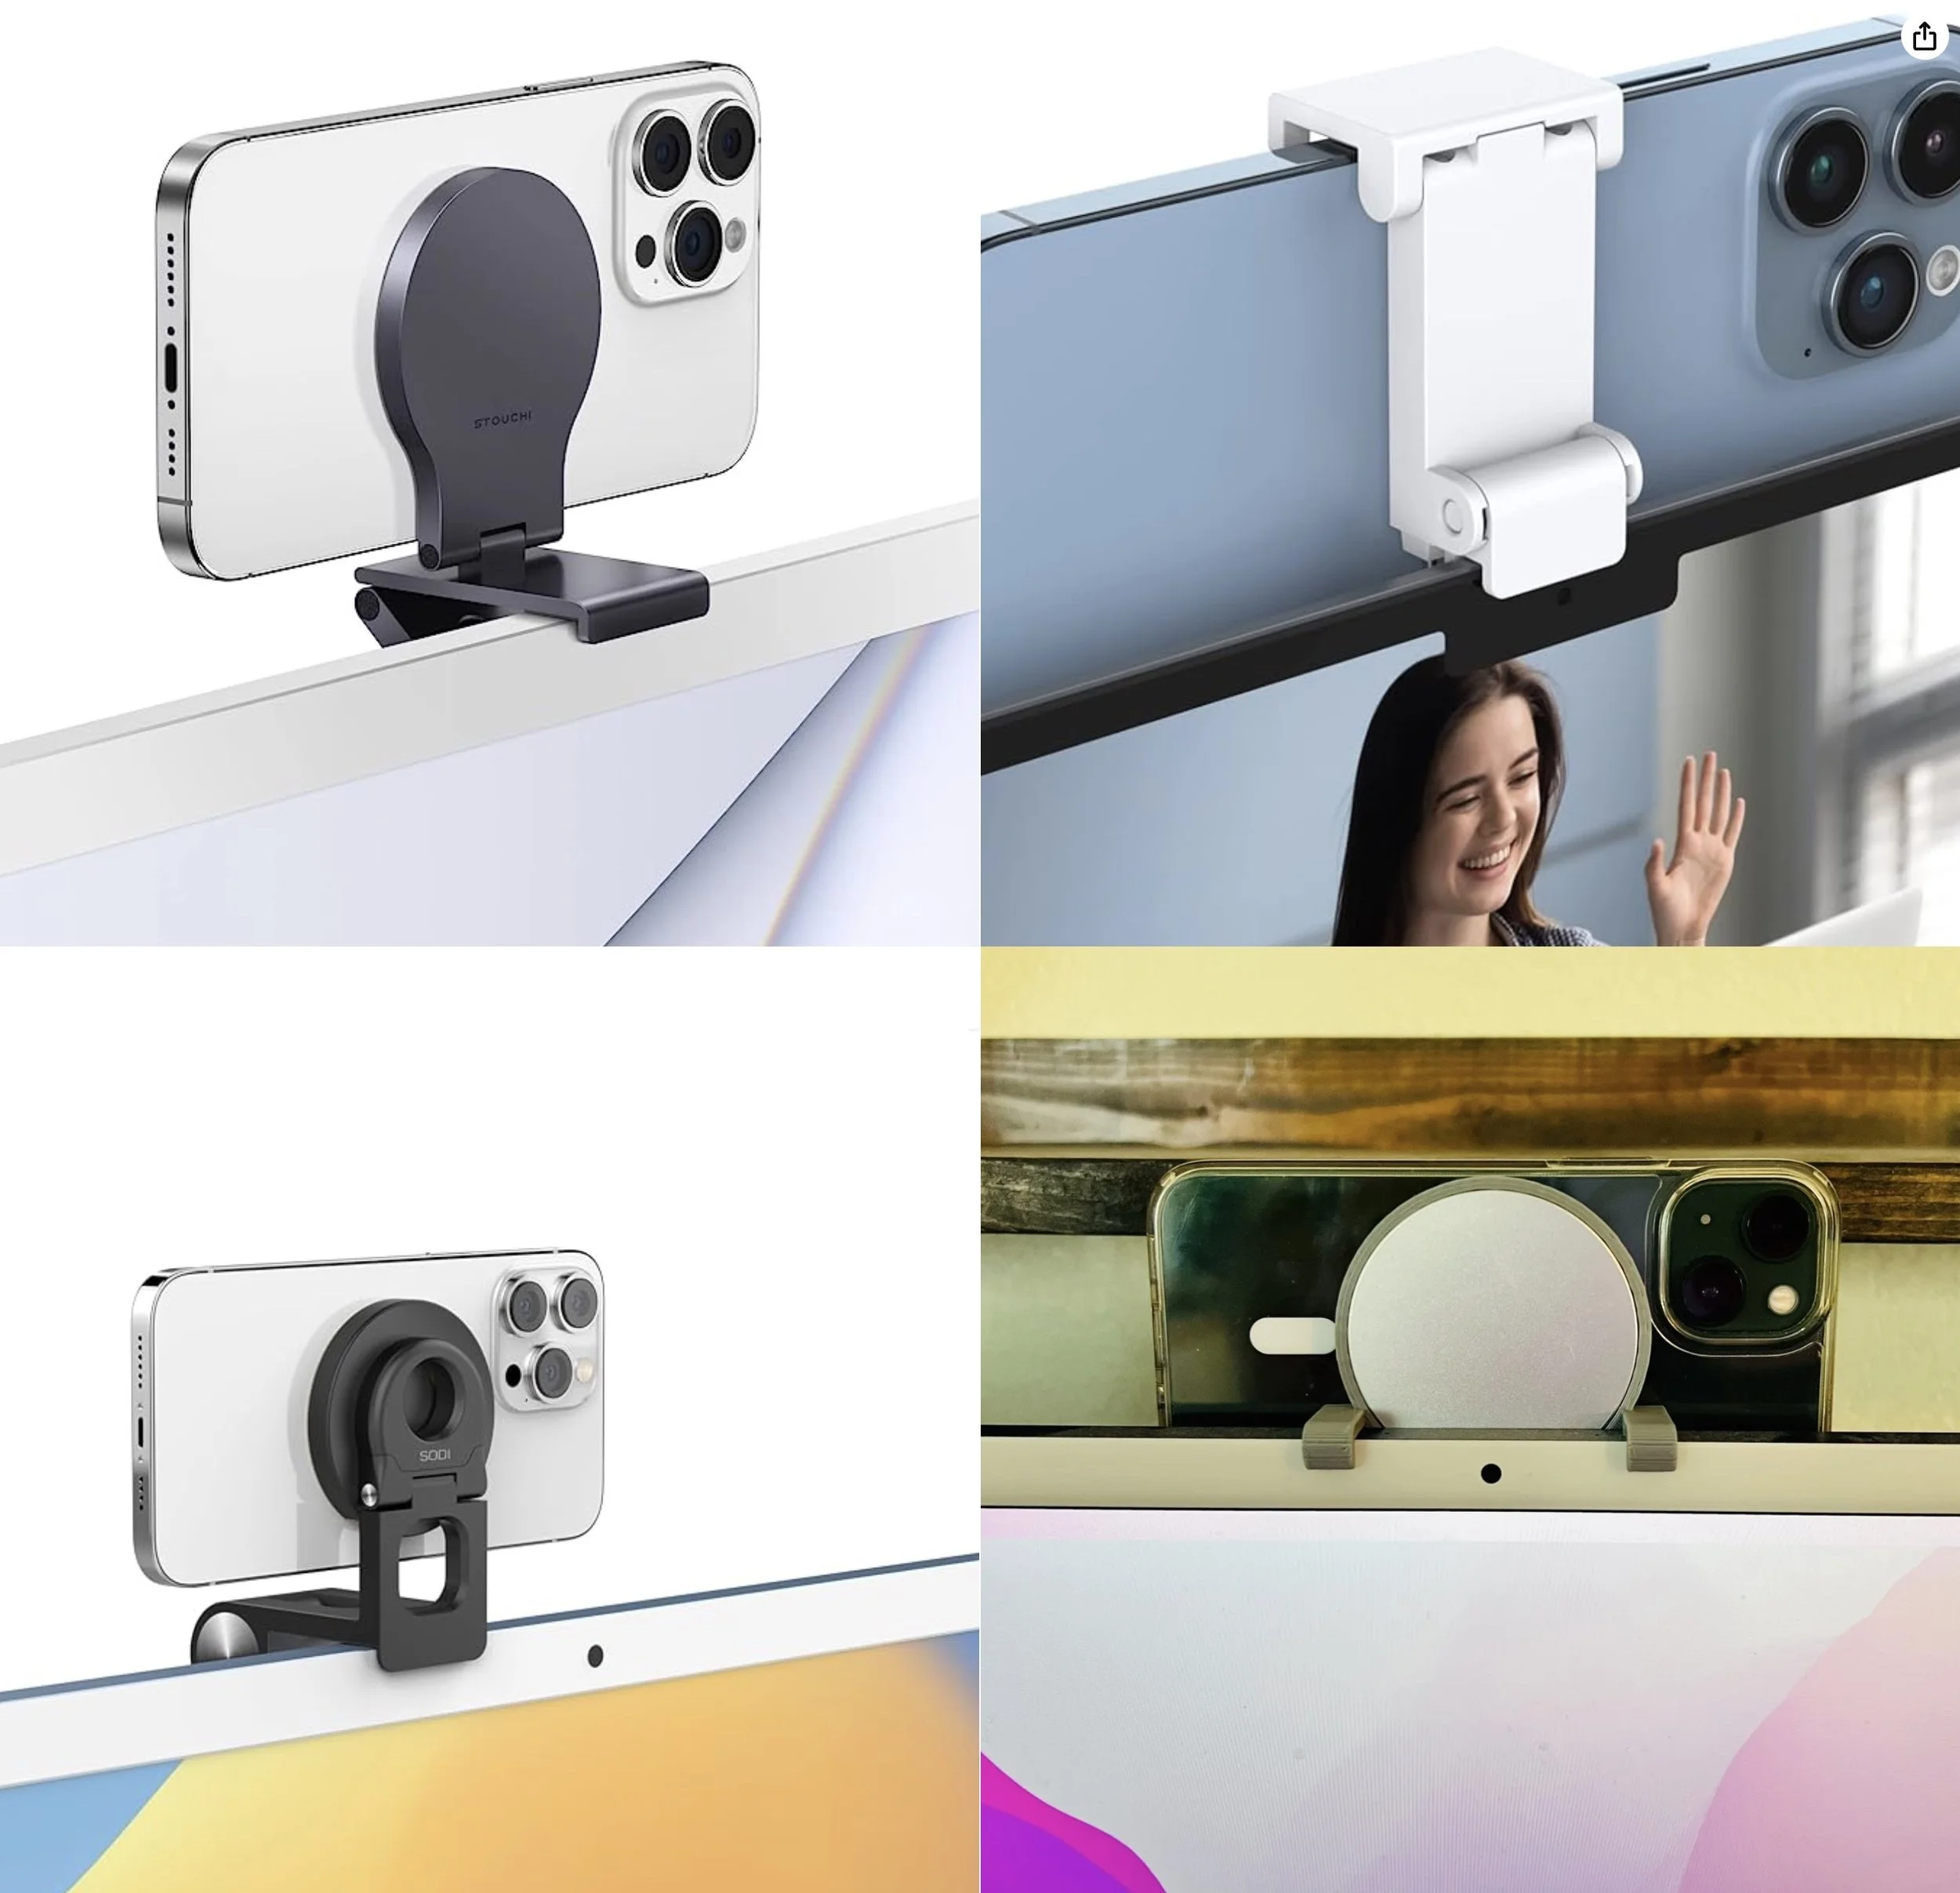
Although the samples above show the iPhone’s cameras in the upper-right corner, you can rotate the iPhone to position the cameras in the lower-left corner, which may put them more in line with your eyes and improve eye contact.
(Technically, you can put the iPhone anywhere—a tripod behind your screen would also work—and it doesn’t have to be in landscape orientation. However, apps detect the iPhone as a webcam automatically only when it’s in landscape orientation, and if it’s below or to the side of your screen, the video angle will likely be problematic. You can also take your iPhone off its mount and walk around with it as long as you stay in Bluetooth range of your Mac.)
When the iPhone is locked and in position, its camera and microphone become available to videoconferencing apps like FaceTime, Zoom, and Webex. Your app may start using the iPhone as a camera automatically, but if not, look for a menu or icon that lets you choose the desired camera. Similarly, you can use the iPhone’s mic as your audio input for the call, although the Mac’s built-in mic, AirPods, or other mic may offer equally good or better audio quality.
For the most part, the iPhone acts like a standard webcam. After you end the call, remove it from the mount to use it normally again. Should you need to check something on your iPhone during the call, you can remove it from the mount and either tap the Pause button or just unlock it—your video (and audio, if you’re using the iPhone as a mic too) will pause. To resume, lock and remount your iPhone. You may want to warn the other people on your call first in case something goes wrong and you get disconnected.
Receiving a phone call is a similar situation. Answering the call on the iPhone pauses the audio and video for the videoconference until you end the call, lock the iPhone, and mount it again. You may also be able to answer the call on the Mac, but that also pauses the audio and video, and you may need to choose the iPhone as your camera again afterward.
Ultimately, using your iPhone as a webcam is remarkably easy—Continuity Camera just works in our experience. The only tricky part is finding the screen mount and charger that work best with your Mac and usage patterns.
(Featured image by Belkin)
Changing Passwords Periodically Doesn’t Increase Security
Security experts no longer recommend password expiration policies that require users to change their passwords periodically. Here’s why.
Does your organization or some financial website require you to create a new password periodically? This practice was recommended long ago, but some organizations haven’t kept up with current recommendations that discourage such policies. If you’re bound by a password expiration policy, you can use this article to encourage your IT department or financial institution to update its approach to password security.
The rationale behind password expiration policies was that if an attacker were to steal a password database and decrypt some passwords, they would work for only a limited period, lessening the risk of unauthorized access. Even if an attacker gained access to an account, they could remain undetected only if they didn’t change the password, and that access wouldn’t last indefinitely.
Over time, security experts realized that the problem wasn’t so much how long an attacker could remain undetected but allowing users to set weak passwords that could be decrypted. It turns out that users often choose weaker passwords when they know they will have to change them, perhaps by tweaking a previous password for easier memorization. This fact hasn’t been lost on attackers, making it easier for them to figure out future passwords. In other words, attempting to increase security by requiring users to change passwords paradoxically reduces security.
The National Institute for Standards and Technology (NIST) is a US government agency that develops cybersecurity standards and best practices for the federal government that large corporations and other institutions tend to follow. In 2017, NIST changed its guidelines to say, “Verifiers SHOULD NOT require memorized secrets to be changed arbitrarily (e.g., periodically).” In a FAQ, NIST explains:
Users tend to choose weaker memorized secrets when they know that they will have to change them in the near future. When those changes do occur, they often select a secret that is similar to their old memorized secret by applying a set of common transformations such as increasing a number in the password. This practice provides a false sense of security if any of the previous secrets have been compromised since attackers can apply these same common transformations.
Of course, if there’s evidence of unauthorized access or a breach of the password database, all passwords should be invalidated and everyone should be required to create a new password immediately—that’s entirely different than requiring passwords to be changed on a schedule.
Interestingly, NIST also doesn’t recommend password composition requirements—such as requiring the password to contain a letter, number, and special character—because users tend to devise predictable techniques to meet such requirements, such as appending an exclamation point to every password. Instead, NIST encourages longer passwords because a long password that’s easily remembered and typed can be stronger than a shorter password composed of random characters. Password managers can generally create both types.
If you’re forced to change a website password periodically, it’s easiest to use a password manager to generate and enter a new strong password, and you won’t have to memorize the new password. For the very few passwords you must remember and type manually, aim for longer passwords that won’t trip up your fingers while typing or require numerous switches of iPhone uppercase and numeric keyboards. To aid memorization, perhaps consider choosing words for your password from categories with many possibilities. For instance, if your initial password is gouda-purple-1989-New-York, the next one could be cheddar-black-2011-Des-Moines. Both are strong in their own right, but only you would know the categories used for each portion.
(Featured image based on an original by iStock.com/designer491)