
When Should You Upgrade to macOS 27 Golden Gate, iOS 27, iPadOS 27, watchOS 27, tvOS 27, and visionOS 27?
Apple is gearing up to release macOS 27 Golden Gate, iOS 27, iPadOS 27, watchOS 27, tvOS 27, and visionOS 27. We briefly examine the features worth upgrading for and suggest when to upgrade each of your Apple devices.
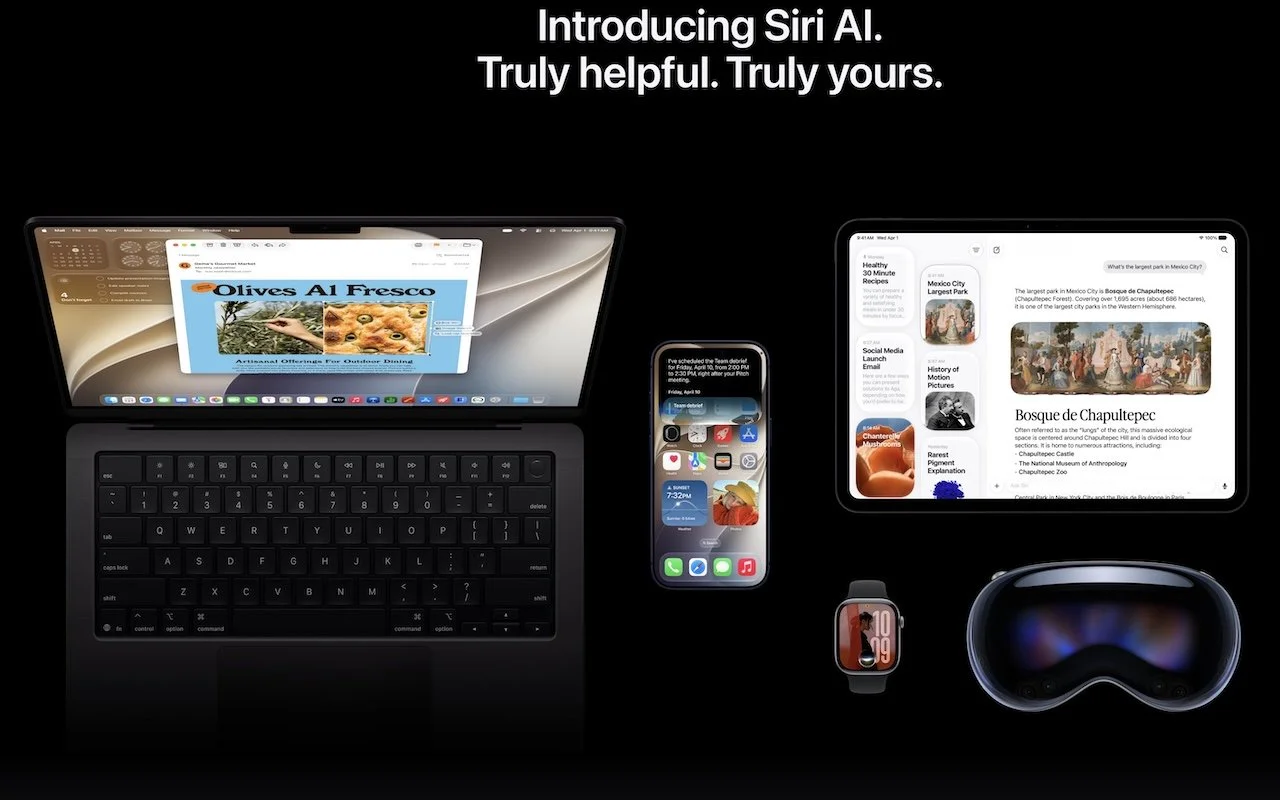
September has arrived, so Apple will soon release major upgrades for all its operating systems. iOS 27 and watchOS 27 will undoubtedly ship alongside new iPhone and Apple Watch models mid-month. iPadOS 27 will likely accompany iOS 27, as will tvOS 27 and visionOS 27. Although Apple has sometimes delayed the release of macOS until later in the year, we anticipate the company will release macOS 27 Golden Gate alongside its siblings, since the new Mac mini and Mac Studio models will ship with it.
Apple previewed these releases at its Worldwide Developers Conference in June, and many people have been testing the public betas since. Once Apple judges each operating system ready for public consumption, the question arises: when should you upgrade?
Note that we say when and not if. There’s no harm in delaying a major operating system upgrade until Apple has sanded off any rough edges that slipped through testing. But waiting too long puts you at risk from security vulnerabilities, increases compatibility annoyances, and prevents you from taking advantage of new features. Plus, when you buy a new Mac, iPhone, or iPad after these operating systems have shipped, you’ll automatically get the latest version, which could pose problems for your existing apps or compatibility with older hardware or workflows. It’s best to be prepared in case you have to replace a device unexpectedly.
Since we don’t know exactly when each operating system will appear, here’s our recommended upgrade order and how long we suggest waiting after each release. We’ve also shared a few new features that might encourage you to upgrade.
Remember, always make a backup before upgrading a Mac, iPhone, or iPad so you can revert if necessary.
iOS 27
It’s usually safe to upgrade iOS fairly quickly because Apple puts significant effort into ensuring that the new iOS version is a good experience for those who buy the just-released iPhones. However, because iPhones are so crucial to our everyday lives, it’s worth delaying iOS 27 upgrades for a week or so, in case there are unexpected bugs. After that, you can install it and enjoy the new features.
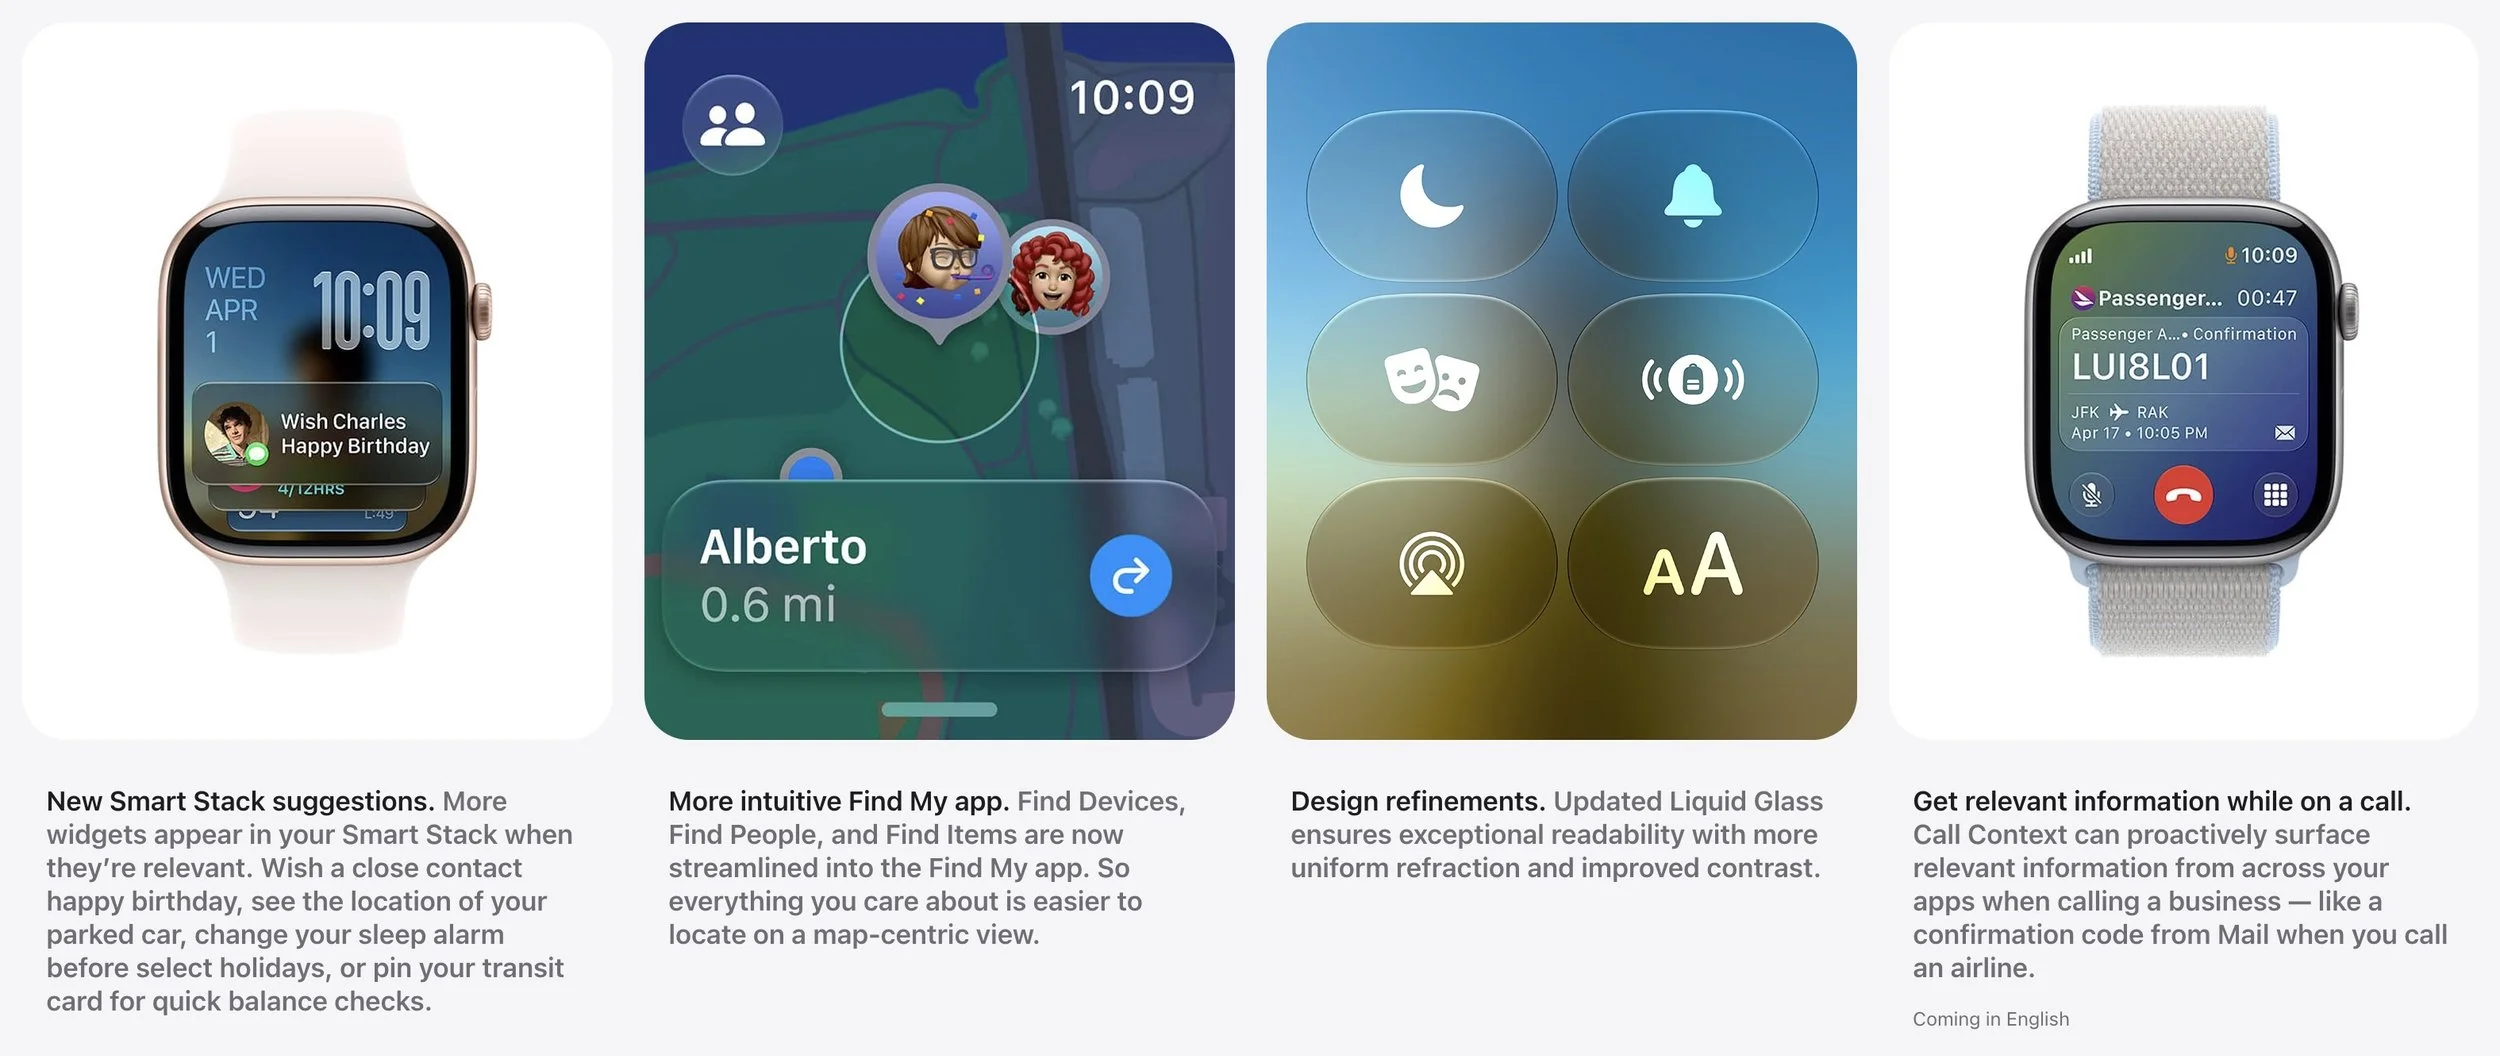
What can you look forward to? Apple says iOS 27 delivers broad improvements across the system, with performance improvements that should keep older devices feeling snappy. Liquid Glass—Apple’s translucent interface material introduced in iOS 26—gets design refinements for better readability and contrast, with a new slider to customize how tinted it appears. Network transitions are smoother, so you stay connected as you move between Wi-Fi networks and cellular service. Searching in Mail will more readily surface the most relevant results. Parents gain new child safety tools: Setup Assistant lets you choose which system apps kids can access, Ask to Browse requires parental approval for new websites, Communication Safety now blocks gore and violence in addition to nudity, and Time Allowances let you set limits across categories. Other additions include GymKit support for connecting to gym equipment, improved iCloud Shared Albums with easier access for Android and Windows users, perimenopause tracking in Health, and enhanced Flyover in Maps.
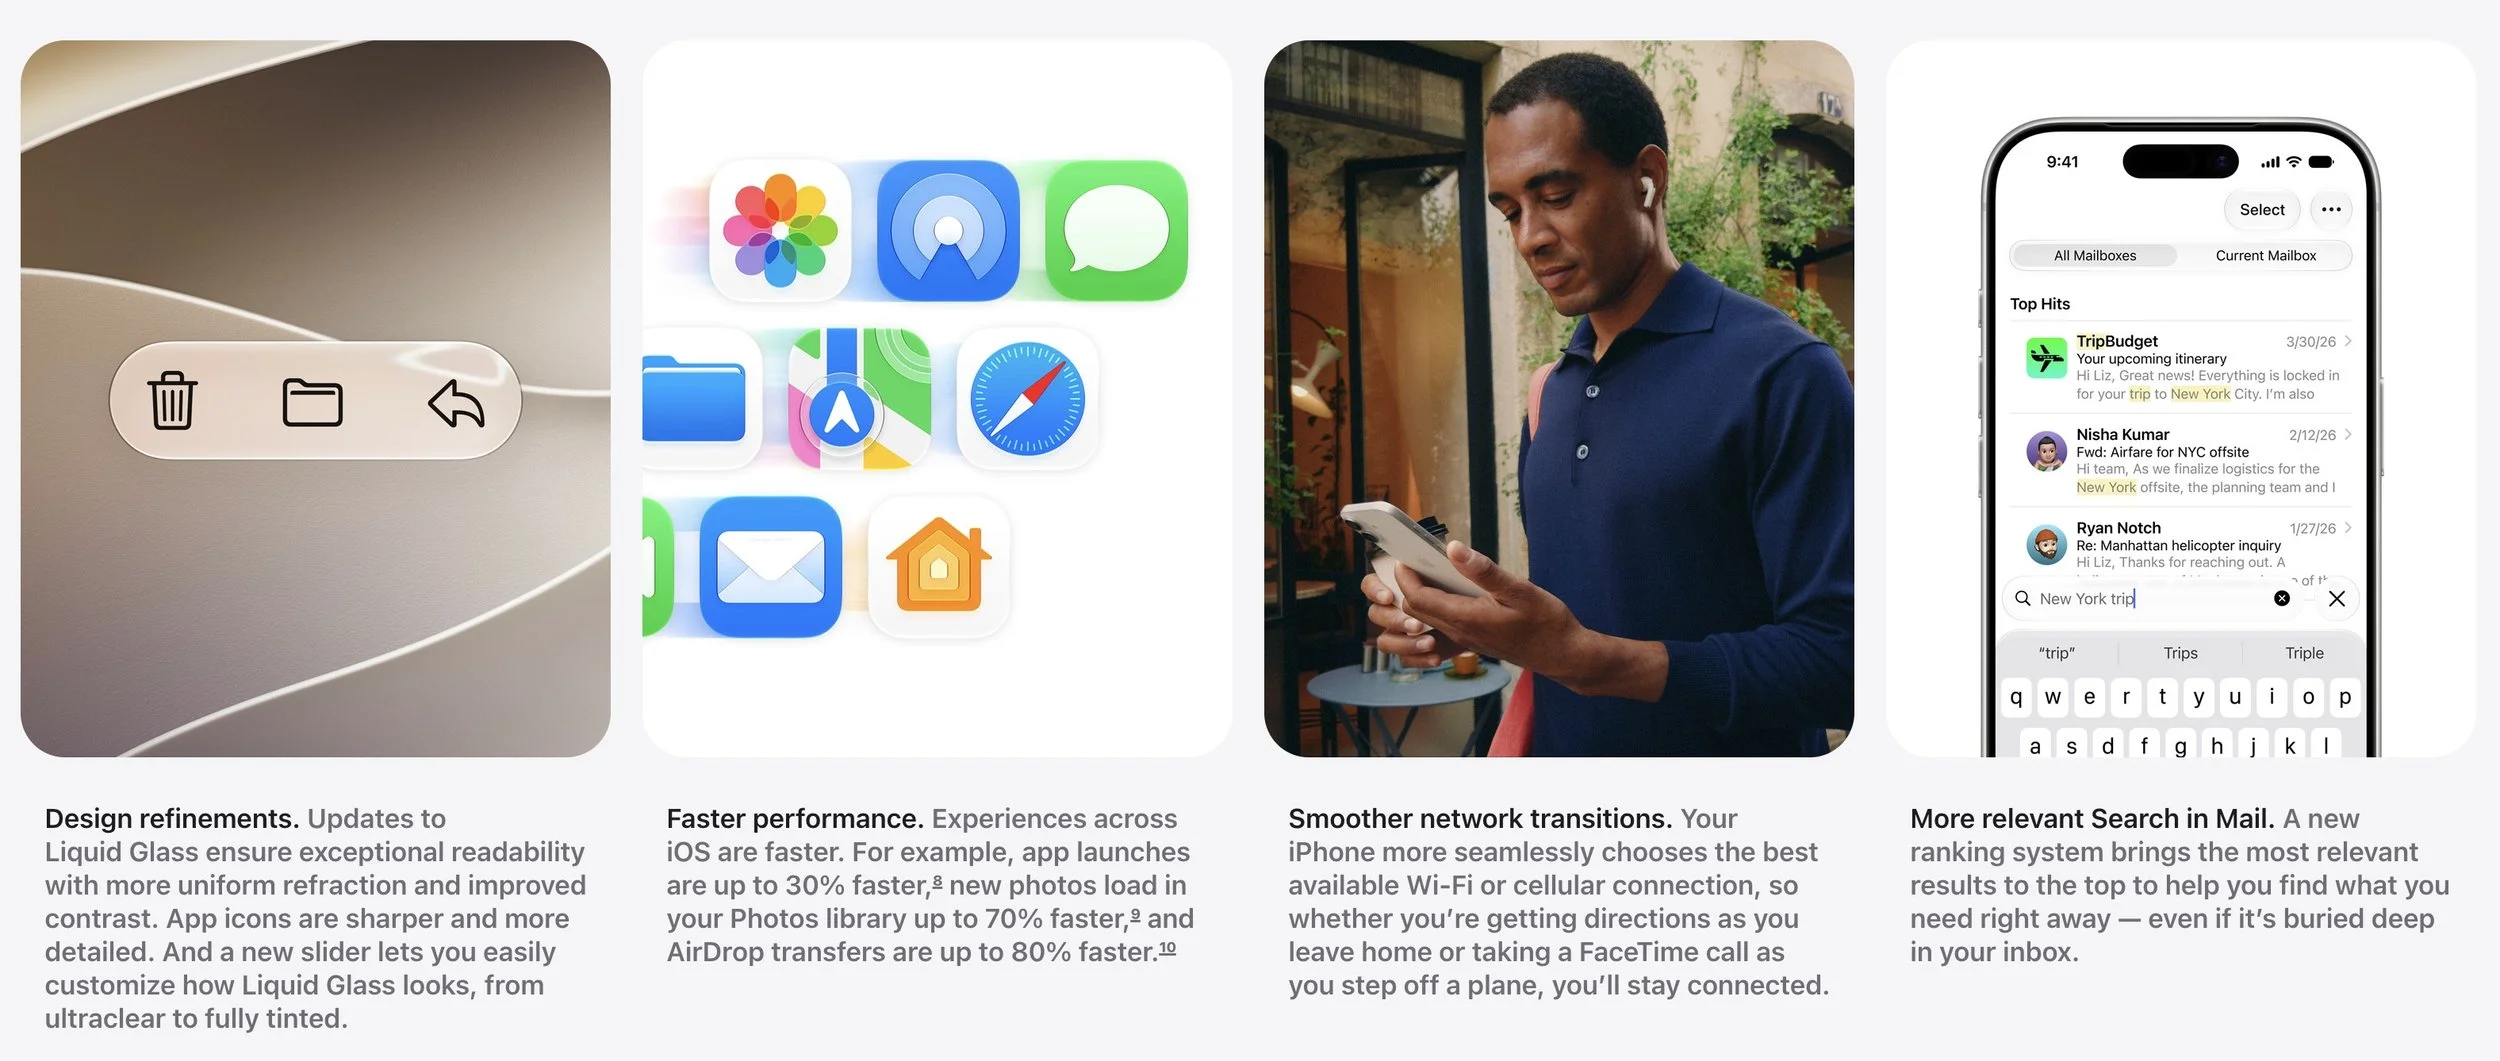
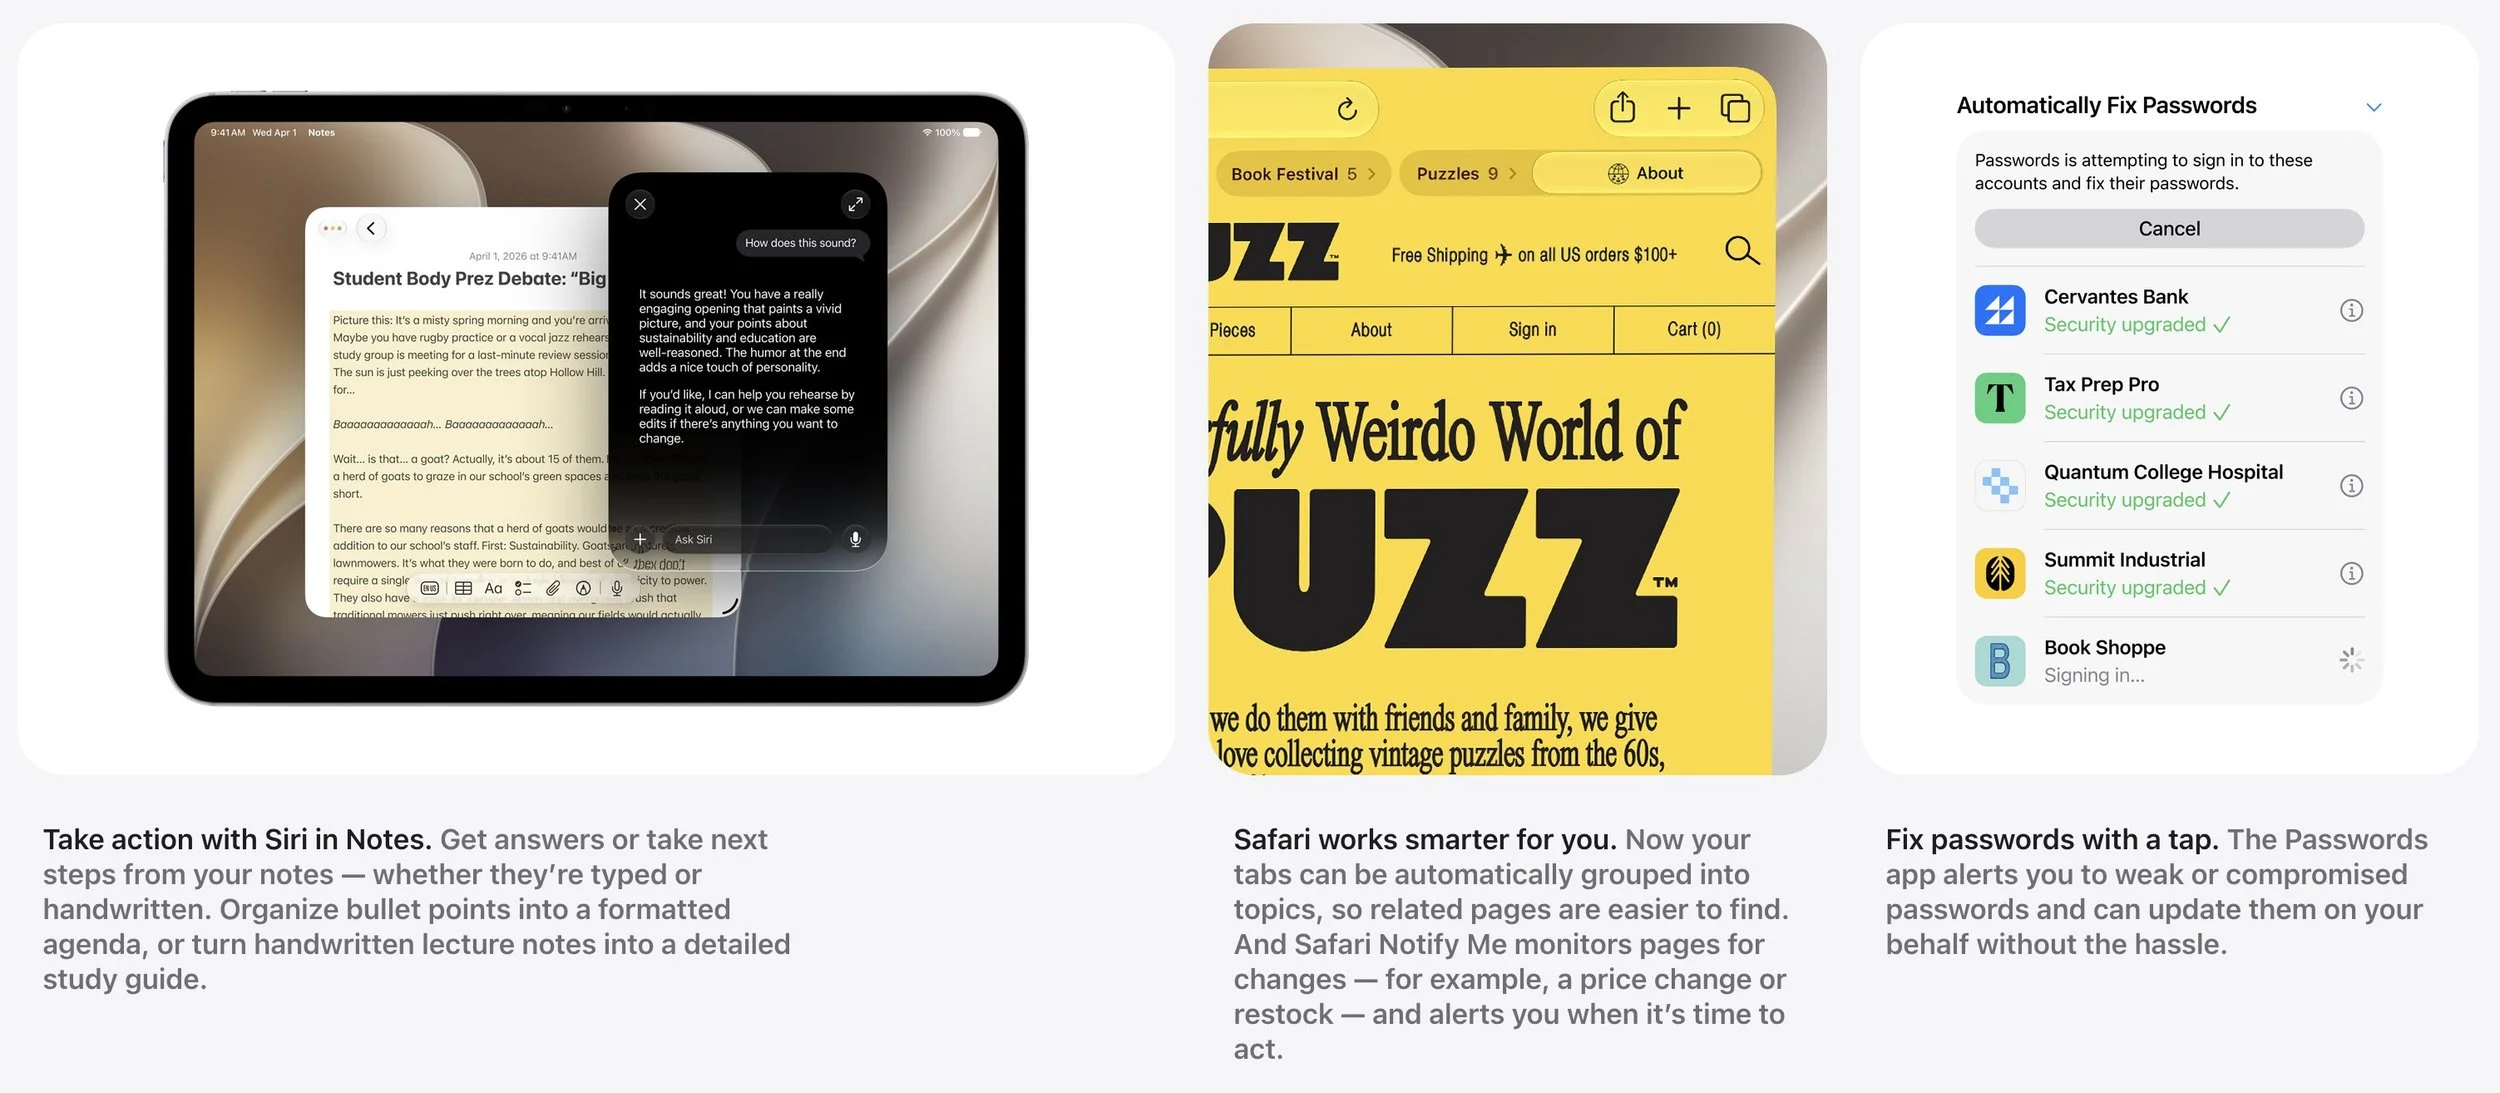
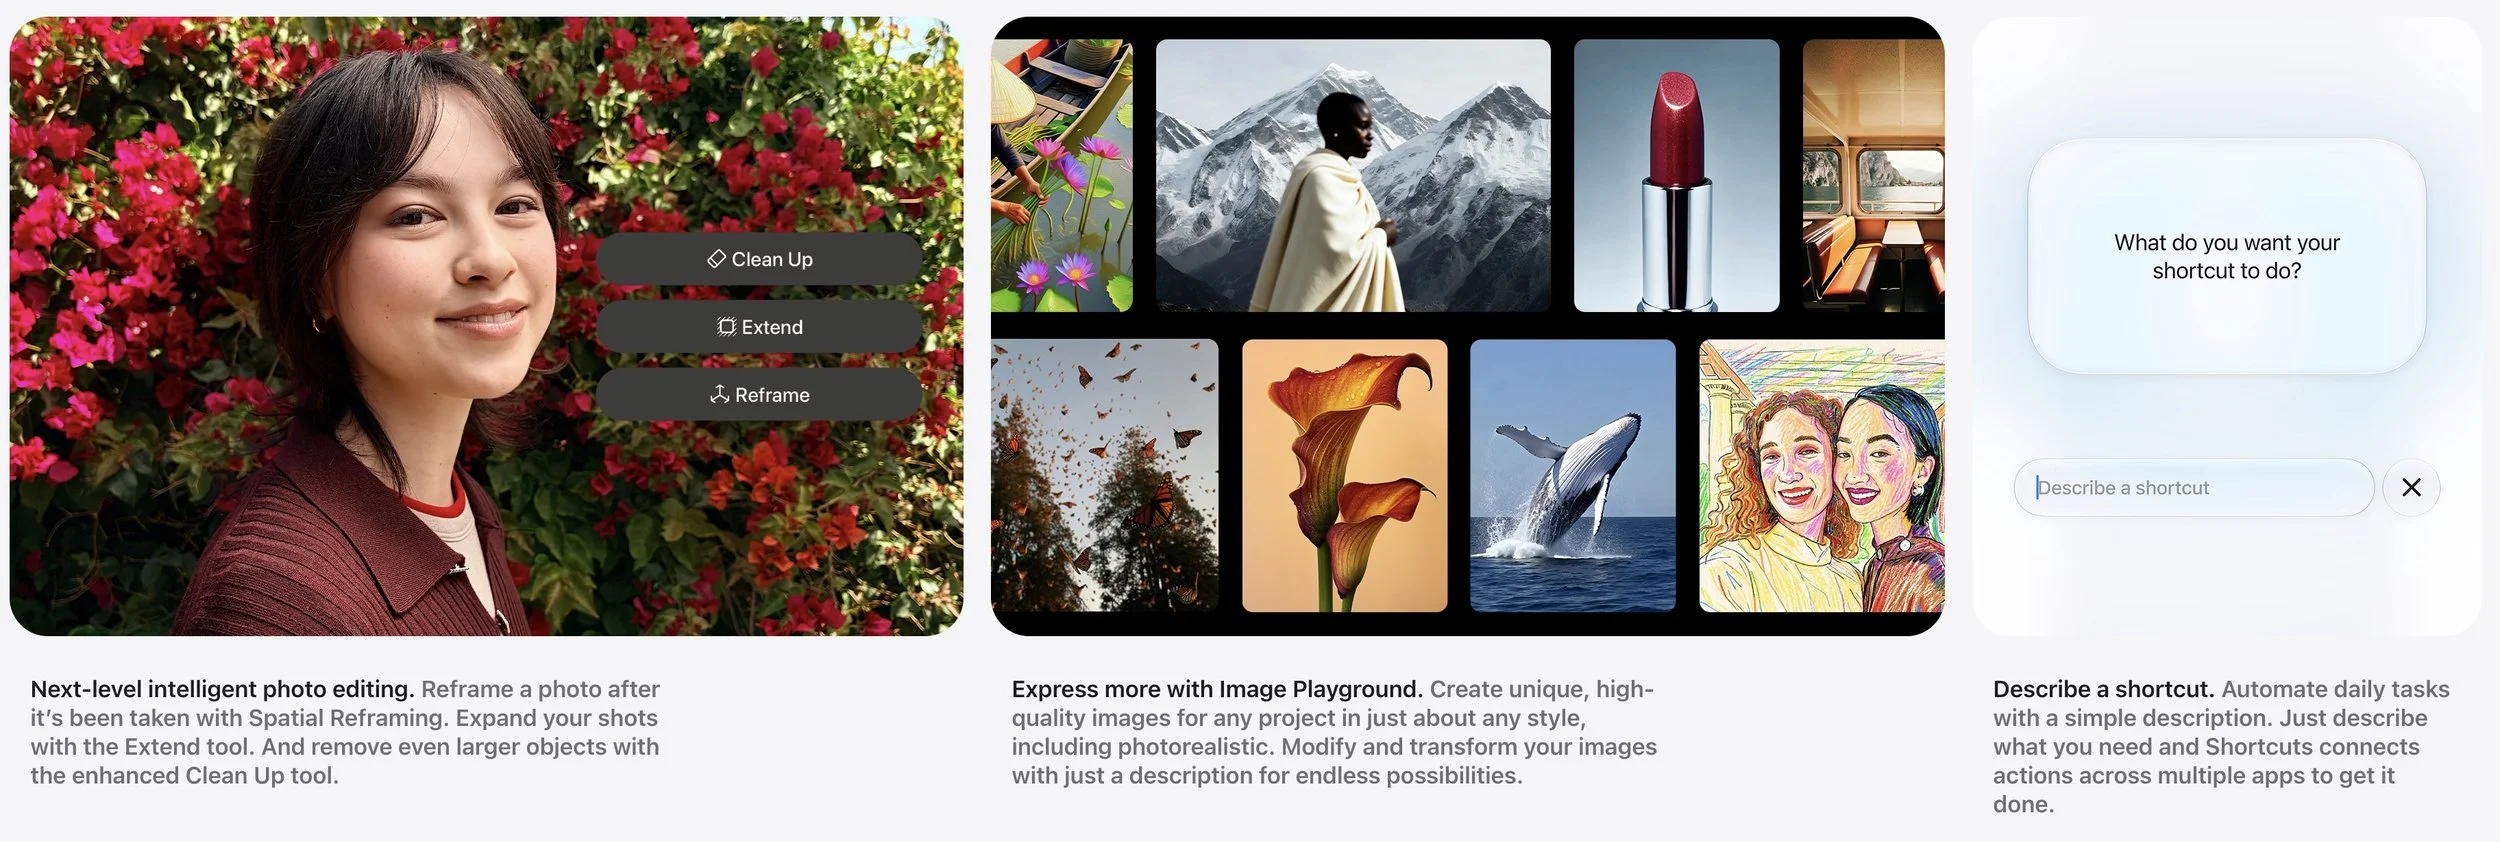
However, what Apple’s really focusing on is Siri AI and Apple Intelligence, which ship across the iPhone, iPad, Mac, Apple Watch, and Vision Pro. Apple has finally brought AI to Siri, making the virtual assistant far more capable and conversational, giving it insight into your personal context (calendar events, email, photos, notes, etc.), and letting it take actions across many more apps. With search capabilities, Siri AI can pull in world knowledge to answer nearly any topic, much like ChatGPT and Claude do now. A dedicated Siri app records your conversations and syncs them across devices. Write with Siri generates drafts or provides feedback anywhere you type. Siri mode in the Camera app brings Visual Intelligence to the viewfinder, letting you search and take action on what you see. Photos gains AI editing tools like Spatial Reframing, Extend, and an enhanced Clean Up. Safari automatically groups tabs by topic and gains Notify Me, which monitors pages for changes like price drops or restocks and alerts you when it’s time to act. Siri AI requires an iPhone 15 Pro or later; the broader iOS 27 features work on devices back to the iPhone 11 and second-generation iPhone SE.
watchOS 27
Once you upgrade your iPhone to iOS 27, there’s no reason to delay upgrading your Apple Watch to watchOS 27. Few changes other than the new app grid are likely to require notable adjustments to your usage patterns, and some may be quite welcome.
Siri AI is the most notable new feature in watchOS 27 because it brings conversational AI to your wrist. However, it may encourage new Apple Watch purchases—our experience with the beta is that it’s slow on the Apple Watch Series 9, which is the oldest model watchOS 26 supports.
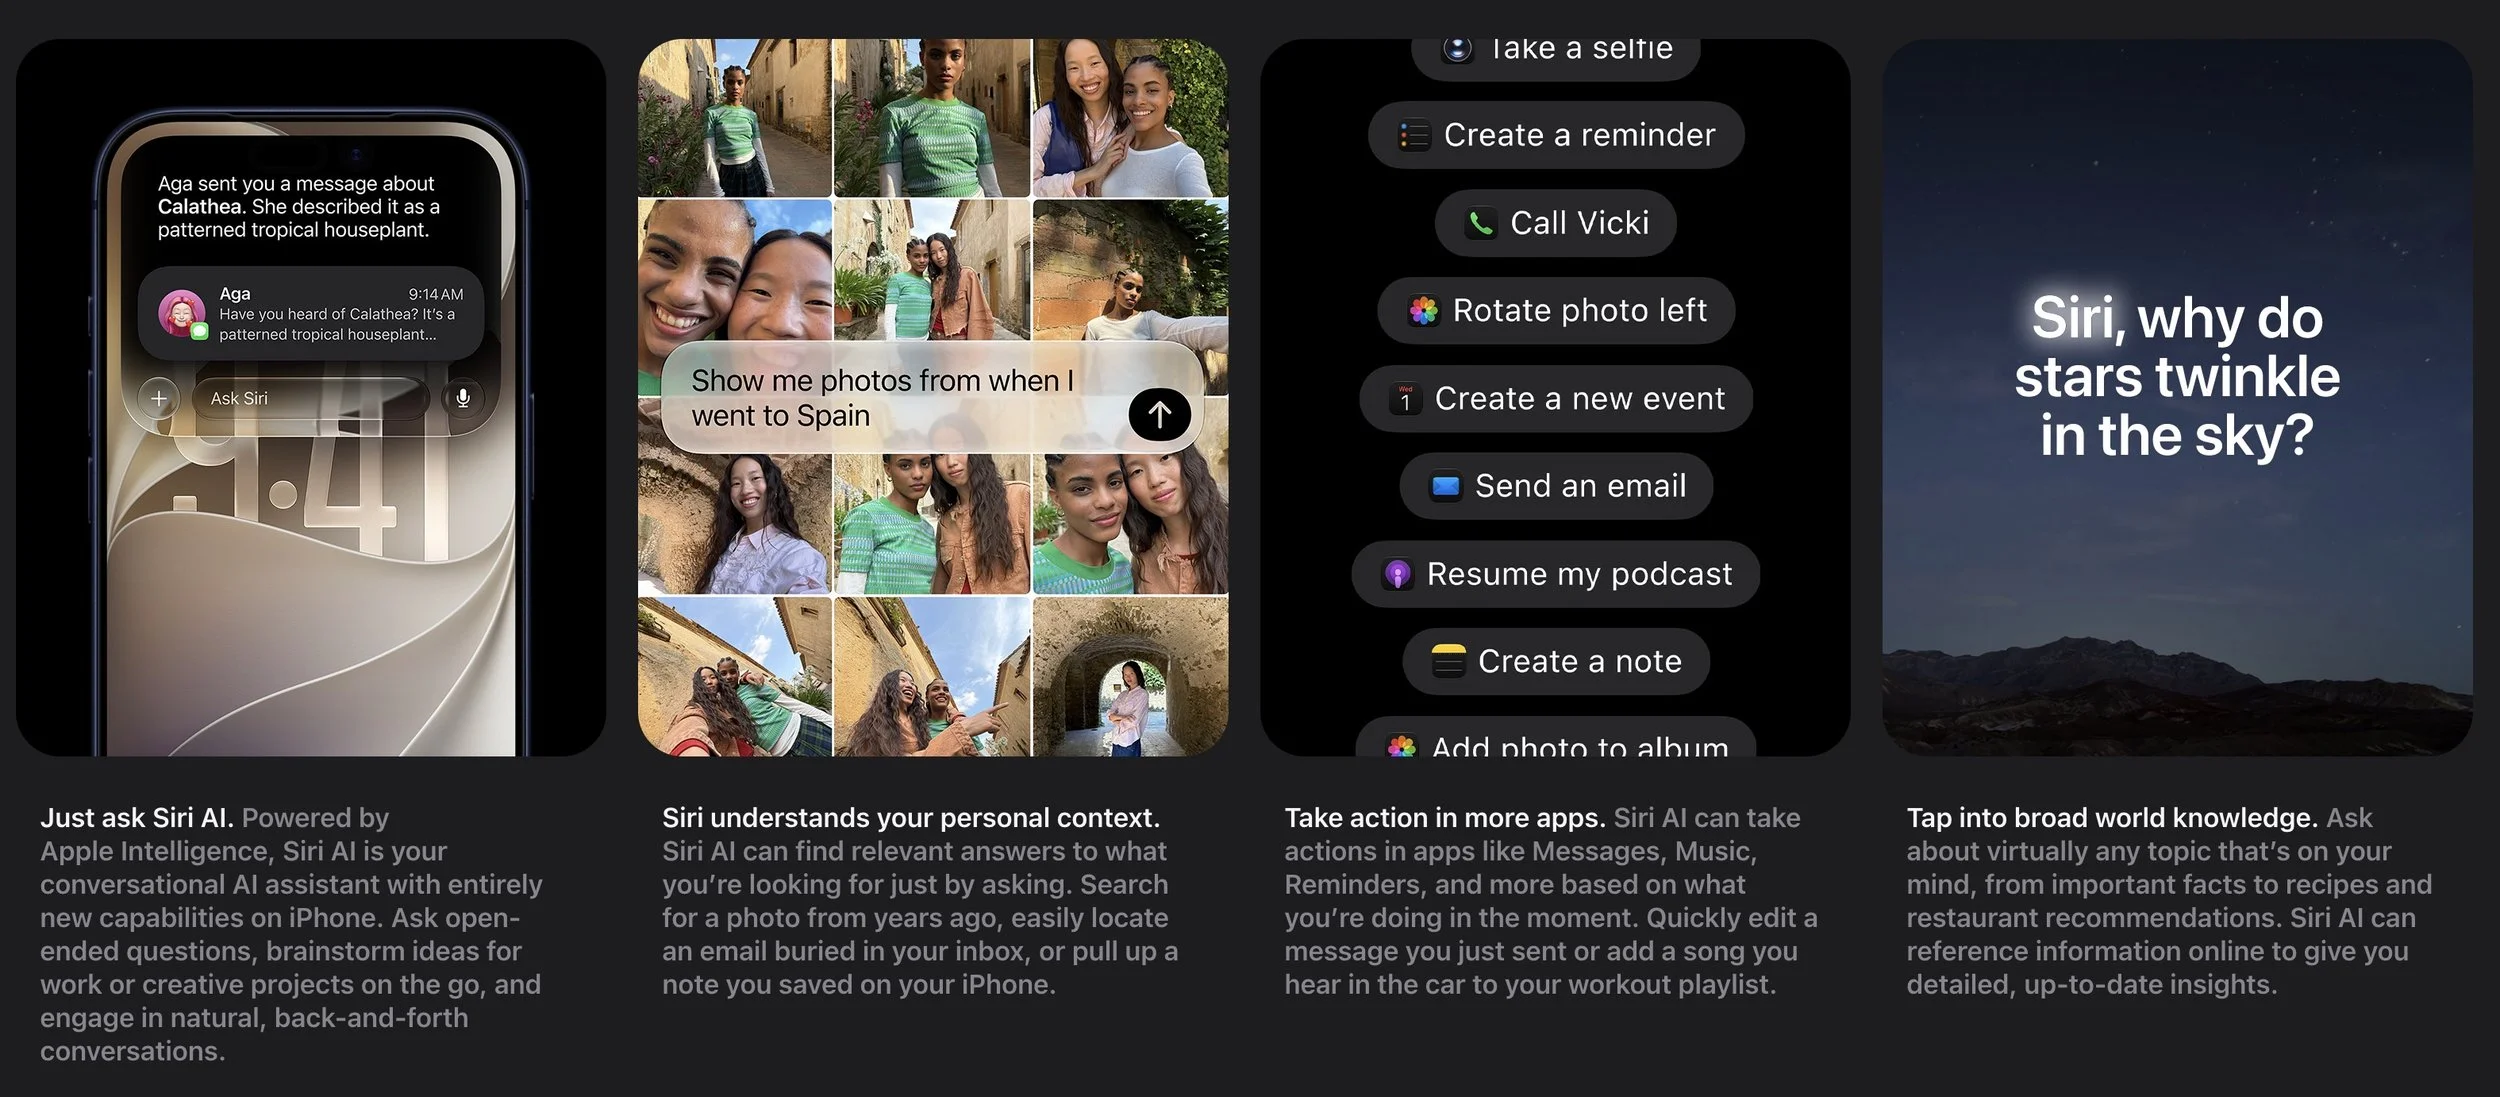
Beyond Siri AI, a new dynamic app grid highlights suggested apps (most recent and most popular) with the Siri app in the center. Workout Buddy now delivers personalized motivation with new insights into your pace, distance, and duration—and works without your iPhone nearby. A new thumb-and-forefinger tap gesture lets you select Smart Stack widgets with one hand, and the Smart Stack itself surfaces more relevant widgets, such as birthday reminders and your parked car’s location. Cycle Tracking gains perimenopause and menopause support with symptom logging and educational resources. Design refinements improve Liquid Glass readability, and a new Call Context feature surfaces relevant information when you call businesses. For Siri AI, your watch must be paired with an iPhone 15 Pro or later.
iPadOS 27
Our general advice is that it’s OK to install iPadOS 27 shortly after it ships. iPadOS is largely a superset of iOS, so if you’re comfortable upgrading to iOS 27, that comfort should carry over to iPadOS 27 as well. The main caveat is if you rely heavily on a particular app, you should check with the developer to ensure it’s compatible before upgrading.
Beyond the iOS 27 features that aren’t specific to the iPhone, iPadOS 27 offers a few unique improvements. It brings Visual Intelligence to the iPad screen—tap an item with your finger or circle it with the Apple Pencil to learn more about it or take action on it. Siri AI now works with handwritten Notes, letting you turn handwritten lecture notes into a study guide. And file transfers to external drives are up to 5x faster.
tvOS 27
Regardless of when Apple releases tvOS 27, it’s safe to update within a week or two of release, depending on how much you depend on your Apple TV. Note that tvOS drops support for the Apple TV HD and first-generation Apple TV 4K, though if you have one of those and it meets your needs, don’t bother replacing it just for tvOS 27. Besides, rumors suggest a new Apple TV model with a Siri AI-capable chip may be on the horizon—the new virtual assistant is otherwise notably absent.
tvOS 27 brings a few modest refinements to the Apple TV experience. Apple redesigned the Podcasts app for improved browsing and playback. If you listen to music on your Apple TV, you might appreciate the new support for Hi-Res Lossless audio playback up to 24-bit/192kHz through Apple Music. Apple promises smoother app launches and animations throughout, faster AirPlay connectivity, and a more responsive Control Center. A new Smart Downloads feature helps manage content automatically. For accessibility, a new Larger Text option in Settings scales text size across the entire tvOS interface. Auto-transcription support in English will provide subtitles where they don’t already exist, and tvOS 27 has expanded support for Made for iPhone hearing aids.
If nothing in that list encourages you to upgrade as soon as tvOS 27 ships, let your Apple TV upgrade itself whenever it gets around to it, assuming you have automatic updates turned on in Settings > System > Software Updates.
visionOS 27
Since the Vision Pro hasn’t seen widespread adoption, most users can upgrade to visionOS 27 shortly after it comes out—it works on all Vision Pro units. Those with mobility issues or disabilities that make the Vision Pro an essential aspect of everyday life should probably wait until early adopters have given the upgrade a thumbs up.
Siri AI is, of course, available in visionOS 27, and Visual Intelligence on the Vision Pro lets you ask Siri about anything by looking at it. You can now turn panoramic photos into spatial scenes and use them as custom Environments—joining the new Thórsmörk Environment featuring an Icelandic aurora. New curved windows in Safari, Freeform, and other apps wrap around you for a more comfortable view. Spatial previewing lets you bring 3D models from your Mac into your space to preview and edit them in real time. System improvements include a redesigned Control Center, notifications you can expand just by looking at them, and Wi-Fi that connects up to three times faster. Accessibility gains include an updated Dwell Control that lets you confirm selections by glancing at a marker instead of waiting for a timer.

macOS 27 Golden Gate
For most of us, the trickiest upgrade decision is when to install macOS 27 Golden Gate. For those still using Intel-based Macs, the decision is easy: never, since Golden Gate runs only on Macs with Apple silicon. But even for people whose Macs have M-series chips and whose mission-critical apps are likely newer, it’s worth upgrading cautiously. The problem is that new macOS features are seldom more compelling than keeping your Mac working the way it is now. Happily, Golden Gate still includes the full Rosetta 2 translation environment that powers Intel-based apps on Apple silicon, but that support will dwindle in the future.
What capabilities does macOS 27 Golden Gate promise? Once again, Apple is pushing Siri AI the hardest, with the dedicated Siri app syncing your conversations across devices and Visual Intelligence letting you ask Siri about anything on your screen by taking a screenshot. The rest of the Apple Intelligence improvements from iOS and iPadOS also appear in macOS, as do the new Child Safety features.
Users will appreciate Golden Gate’s refinements to Liquid Glass, which was more controversial on the Mac than on the iPhone. Along with the new transparency slider, macOS will feature a uniform toolbar across the top of apps, sidebars will extend to the edges of windows, and colored icons will return to sidebars. Apple is also promising performance improvements, better Spotlight search suggestions, improved support for ultrawide external displays, app resizing in iPhone mirroring, natural language event creation in Calendar, and updated video podcast playback.
We always encourage caution when upgrading to a new version of macOS. Wait at least a month or two before upgrading your primary Mac to Golden Gate, especially if you rely on older Mac apps. Even once you’re confident your apps will work adequately, workflow or intra-office compatibility concerns may arise if some people upgrade and others don’t.
In short, please don’t upgrade to Golden Gate without checking with us first. With luck, the bug fixes and app updates needed to give you the green light will appear by the end-of-year break, which provides welcome downtime to install and explore the new features.
(Featured image by Apple)
Apple Announces iPhone 18 Pro, iPhone Duo, Apple Watch Series 12 and Ultra 4, and AirPods 5
Apple has introduced the iPhone 18 Pro with a variable-aperture camera, the foldable iPhone Duo, Apple Watch Series 12 and Ultra 4 with advanced health sensing, and AirPods 5 with noise cancellation. Here’s what’s new and whether you should upgrade.
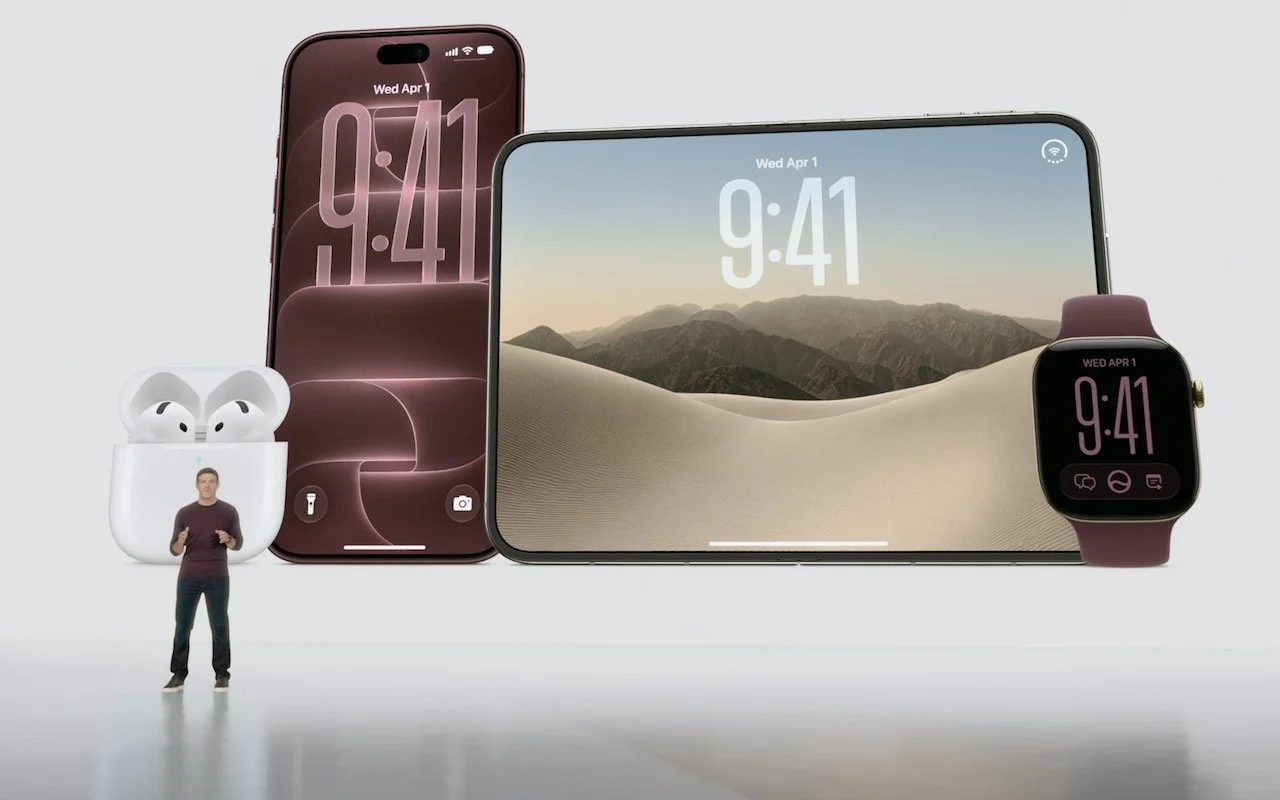
Apple’s annual September event delivered more than the usual annual iPhone and Apple Watch updates. Alongside the iPhone 18 Pro and iPhone 18 Pro Max, new Apple CEO John Ternus led the unveiling of the iPhone Duo—Apple’s first foldable iPhone—the Apple Watch Series 12 and Ultra 4 with new health-sensing and listening capabilities, and the AirPods 5 with Active Noise Cancellation available in both models.
After the event, Apple confirmed that iOS 27, watchOS 27, macOS 27 Golden Gate, iPadOS 27, tvOS 27, and visionOS 27 will ship on September 14. As always, we recommend waiting a week or two before upgrading essential devices and holding off on Golden Gate for a few months until you’re confident your necessary Mac apps are compatible. Always make a backup before upgrading.
Let’s examine the new products.
iPhone 18 Pro and iPhone 18 Pro Max
The iPhone 18 Pro and iPhone 18 Pro Max boast improvements to the camera system, performance, and battery life. Apple did not announce a plain iPhone 18—rumors suggest it will arrive in early 2027.
The headline feature is the new 48-megapixel Fusion Main camera with a variable aperture. For the first time on the iPhone, the camera offers four aperture settings: ƒ/1.48, ƒ/1.8, ƒ/2.8, and ƒ/4.0. The Camera app automatically adjusts the aperture based on lighting conditions, but photographers can also take manual control through new Pro controls. The wider ƒ/1.48 maximum aperture should improve low-light performance and provide shallower depth of field for better bokeh. The Ultra Wide and Telephoto cameras remain unchanged from the iPhone 17 Pro.
Performance should be noticeably better. The A20 Pro chip delivers up to 20% faster CPU performance and 40% faster GPU performance compared to last year’s A19 Pro. The chip also features a Dual 16-core Neural Engine with double the AI processing power.
Apple redesigned the Dynamic Island—where the Face ID sensor lives—to be smaller while displaying more information, now showing up to three Live Activities simultaneously.
Battery life is also better. In Apple’s new “typical use” battery metric, the iPhone 18 Pro offers up to 24 hours, while the Pro Max delivers up to 30 hours. Fast charging has improved as well—the iPhone 18 Pro can add 50% in just 15 minutes with a 60W or higher adapter.
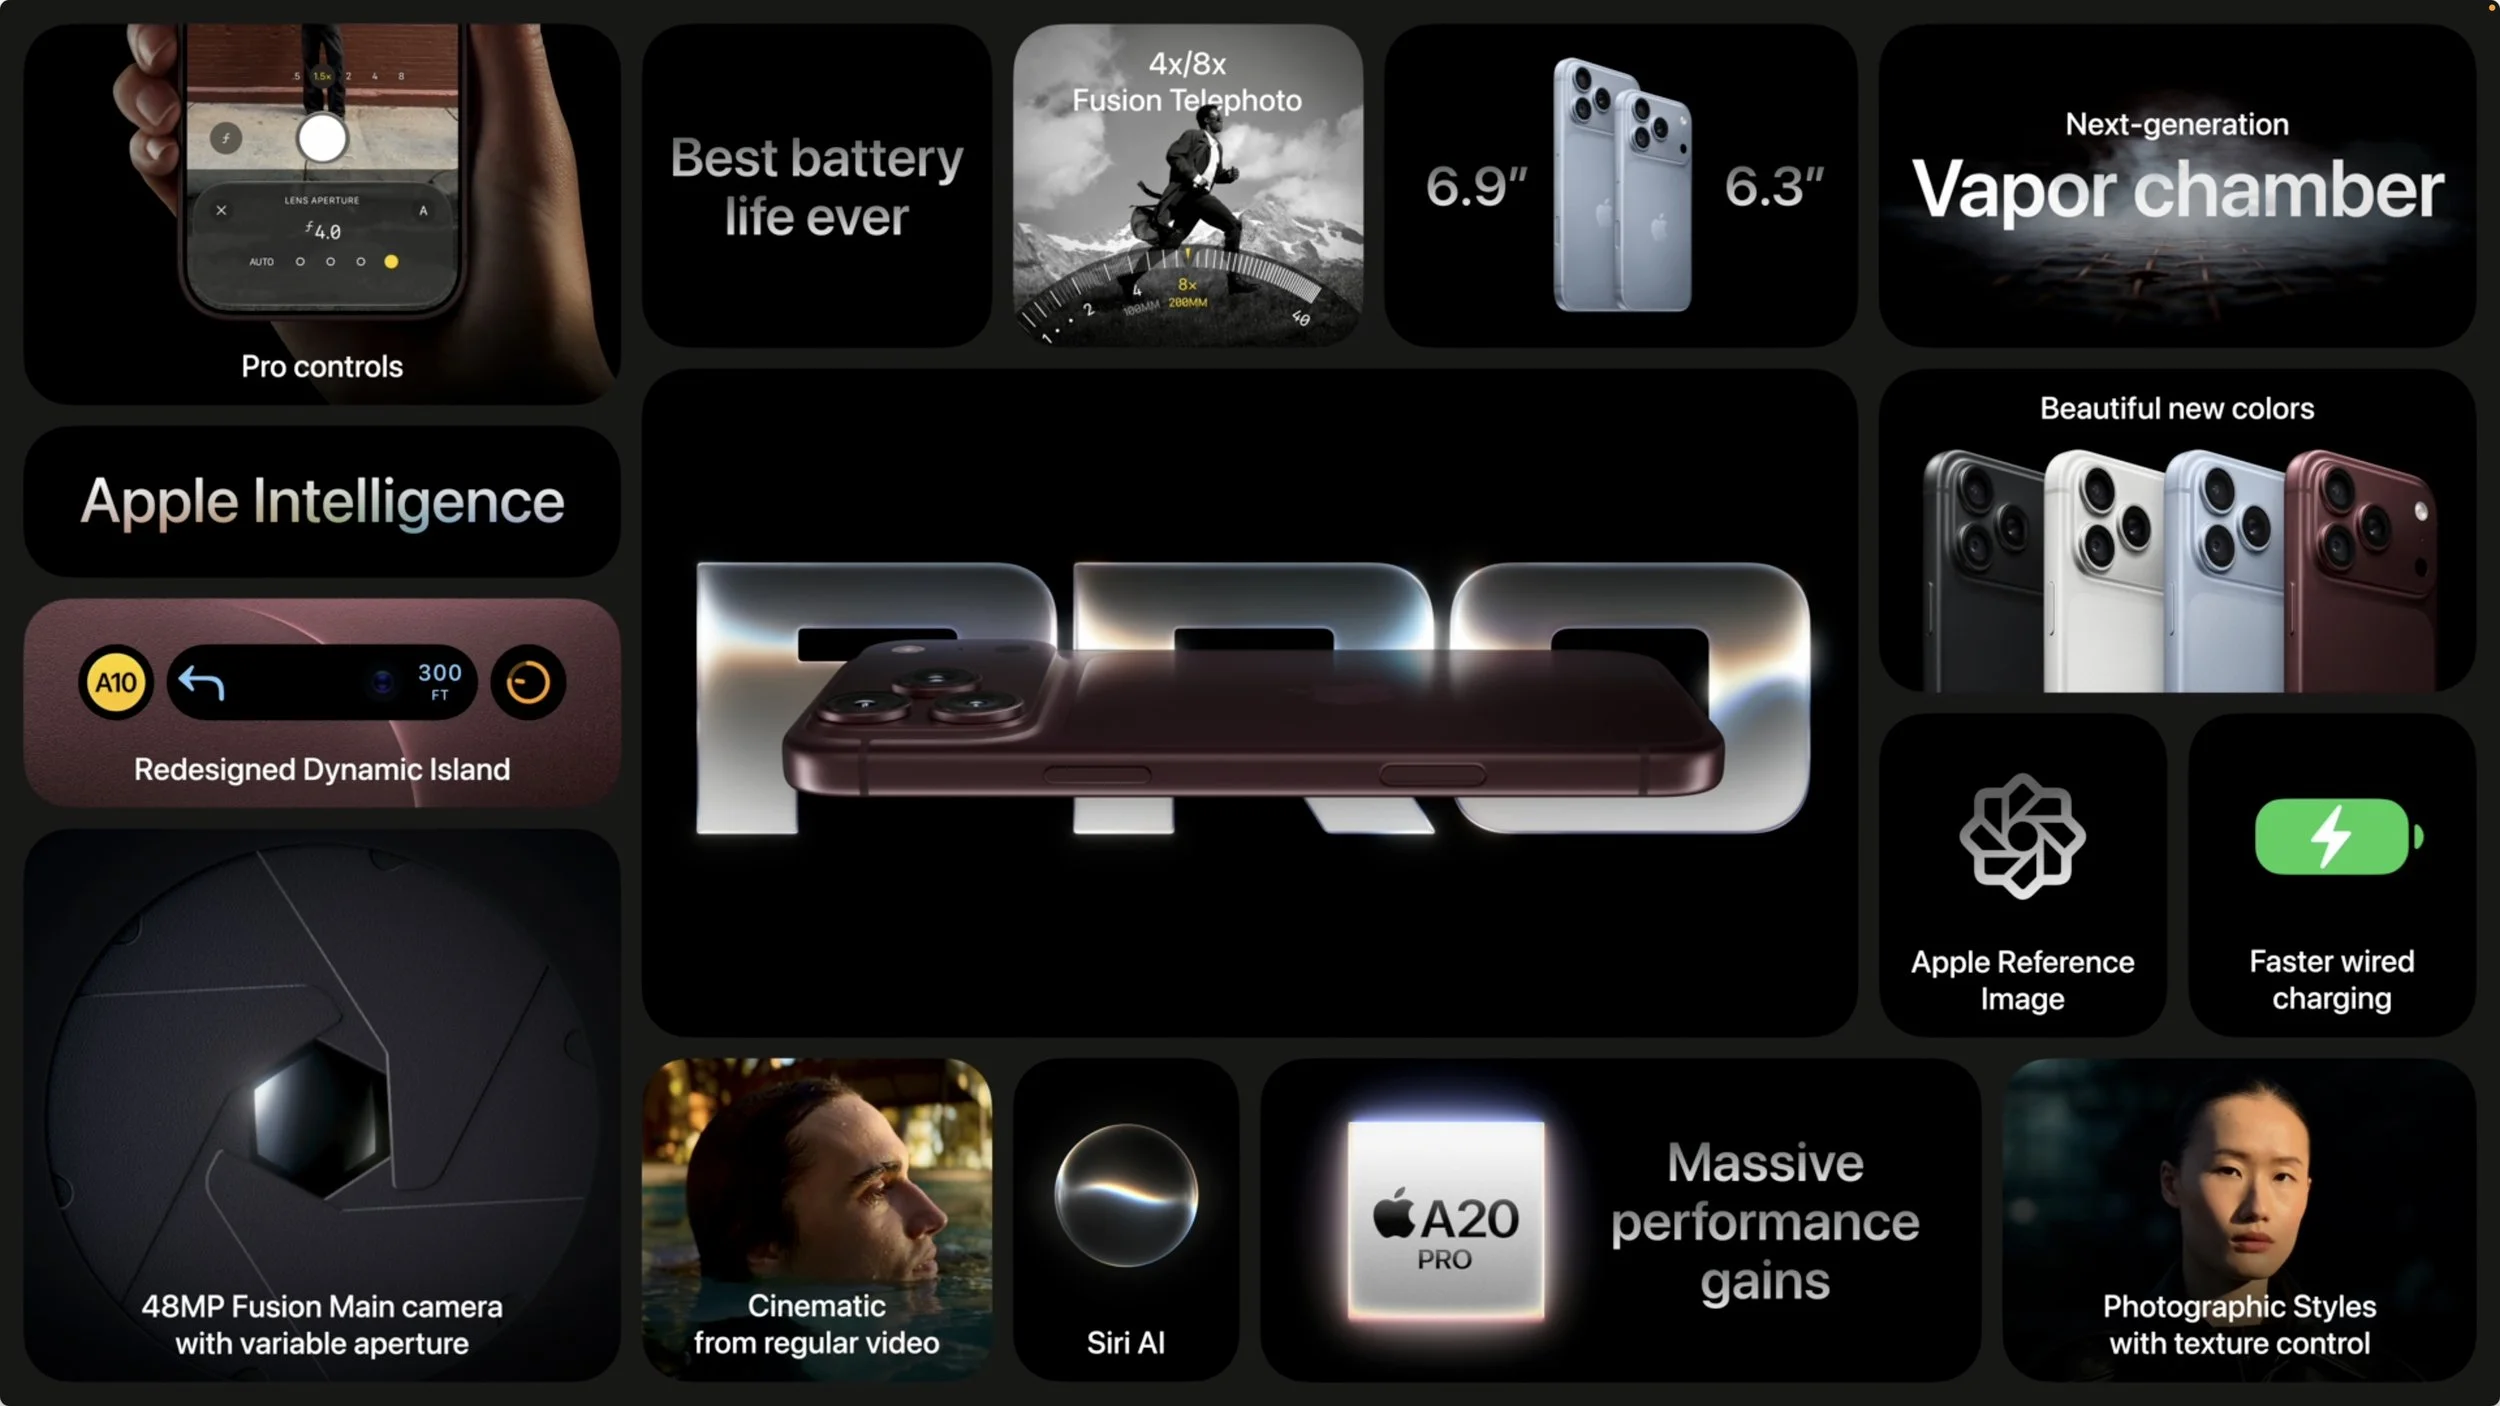
The iPhone 18 Pro starts at $1,199 and the Pro Max at $1,299—$100 increases over last year’s models due to the ongoing memory shortage. Storage upgrade prices have also jumped significantly. Available colors include black, silver, glacier, and burgundy. Pre-orders open at 5 AM Pacific on September 12, with availability beginning on September 18.
If those prices are too steep for your budget, the iPhone 17e ($699), iPhone 16 ($799), iPhone 17 ($899), and iPhone Air ($1,099) remain available, all $100 more than before the event.
Should you upgrade? The iPhone 18 Pro models look great, but unless you want the best possible camera, highest possible performance, and longest battery life, we recommend holding off. An iPhone 15 Pro or newer model that supports Apple Intelligence, which Apple is emphasizing in iOS 27, will likely still meet your needs.
iPhone Duo
The most surprising announcement was the iPhone Duo, Apple’s first foldable iPhone. While foldable Android phones have been interesting but often flawed, the iPhone Duo showcases Apple’s attention to industrial design and software integration.
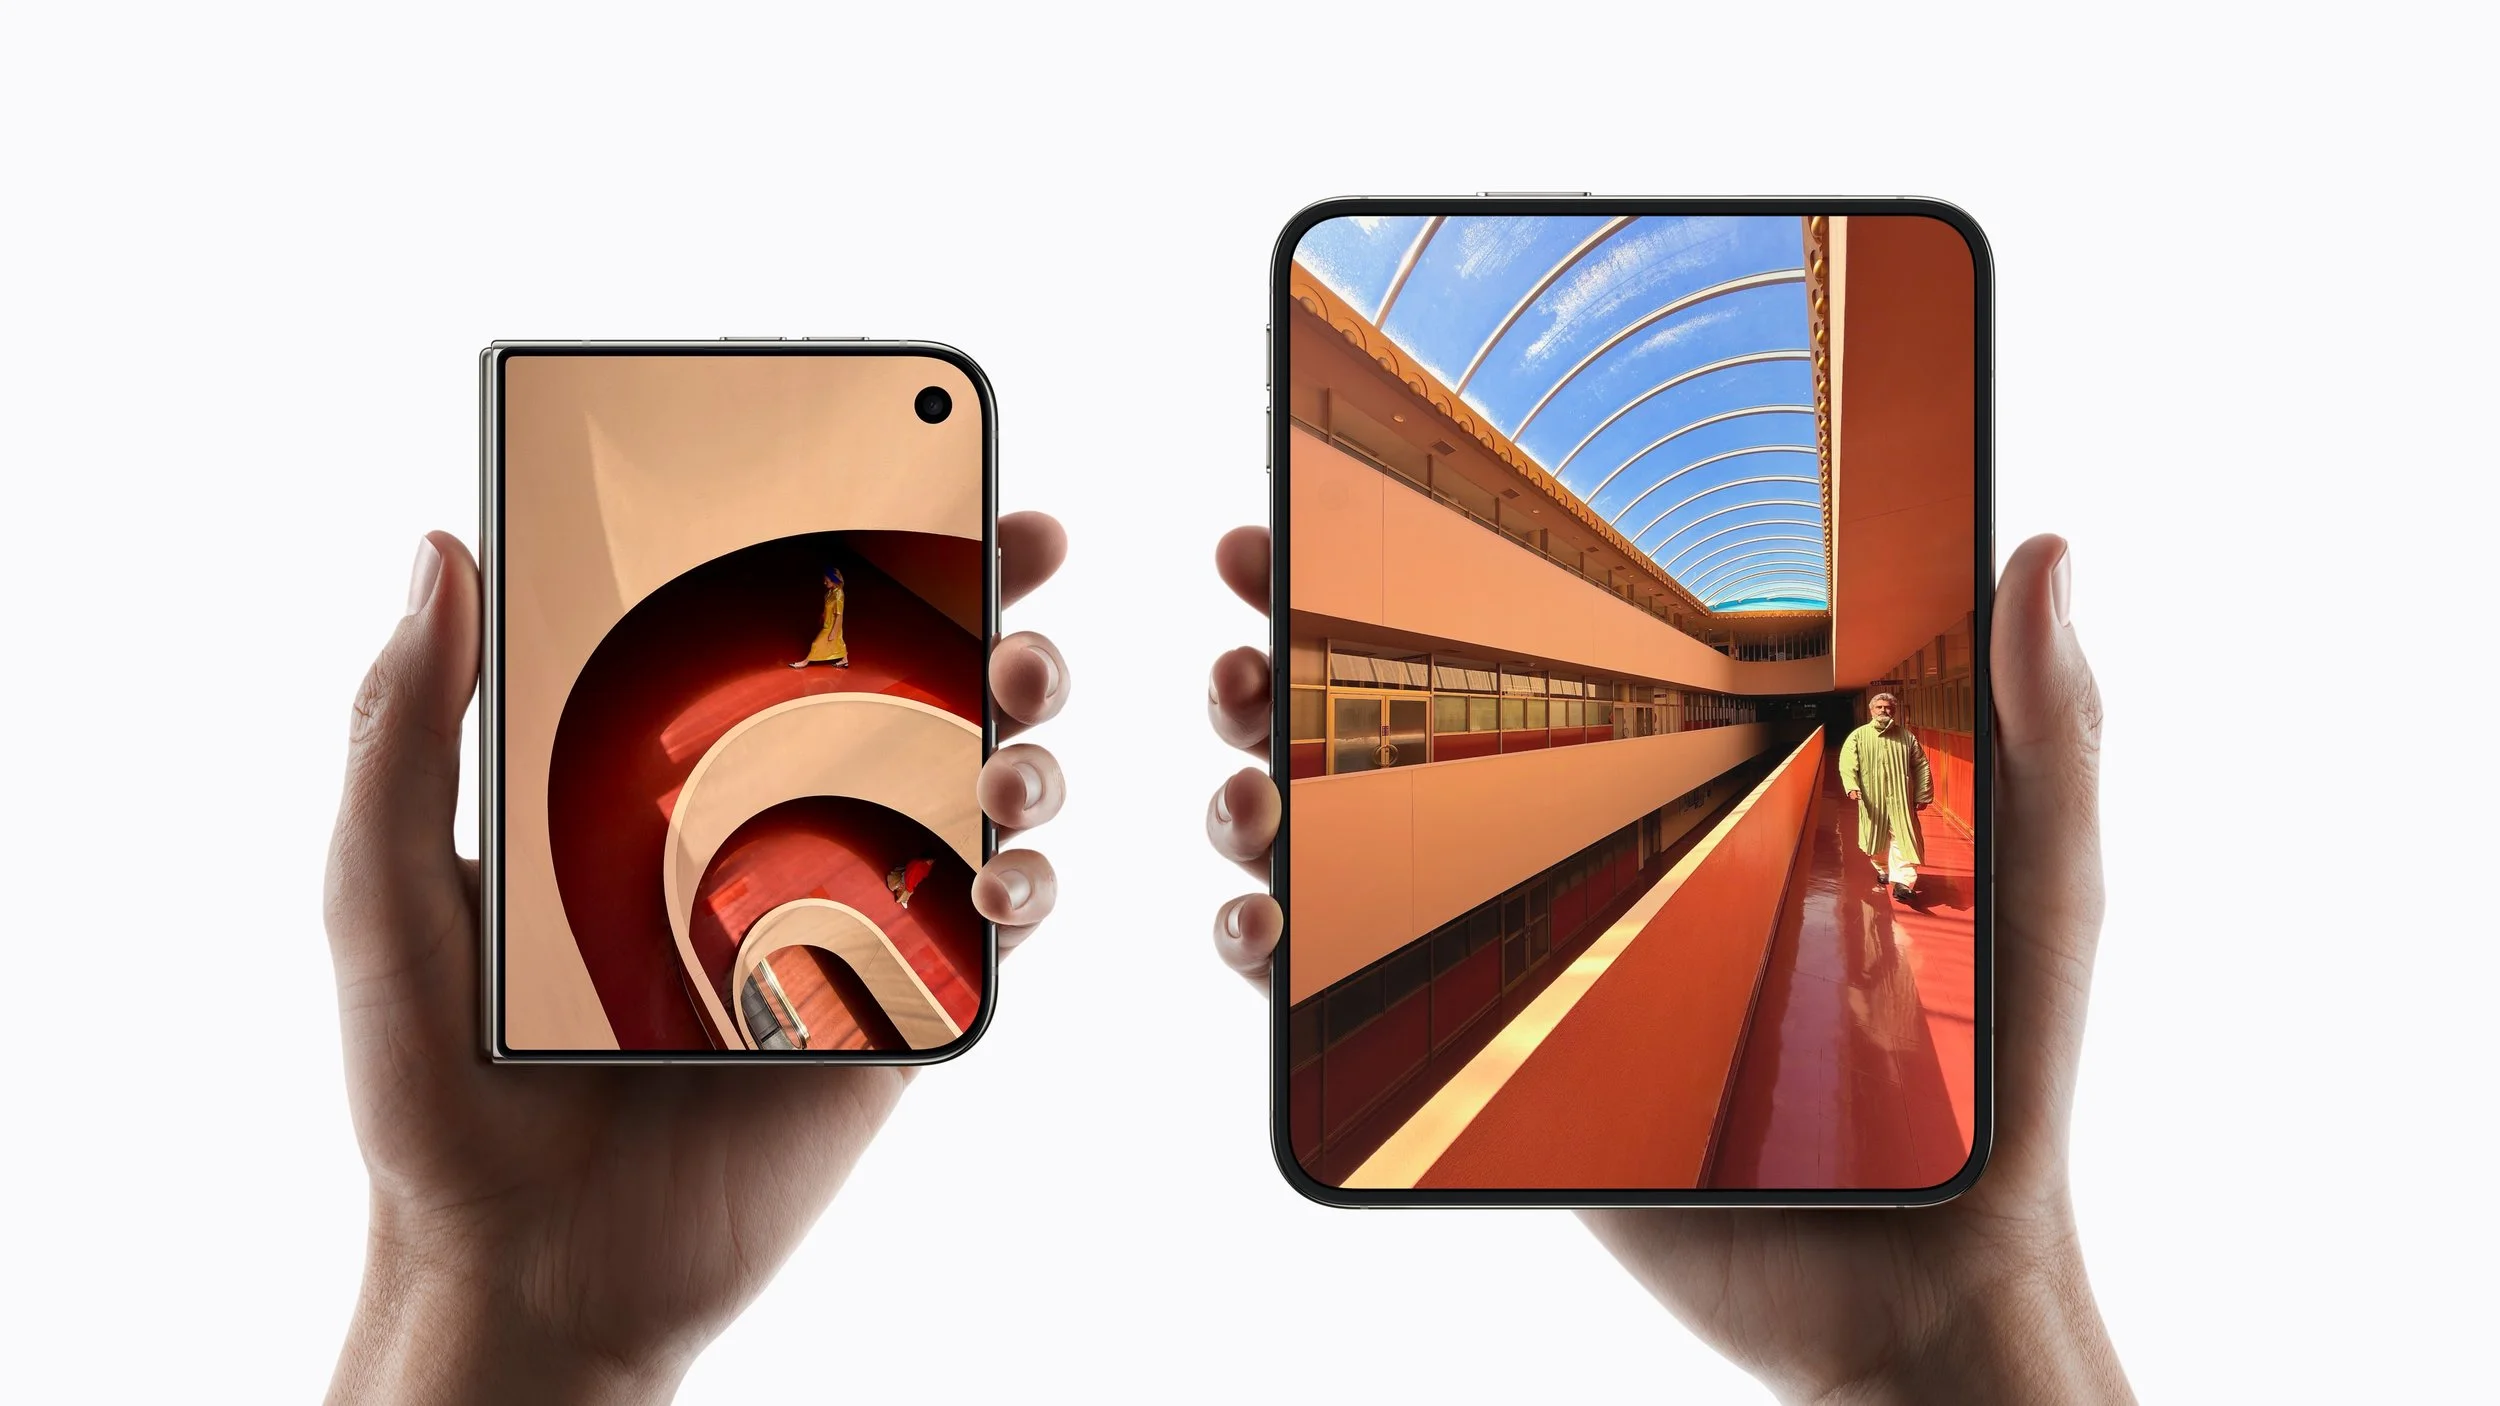
Closed, the iPhone Duo is about the size of a passport book, with a 5.4-inch outer display that provides 90% of the screen area of the iPhone 18 Pro. When opened, the 7.6-inch inner display is 50% larger than the iPhone 18 Pro Max, offering more screen space for media, gaming, and productivity apps. A nano-texture finish on the inner display reduces glare and minimizes the visibility of the crease.
Apple says that the iPhone Duo’s hinge and integrated magnet array deliver a smooth, secure feel. Despite the hinge, it’s still rated IP68 for water resistance (up to 6 meters for 30 minutes), the same as the iPhone 18 Pro. Ceramic Shield and Ceramic Shield 2 protect from scratches on the back and front, respectively.
Unlike other current iPhones, the iPhone Duo uses Touch ID in the side button rather than Face ID. It’s powered by the same A20 Pro chip as the iPhone 18 Pro models, and Apple claims 24 hours of battery life in typical use.
Apple has reimagined iOS 27 for the iPhone Duo. Lock Screen controls, the Dock, the Dynamic Island, and app navigation appear on the side to maximize vertical content space. When open, the display shows two Home Screen pages with Today View—a scrolling list of widgets—on the left. Content reacts as the iPhone Duo folds, reorients when turned sideways, and switches to the appropriate display when flipped over. iOS on the iPhone Duo even borrows from iPadOS—Split View lets two apps run side by side. StandBy can kick in whenever the iPhone Duo is set down, even if it’s not charging.
The camera system includes a 48-megapixel Fusion Main camera and a 48-megapixel Fusion Ultra Wide, but no variable aperture or Telephoto camera. The folding design enables different camera experiences: Smart Take uses on-device AI to capture photos automatically while subjects are posing, Duo Preview shows a live preview on the outer display so subjects can guide the shot, and Kid Cue plays Peanuts animations to grab children’s attention. Duo FaceTime lets people who are with the user join a video call on the outer display.
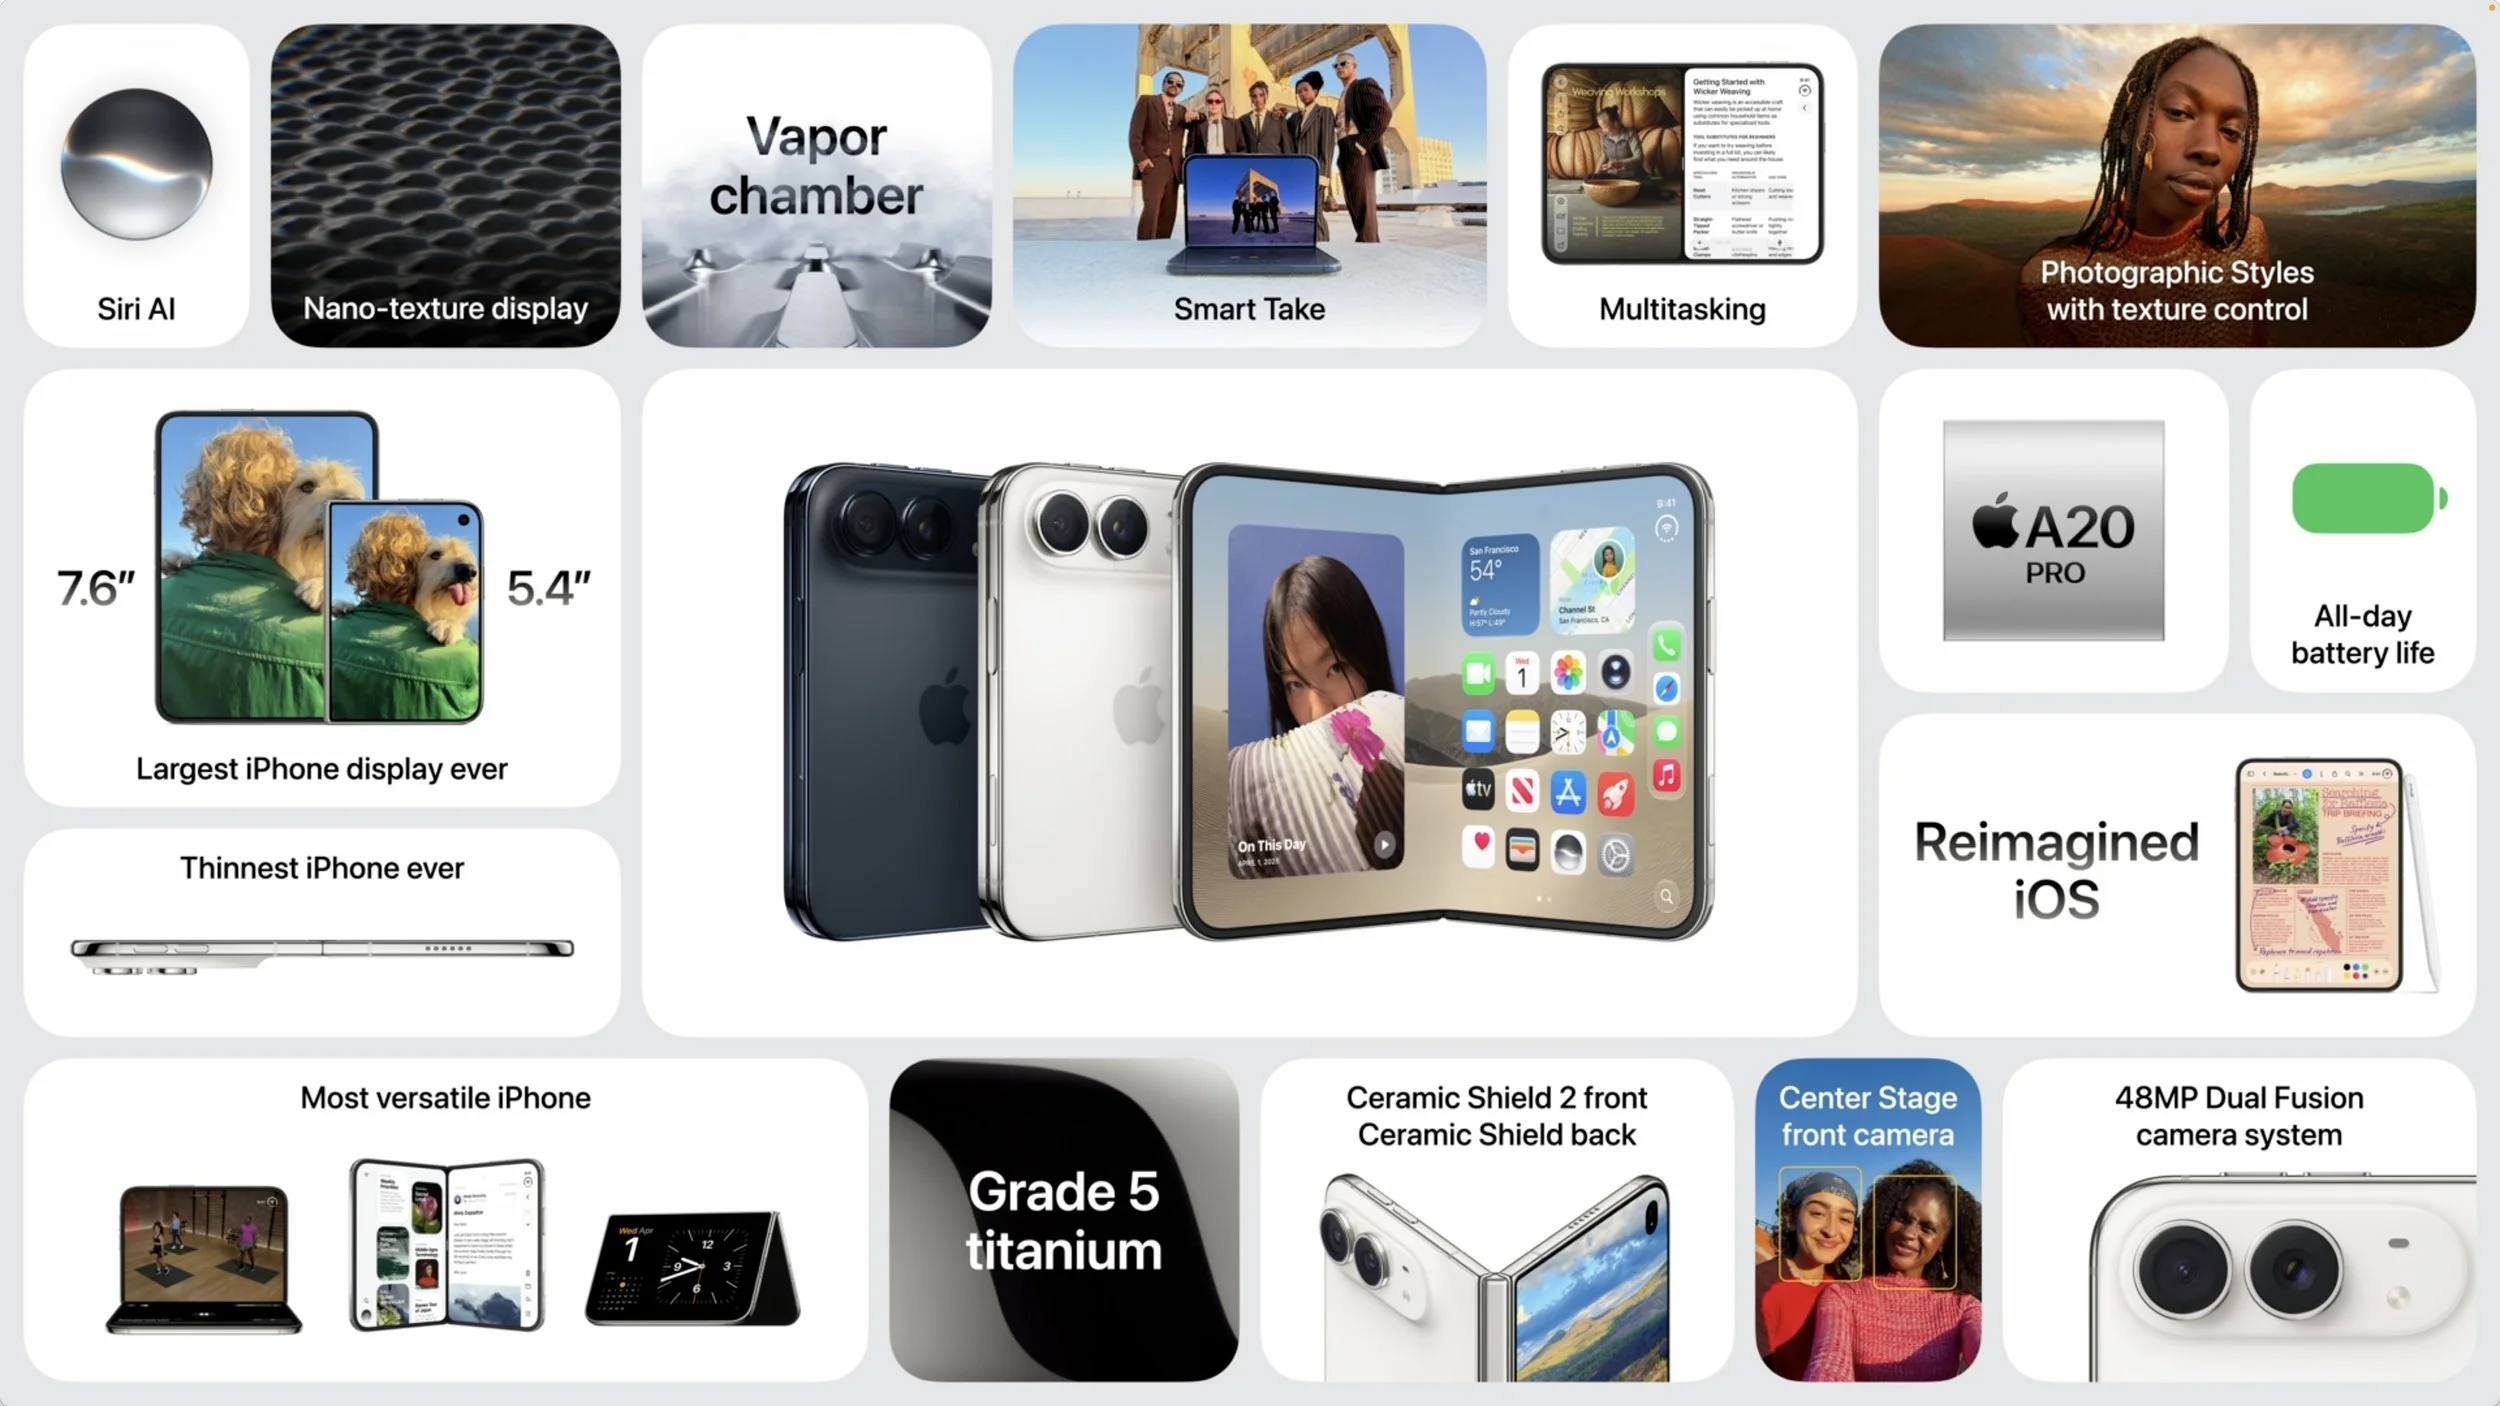
The iPhone Duo starts at $1,999 in star white and night sky colors, with pre-orders opening October 16 and availability starting October 23. Apple Pencil support is coming later this year.
The iPhone Duo is clearly aimed at early adopters and those who want a larger display in a pocketable form factor. At $1,999, it costs more than an iPhone 18 Pro and an iPad mini combined, but for those waiting for Apple to enter the foldable market, the iPhone Duo is worth checking out.
Apple Watch Series 12 and Ultra 4
The Apple Watch Series 12 and Apple Watch Ultra 4 focus on health sensing accuracy and introduce Audio Intelligence features powered by the new S11 chip.
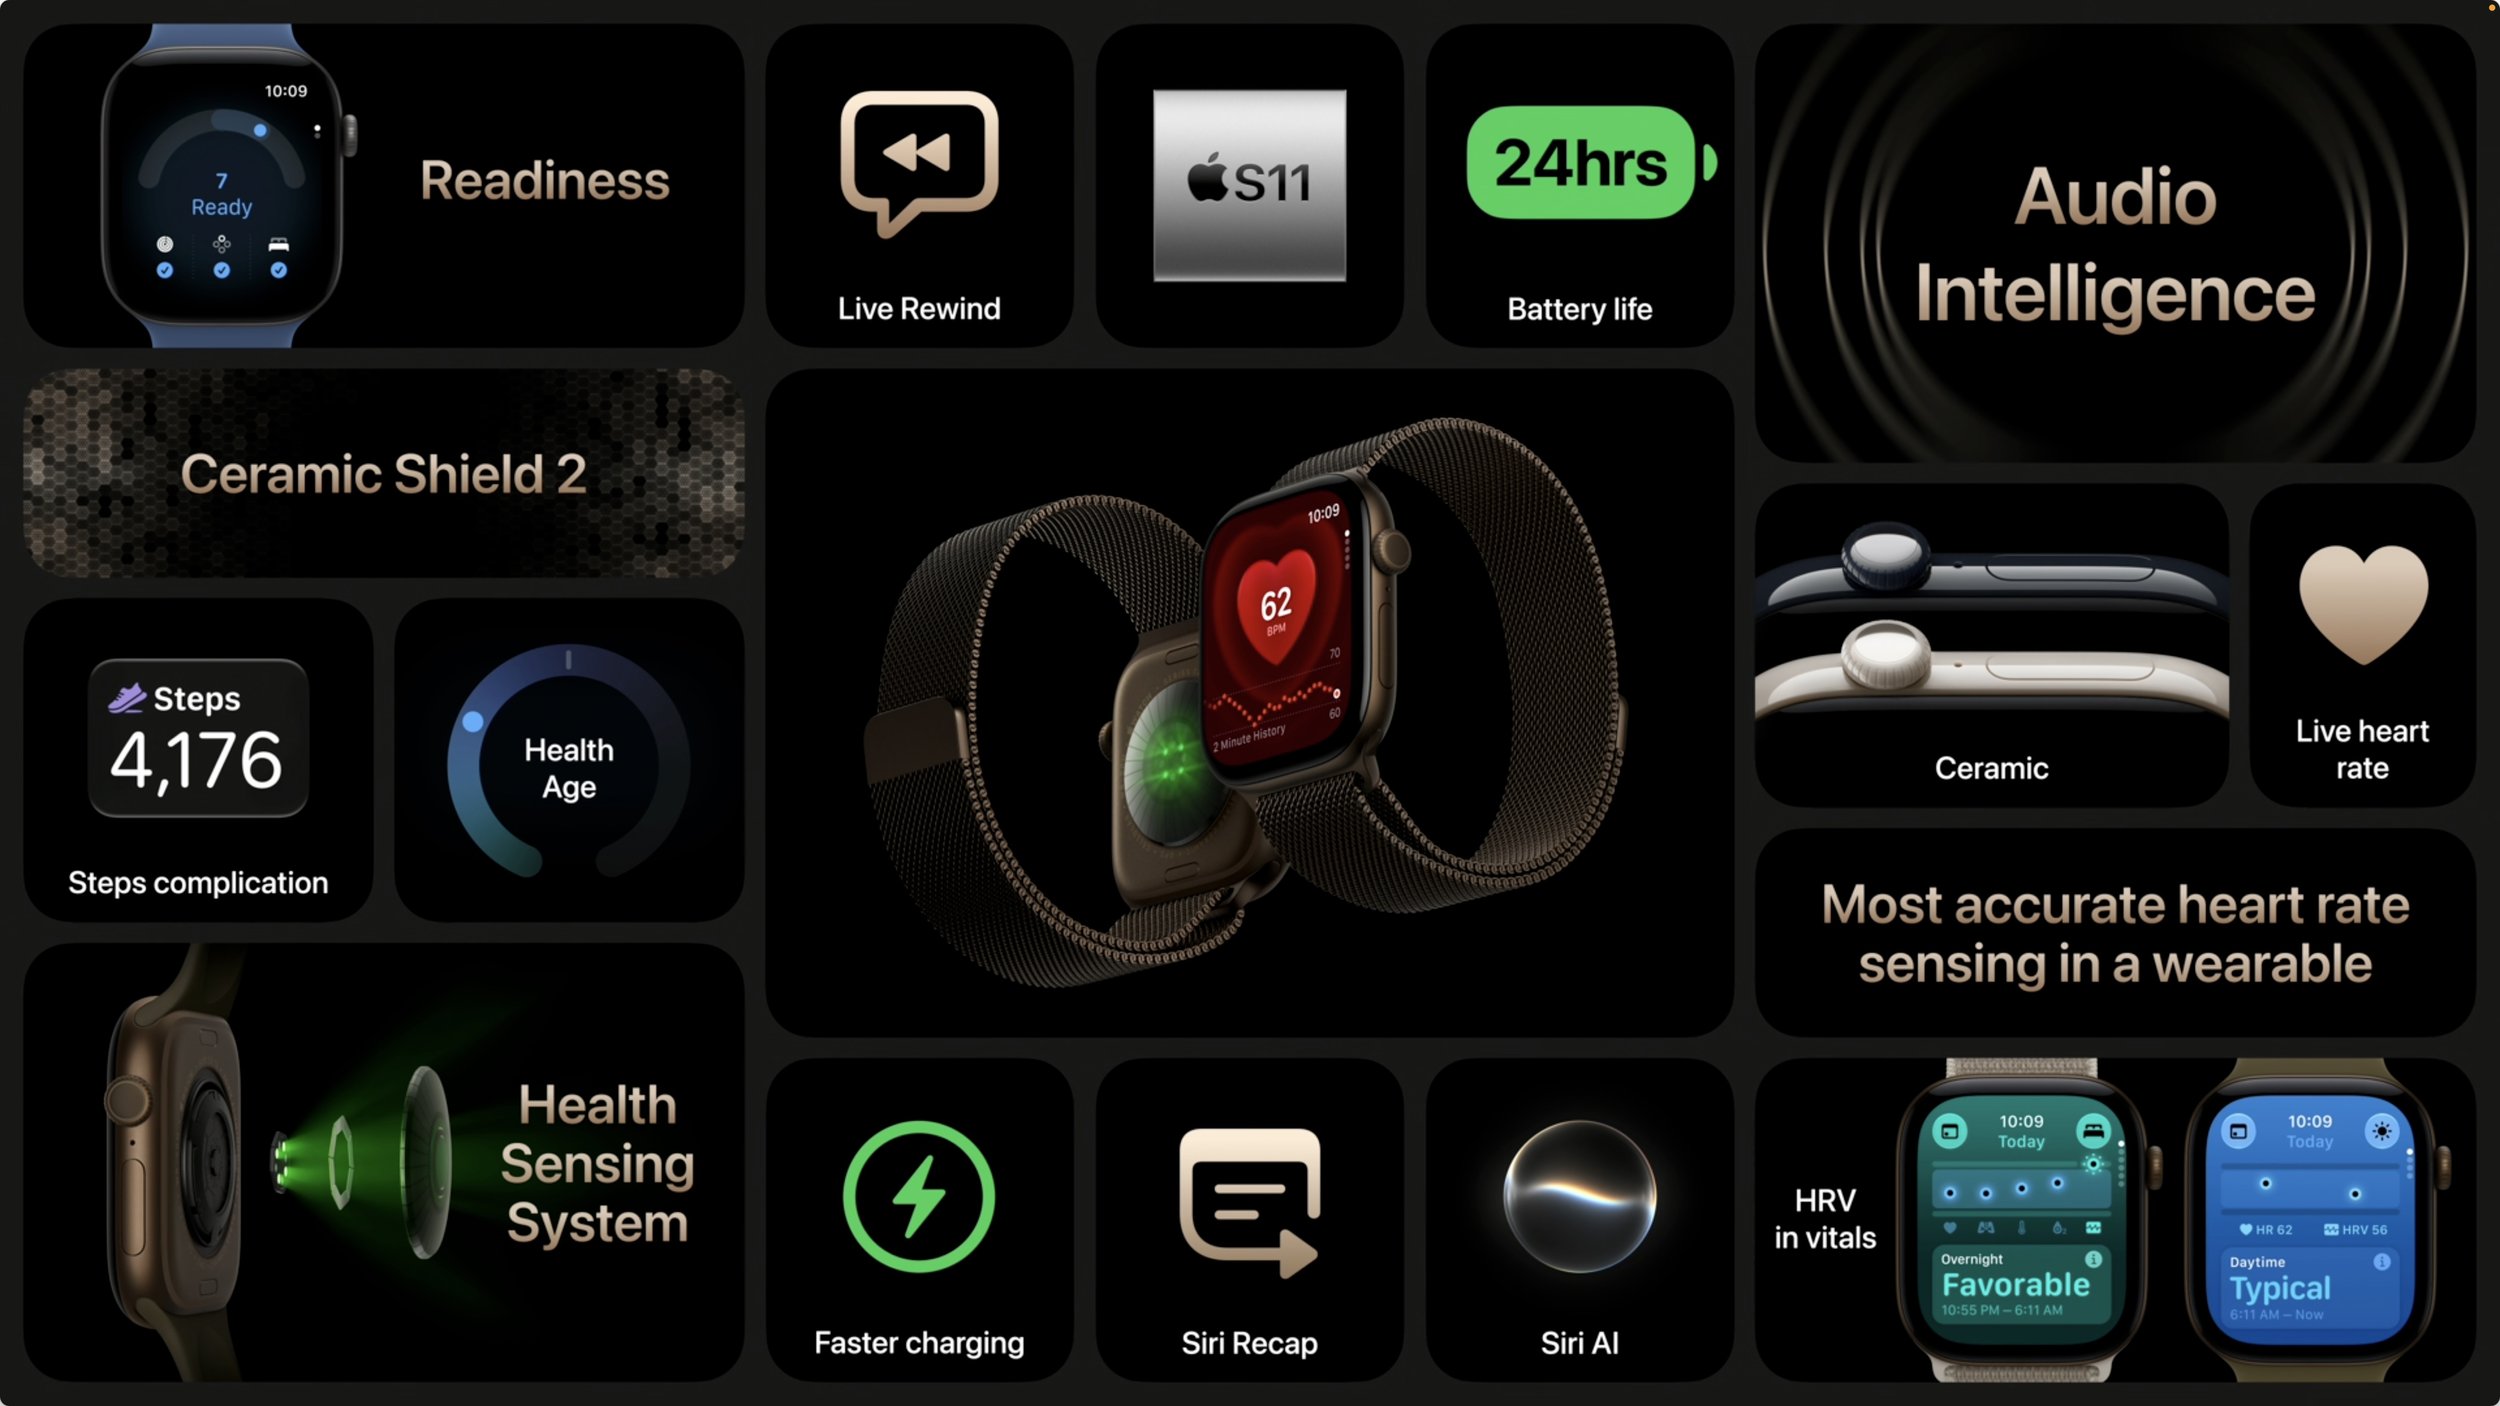
The new Health Sensing System delivers what Apple calls “the most accurate heart rate sensing in a wearable.” Larger, more power-efficient green LEDs now measure heart rate every 5 seconds throughout the day—60 times more frequently than before. Heart rate variability is measured up to 24 times more often.
These improvements power a new Readiness feature that analyzes recent activity, training load, vitals, and sleep score to provide a 0-10 score with recommendations: Recover, Pace Yourself, Ready, or Go For It. The score updates throughout the day as new data arrives.
Audio Intelligence represents a new category of Apple Watch features. Sound Recognition alerts Deaf users or those who are hard of hearing to sounds like doorbells, sirens, or crying babies. Shazam now automatically identifies nearby music and displays it in the Smart Stack. Live Rewind shows the previous 15 seconds of conversation as text when you double-press the Digital Crown. Siri Recap creates high-level summaries of conversations for later review. Live Rewind and Siri Recap will arrive in beta later this year and require an iPhone 16 or later, excluding the iPhone 16e.
Although the prospect of an always-listening watch has already raised privacy concerns, Apple emphasizes that Audio Intelligence features don’t create or store audio recordings: raw audio is processed in a hardware-isolated Secure Exclave and immediately deleted, while Live Rewind snippets and Siri Recap summaries synced via iCloud are end-to-end encrypted. We’ll see whether the features prompt the same kind of privacy backlash as Meta’s controversial AI glasses.
The Series 12 now offers up to 10 hours of workout battery life—25% more than the Series 11—while maintaining 24 hours of everyday battery life. Charging is faster: 15 minutes provides up to 12 hours of battery life.
Aluminum models gain Ceramic Shield 2, which Apple says is 60% tougher than the previous Ion-X glass. A new ceramic case option is available in pearl white and night blue. Other finishes include dark bronze, black, light gold, and space gray aluminum, plus radiant gold and natural titanium.
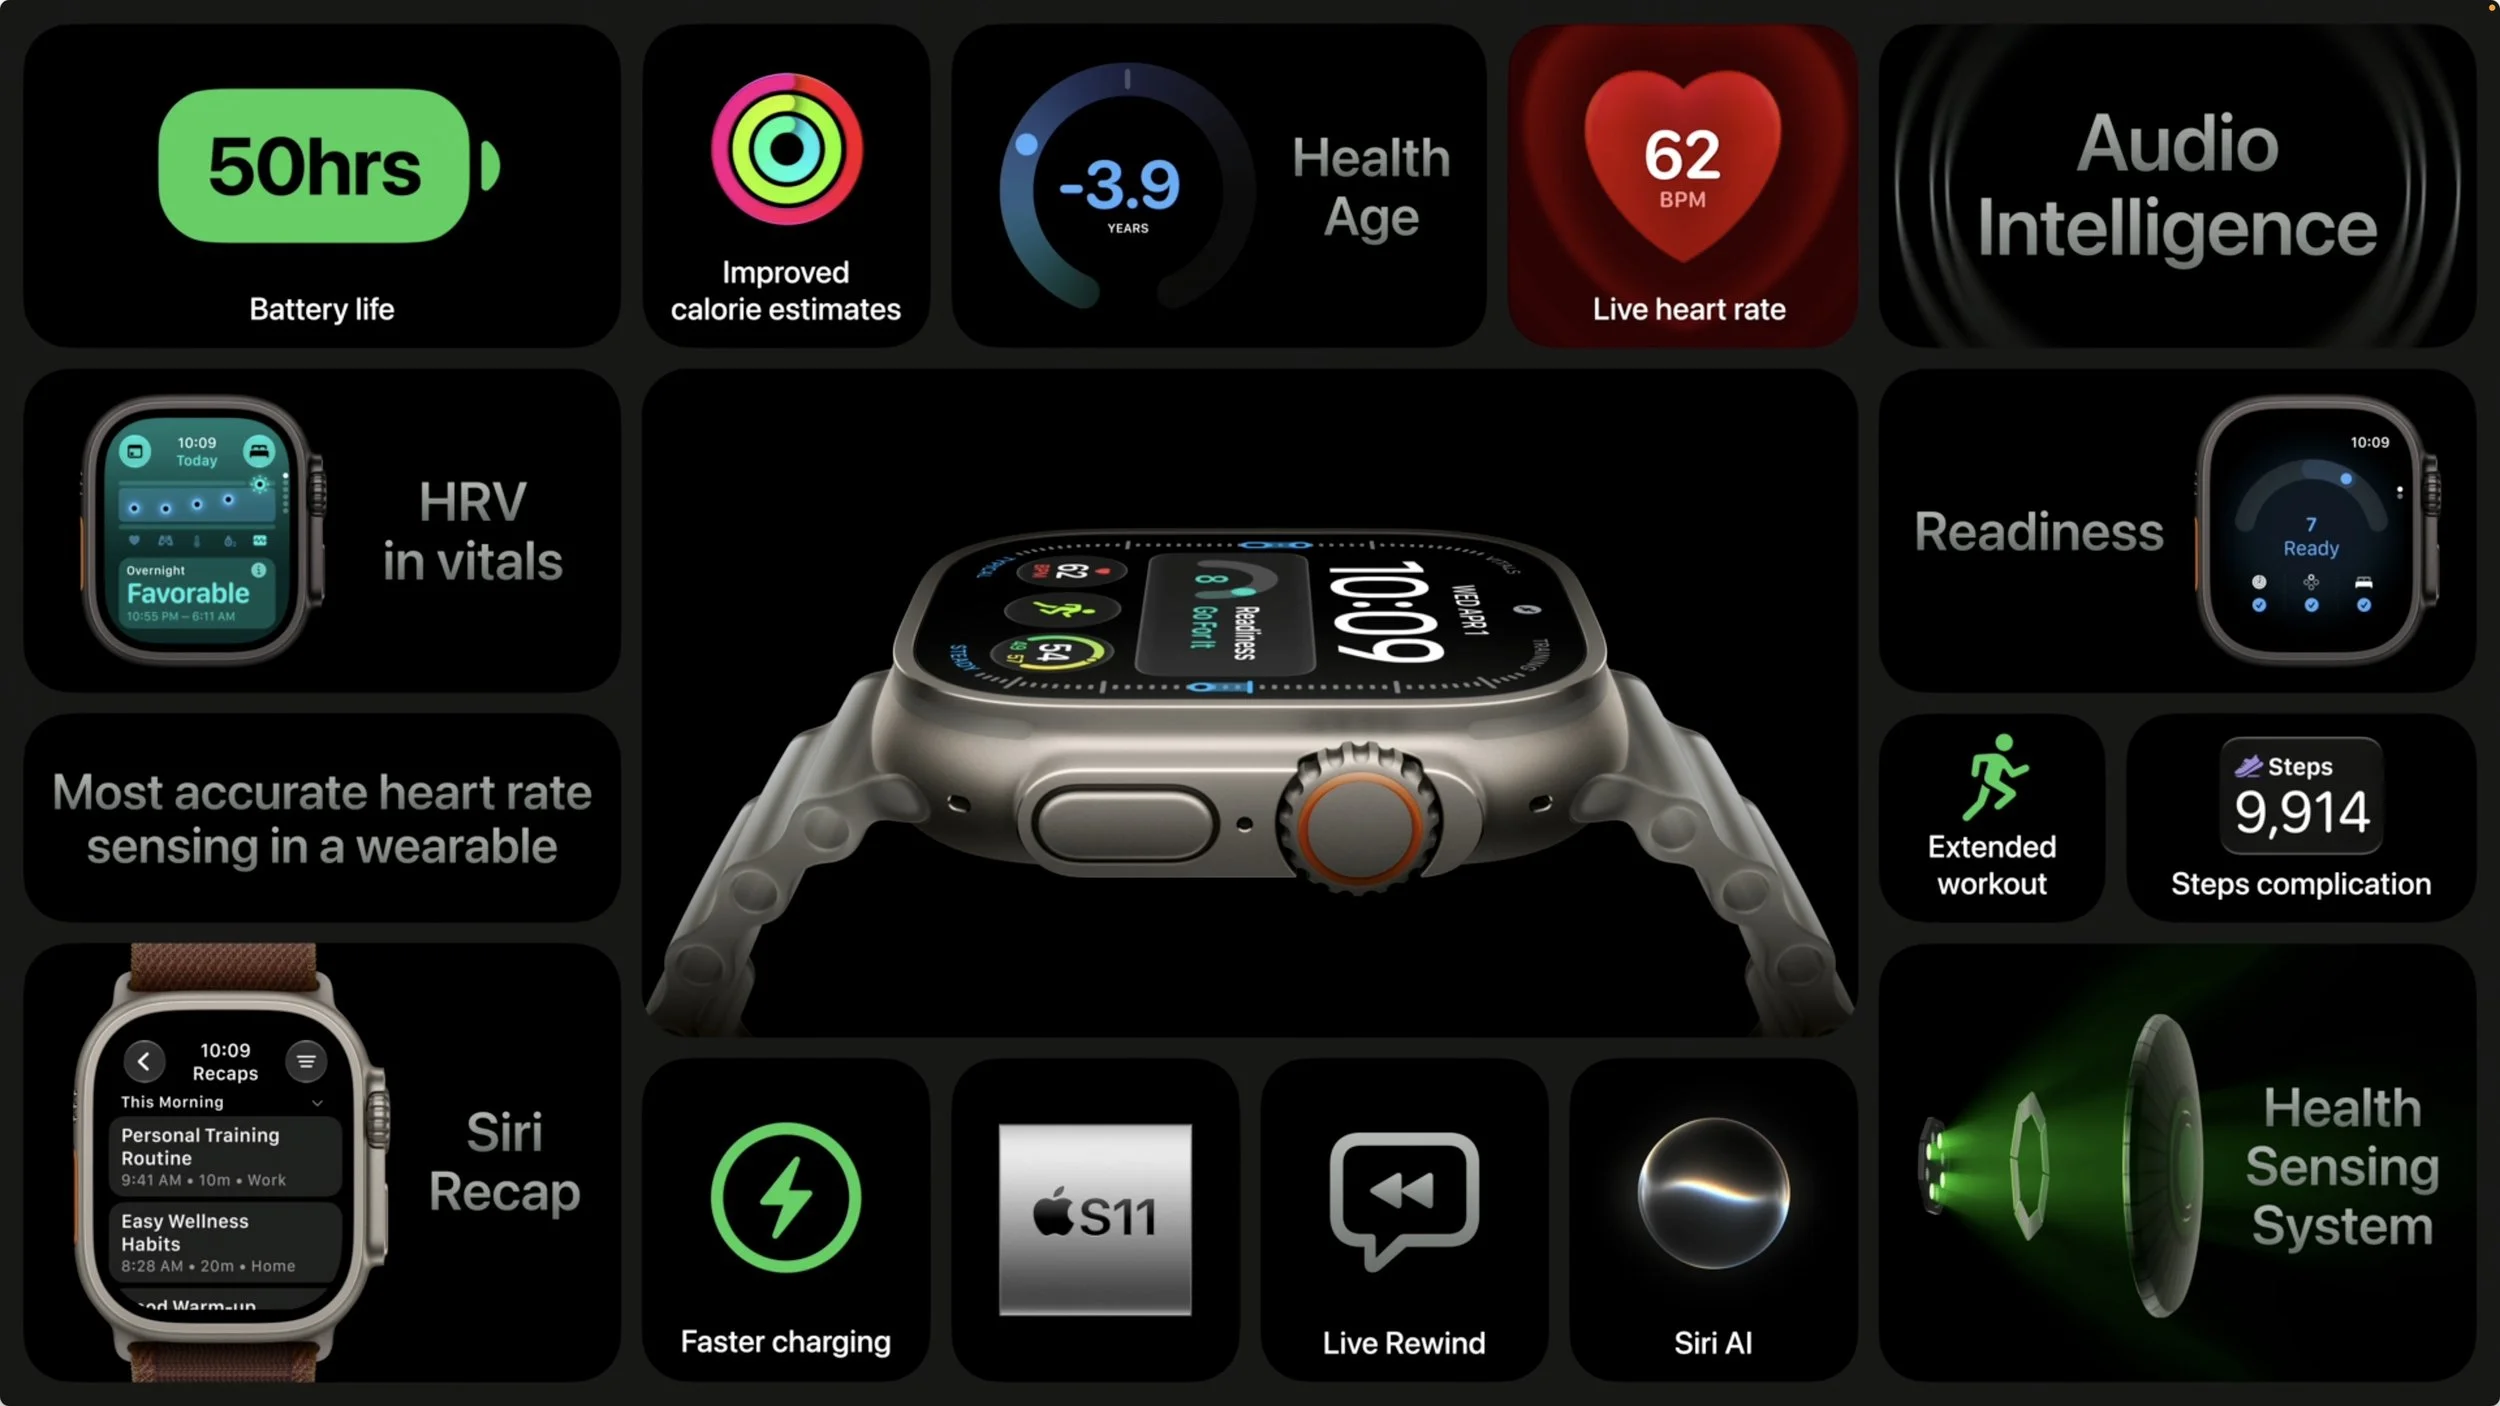
The Apple Watch Ultra 4 gains the same Health Sensing System and Audio Intelligence features, plus improved battery life: up to 50 hours of everyday use, up to 25 hours in Extended Workout mode with full GPS and heart rate, and up to 45 hours in Max Extended Workout mode. It also shares the new fast charging.
Pricing remains unchanged: the Series 12 starts at $399, and the Ultra 4 at $799. Pre-orders are available now, with availability on September 18. The Apple Watch SE 3 remains available, starting at $249.
For most people with an Apple Watch Series 10 or 11, the upgrade may be hard to justify unless Audio Intelligence features are particularly compelling. Those with older models may be considering an upgrade for refreshed battery life, and remember that watchOS 27 requires a Series 9 or later, SE 3, or Ultra 2 or later.
AirPods 5
The AirPods 5 bring Active Noise Cancellation to Apple’s entire open-ear AirPods lineup for the first time. Both the base model and the model with wireless charging case now include ANC, along with Transparency mode, Adaptive Audio, Conversation Awareness, Voice Isolation, Personalized Spatial Audio, and Live Translation.
The AirPods 4 were rated IP54 for dust and water resistance, while the AirPods 5 improve that to IP57, meaning they should survive temporary immersion for up to 30 minutes.
The wireless charging case model retains a few exclusive features: volume swipe on the stems, longer battery life (5 hours with ANC versus 4 hours on the base model), support for Apple Watch and Qi chargers, and a speaker in the case for Find My.
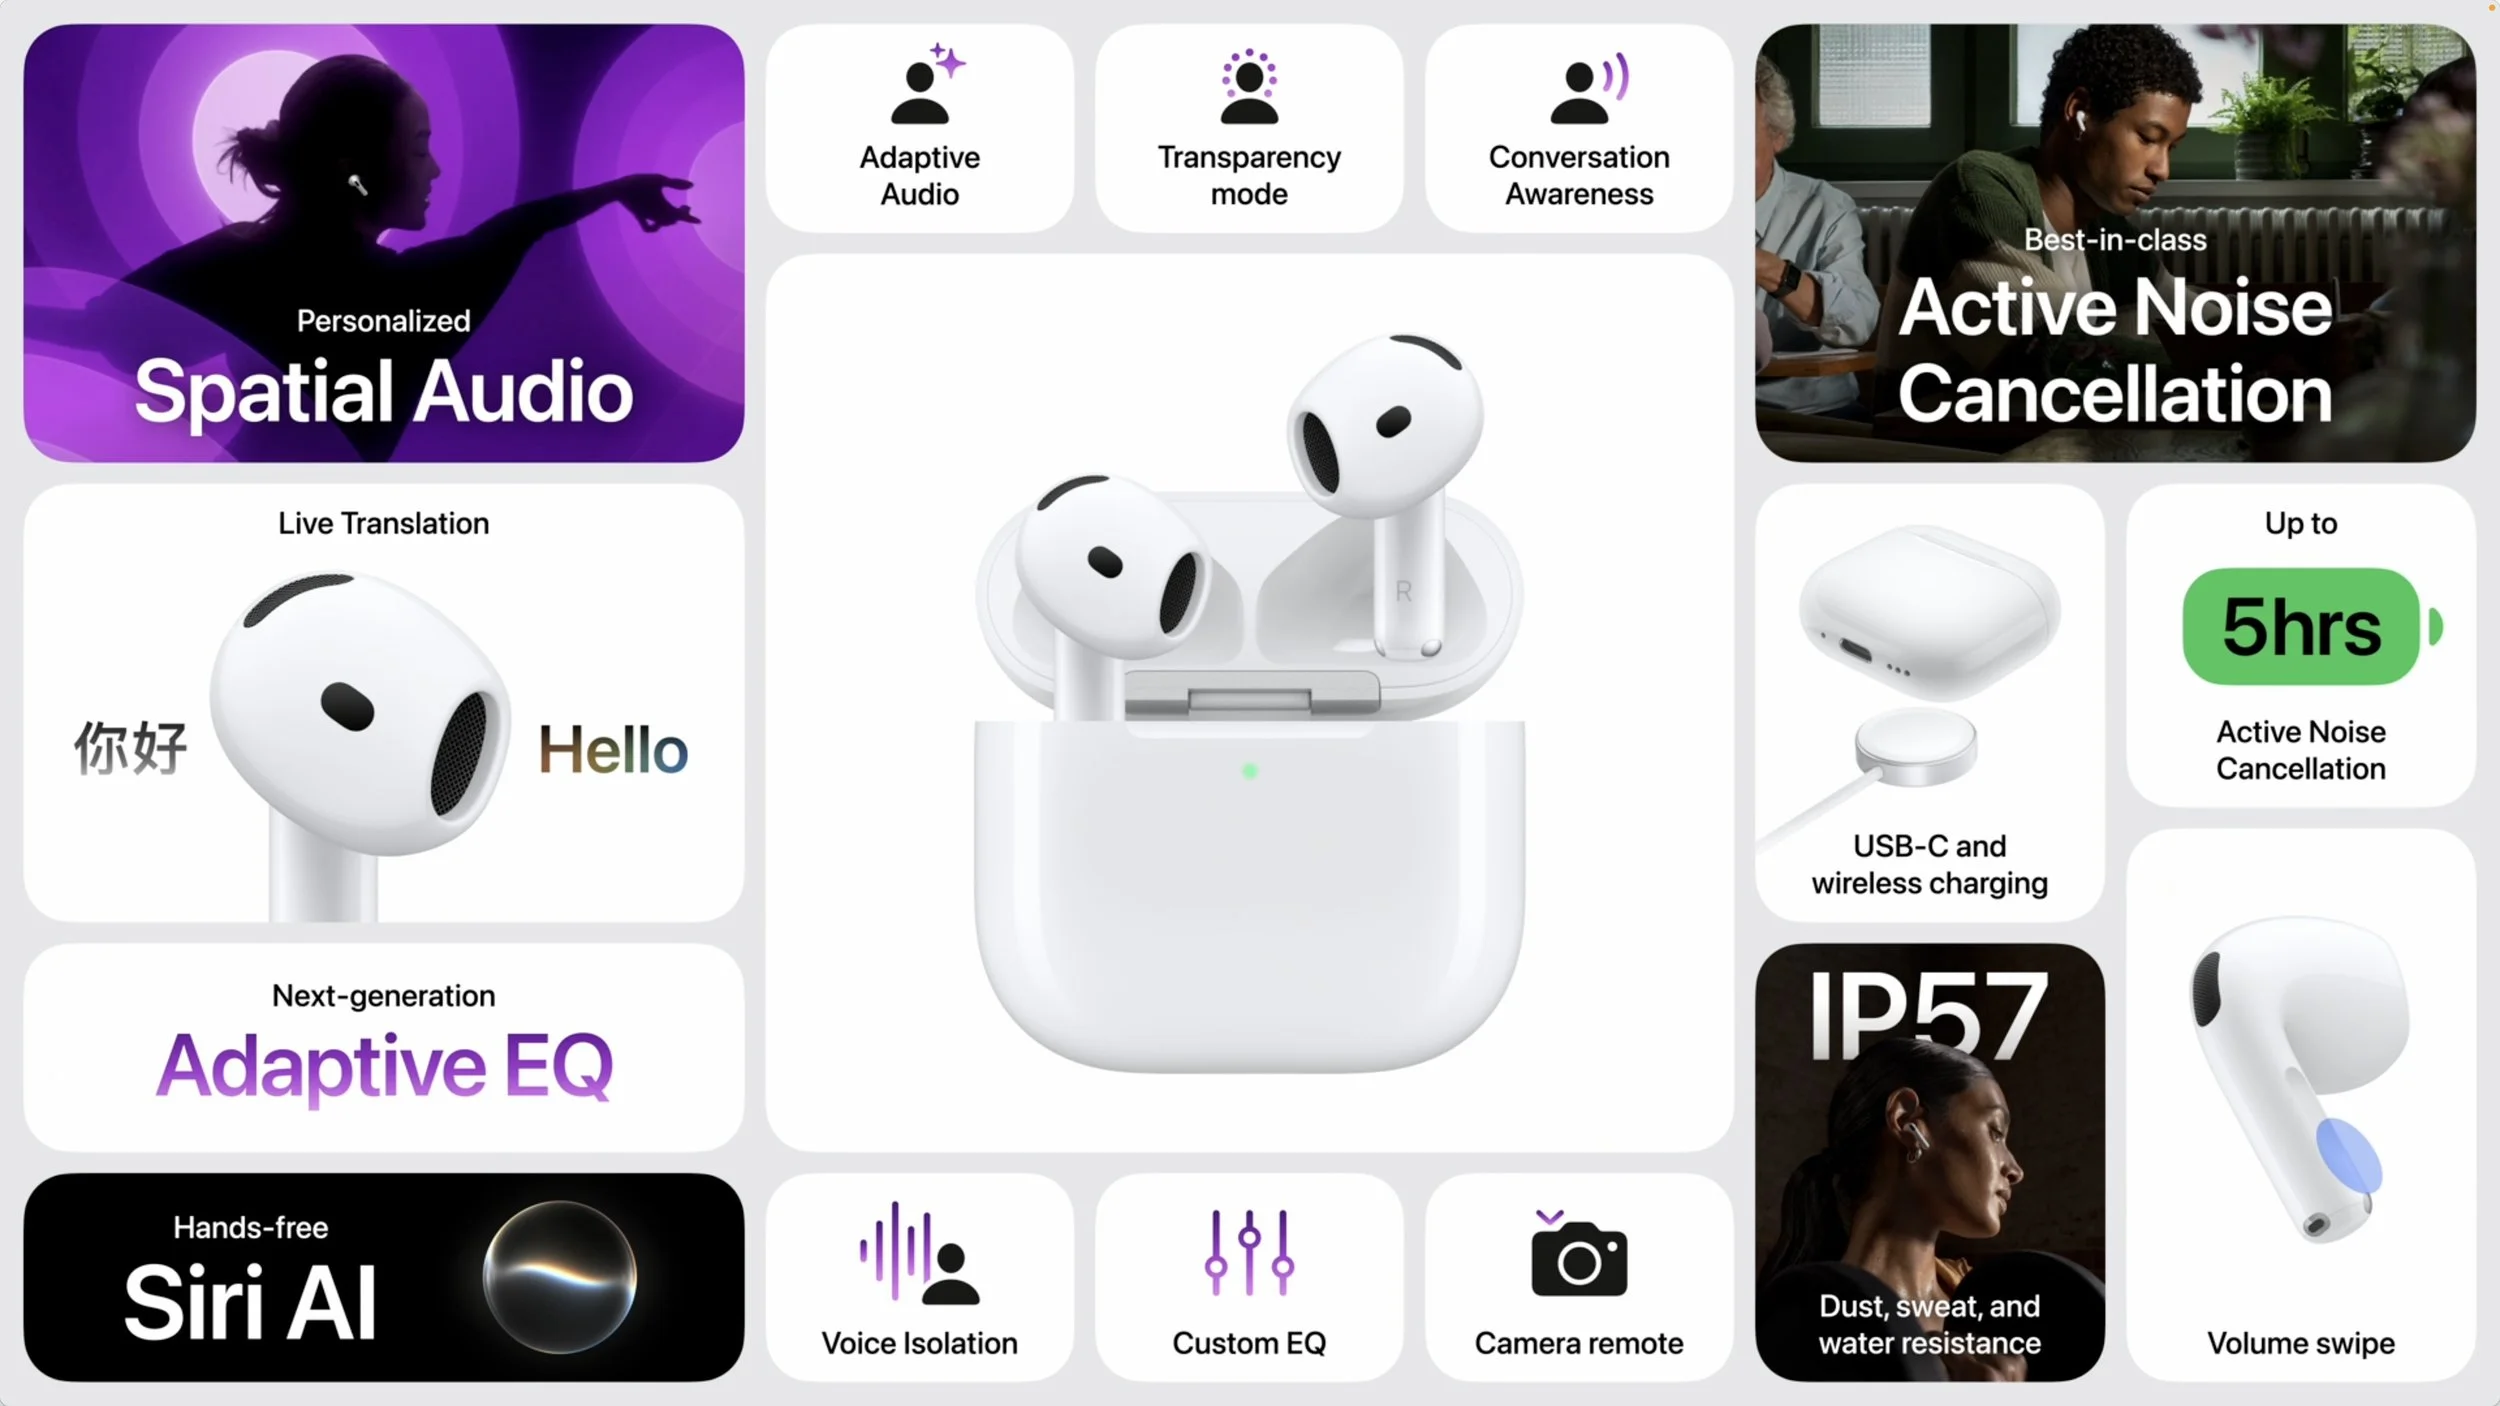
The AirPods 5 with Wireless Charging Case costs $149, $30 less than the $179 AirPods 4 with ANC it replaces, while the base model remains at $129. This makes Active Noise Cancellation more accessible than ever, though those who need maximum noise cancellation should still consider the AirPods Pro 3. It’s probably not worth upgrading from working AirPods unless you need better ANC, but the AirPods 5 will be waiting the next time you need a pair.
(Featured image by Apple)
Follow These Steps When Switching to a New iPhone 18
Getting a new iPhone 18? Don’t rush the setup. A little prep work now can save you from missing data, apps, and settings later. Here’s what to do before and after transferring from your old iPhone.
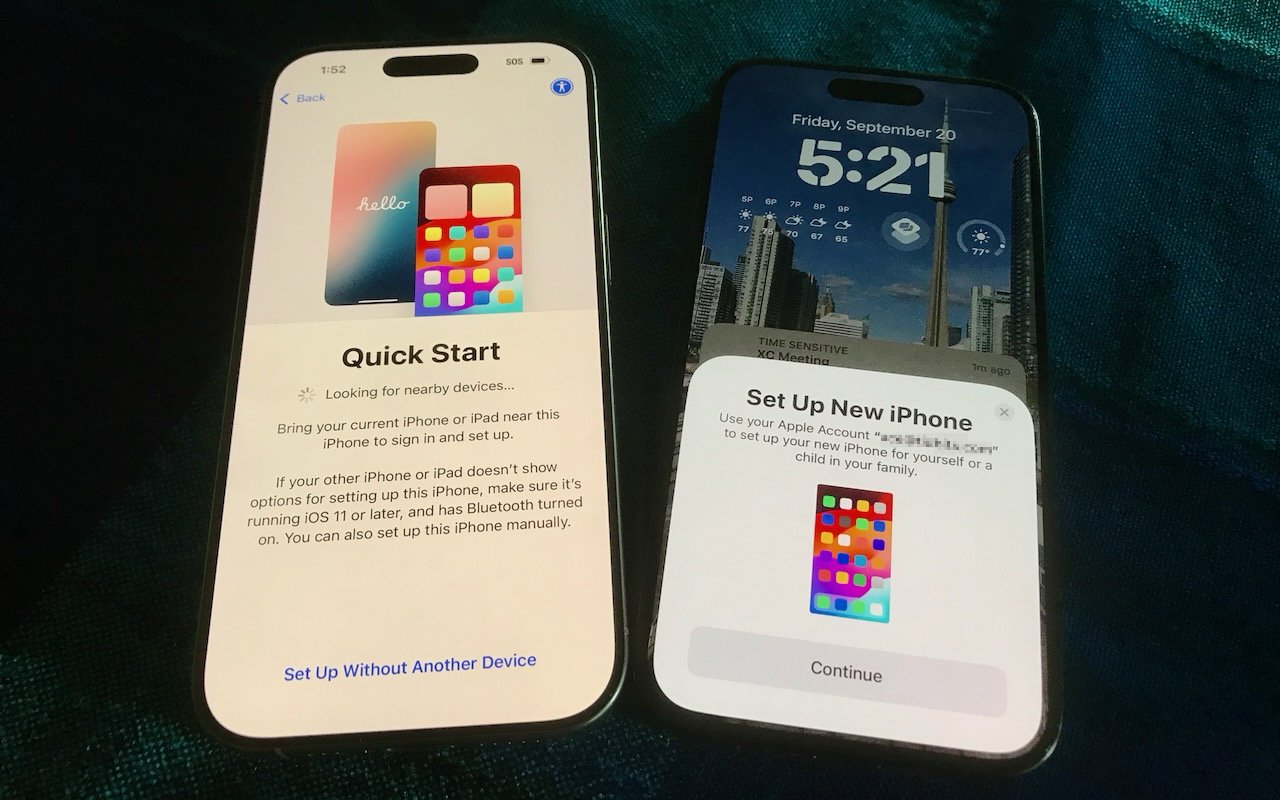
Are you considering getting one of Apple’s new iPhone 18 models? While it’s tempting to unbox a new iPhone and dive right in, a methodical setup will save you from potential frustrations down the road. When you’re ready to transfer your data—and, for many people, that means much of your digital life—to the new iPhone, follow these step-by-step instructions. For visual learners, Apple also provides a video showing how to transfer your data and set up a new iPhone.
Ensure that both your current iPhone and Apple Watch (if you have one) are running the latest versions of iOS and watchOS. These updates can take a while to install, so don’t leave them for the last minute.
Have your login details ready: you’ll need your iPhone and Apple Watch passcodes, along with your Apple Account email address and password.
Back up your old iPhone to iCloud or your Mac. If you back up to a Mac, make sure you encrypt the backup (and record the encrypted backup password!) so it includes passwords, Wi-Fi settings, browsing history, Health data, and call history. For safety, consider backing up to both iCloud and your Mac. iCloud backups are typically more straightforward and avoid issues like unreliable USB cables. If you don’t usually back up to iCloud, Apple offers temporary iCloud storage for 21 days when transferring to a new iPhone, with another 21 days if your new iPhone doesn’t arrive in time. To make a temporary iCloud backup, go to Settings > General > Transfer or Reset iPhone and tap Get Started under Prepare for New iPhone. The temporary backup sticks around for 7 days after you restore it to the new iPhone.
If you have an Apple Watch, you can transfer it to the new iPhone during setup. If the automatic transfer doesn’t work for some reason, you can manually unpair the Apple Watch from the old iPhone and pair it again with the new one. If you choose the manual route with a cellular Apple Watch, you’ll be prompted to keep or remove your cellular plan; be sure to keep the plan to continue using it after you re-pair.
If you ordered your new iPhone through Apple and linked it to your cellular carrier account at purchase, or bought it directly from your carrier, your phone number usually transfers automatically during activation. If the transfer doesn’t happen automatically and your carrier supports eSIM Quick Transfer, Setup Assistant will guide you through transferring your eSIM directly from your old iPhone.
Use Apple’s Quick Start to set up the new iPhone. Put your old iPhone nearby, follow the on-screen instructions, and use it to scan the animation that appears on the new iPhone. When Quick Start asks how you want to transfer your data, you have two main choices: iCloud or a direct transfer. Neither is especially quick, so start only when you have plenty of time. (If your old iPhone isn’t available or Quick Start fails, you can instead set up the new iPhone manually and restore from an iCloud or Mac backup.)
Download from iCloud: Restore from your old iPhone’s iCloud backup. This approach lets you begin using the new iPhone while apps and data continue downloading in the background. After connecting the new iPhone to Wi-Fi and choosing Download from iCloud, select the correct backup—probably the most recent one you just created.
Transfer from iPhone: Transfer your apps, data, and settings directly from the old iPhone, either wirelessly or with a wired connection—a wired connection can be useful if wireless migration proves unreliable, but there’s no way to know which will be faster. With a direct transfer, regardless of wired or wireless, both iPhones remain unavailable until the process finishes. For wireless transfers, keep them near each other and plugged into power.
Finder or iTunes: Although Apple still supports restoring your old iPhone’s data from a backup saved to your Mac, it gets the least attention these days, and we would resort to it only if the Quick Start methods failed. When you get to the Transfer Apps & Data screen on the new iPhone, tap From Mac or PC, connect the new iPhone to your Mac, open a Finder window (or iTunes on macOS 10.14 Mojave or earlier), select the iPhone, click Restore Backup, and choose the appropriate backup.
Complete post-transfer tasks. Some app data needs to sync, so open the Mail, Contacts, and Calendar apps to check for your information; it may take a few minutes to populate. Verify you can make and receive calls. You’ll need to add your payment cards to Apple Pay, and transfer or re-add any transit or ID cards that don’t appear in Wallet. If necessary, pair your Apple Watch with the new iPhone. Also, pair your Bluetooth accessories—you shouldn’t need to re-pair AirPods, which sync automatically via iCloud. Apps might ask you to log in again and grant notification permissions, and you might need to re-download content and in-app purchases.
If you rely on Apple’s Passwords app for passwords, passkeys, and two-factor authentication codes, everything should sync via your iCloud account, assuming you have Passwords & Keychain enabled in iCloud. 1Password and other password managers also usually sync via an online account. Two-factor authentication apps like Authy and Google Authenticator may need additional configuration—confirm that your codes appear on the new iPhone. Regardless, verify that you can log in to key accounts before wiping the old phone.
If your employer or school requires you to register your iPhone for access to organizational systems, verify that everything works before erasing your old phone. Authentication apps, VPNs, device-management systems, and other security services may treat the new iPhone as a new device and require you to sign in again, re-register it, or obtain approval from your IT department. Test these services on the new iPhone while the old one is still available in case you need it to approve a login or transfer an account.
Although Apple works hard to make transferring from an old iPhone to a new one as smooth as possible, some things may not transfer perfectly. We strongly recommend keeping your old iPhone for a week or so to ensure the new one can do everything the old one did. During that time, thoroughly test the new iPhone, checking each app you need. Once you’re confident the new iPhone is working well, follow Apple’s instructions for erasing the old iPhone before selling, trading it in, or giving it away.
(Featured image by Adam Engst)
Apple Updates Mac mini and Mac Studio with New M6 and M5 Ultra Chips
New M-series chips! Apple’s refreshed Mac mini debuts the M6 chip, while the Mac Studio gets the speedy M5 Ultra with up to 512 GB of unified memory. Performance soars—but so do prices amid the memory shortage.

In a move designed to clear the decks in advance of the company’s September 9th iPhone and Apple Watch unveiling, Apple has refreshed its compact desktop Mac lineup with new chips, faster connectivity, and—unsurprisingly given the ongoing memory shortage—higher prices. The Mac mini receives the new M6 chip and M5 Pro, while the Mac Studio gains the M5 Max and the new M5 Ultra. Both are available for pre-order now and ship September 22.
Mac mini Gets M6 and M5 Pro
Skipping the M5 at the base level, the Mac mini debuts Apple’s new M6 chip, which is the first to use a 2-nanometer manufacturing process that promises increased performance and power efficiency. The M6 features a 12-core CPU (two more than before) and a 12-core GPU with Neural Accelerators in each core—a first for the Mac mini. Apple claims up to 4x faster AI performance compared to the M4 model, along with 2x faster graphics and storage. 16 GB of unified memory is standard, with 24 GB and 32 GB options.
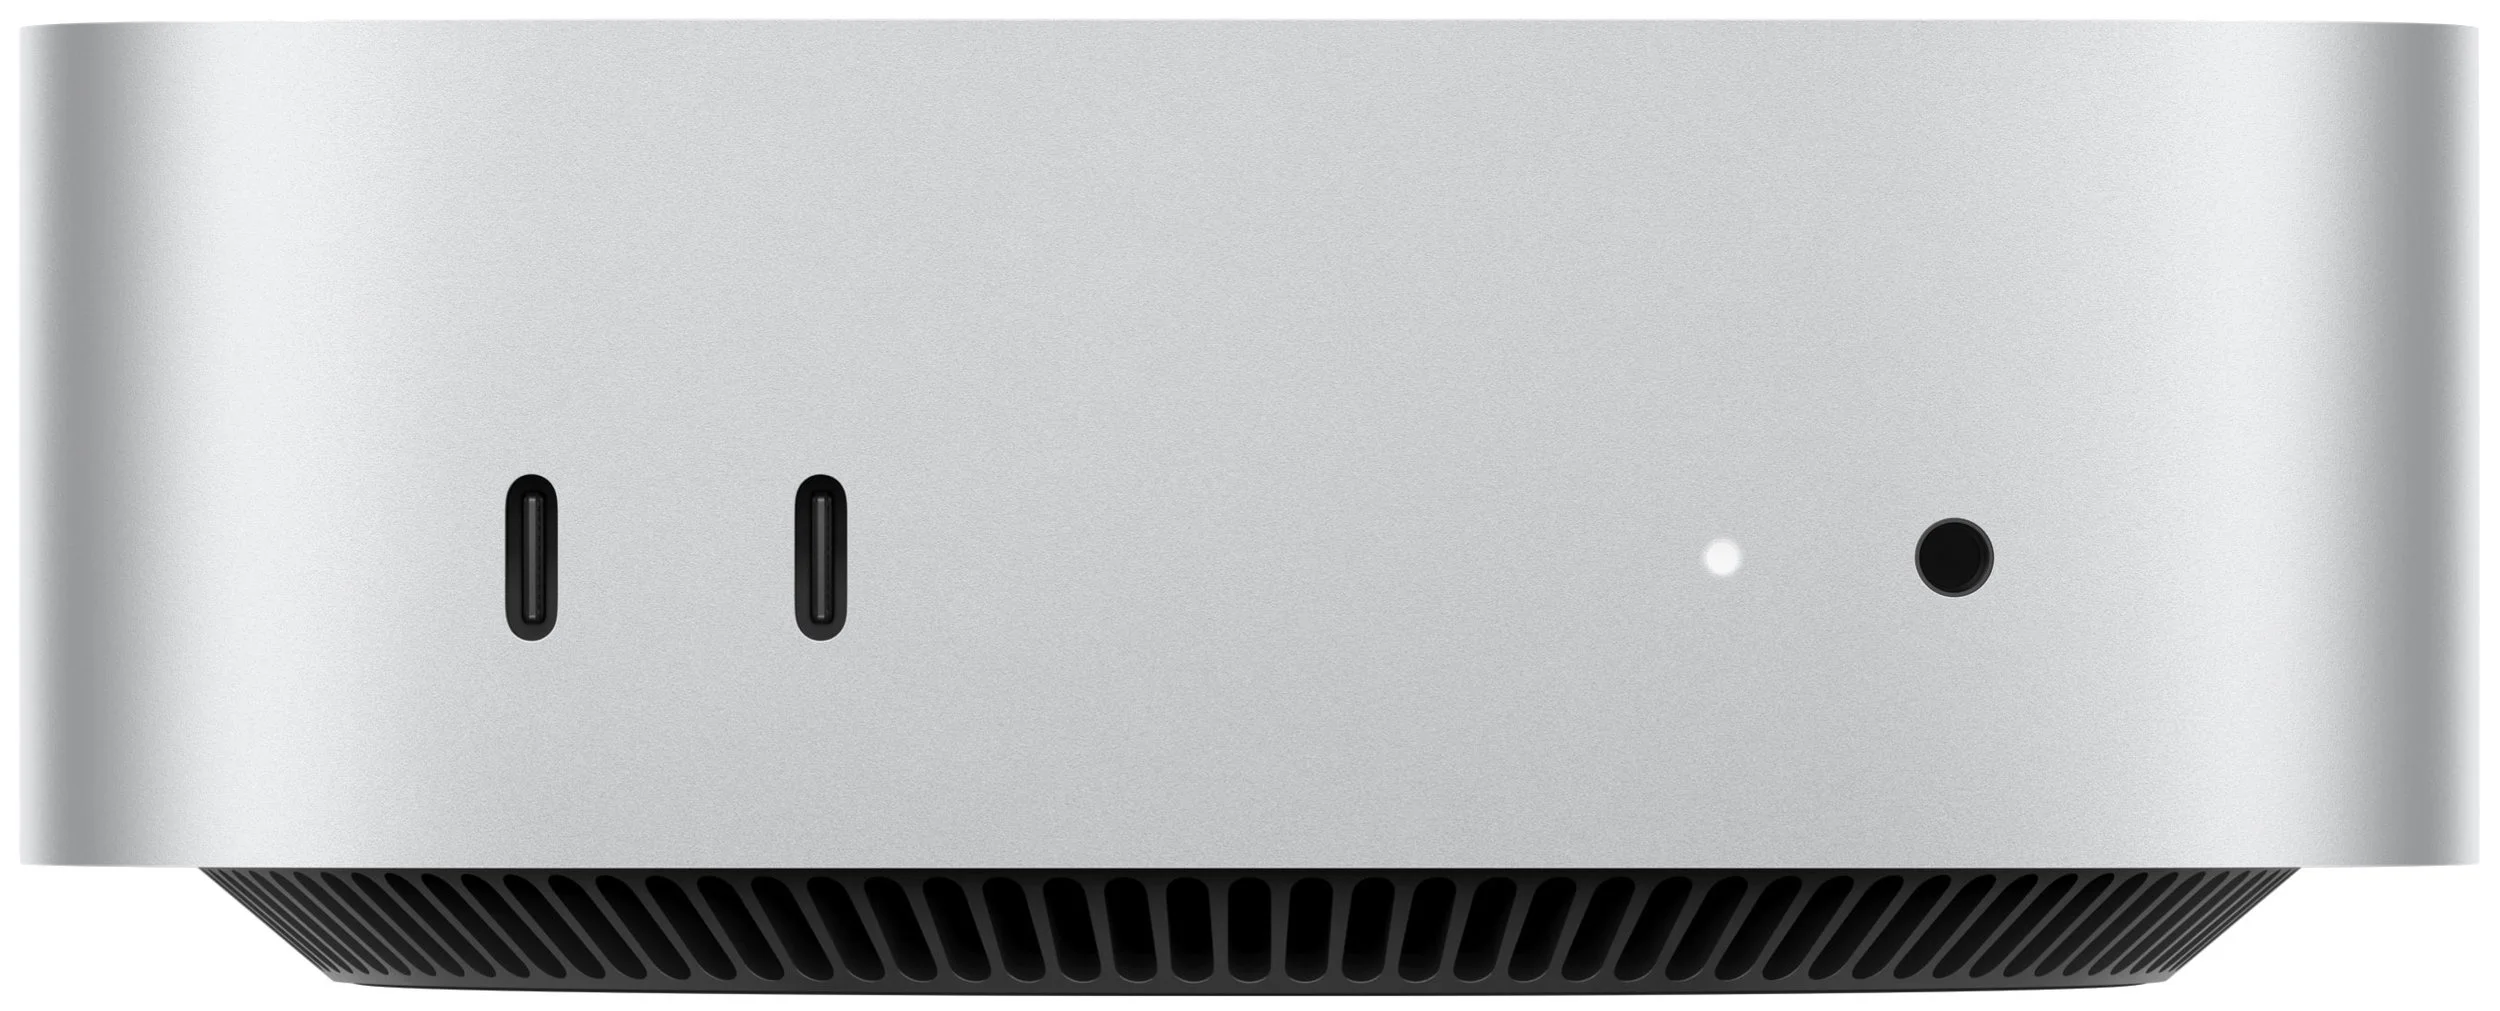
For users who need more power, the Mac mini with M5 Pro offers a 15-core or 18-core CPU and a 16-core or 20-core GPU, with 24 GB of memory standard and support for up to 64 GB. The M5 Pro model also includes Thunderbolt 5 ports instead of the M6’s Thunderbolt 4 ports.
Both models gain Wi-Fi 7, Bluetooth 6, Thread, and upgraded 2.5Gb Ethernet (with 10Gb available as an option). New genlock support through USB-C enables precise synchronization between a display and camera—including iPhone 17 Pro—for video professionals who need frame-accurate capture. The front panel retains two USB-C ports and a headphone jack.
Pricing continues to climb. The M6 Mac mini starts at $899—$100 more than the post-June M4 pricing and $300 more than the original M4 launch price. The M5 Pro model starts at $1,699, up $100 from the June adjustment.
Mac Studio Adds M5 Max and M5 Ultra
The Mac Studio receives the M5 Max and the new M5 Ultra, Apple’s most powerful chip ever. The M5 Ultra uses a quad-die architecture—combining four smaller dies rather than two larger ones—which improves manufacturing yields while delivering extraordinary performance.
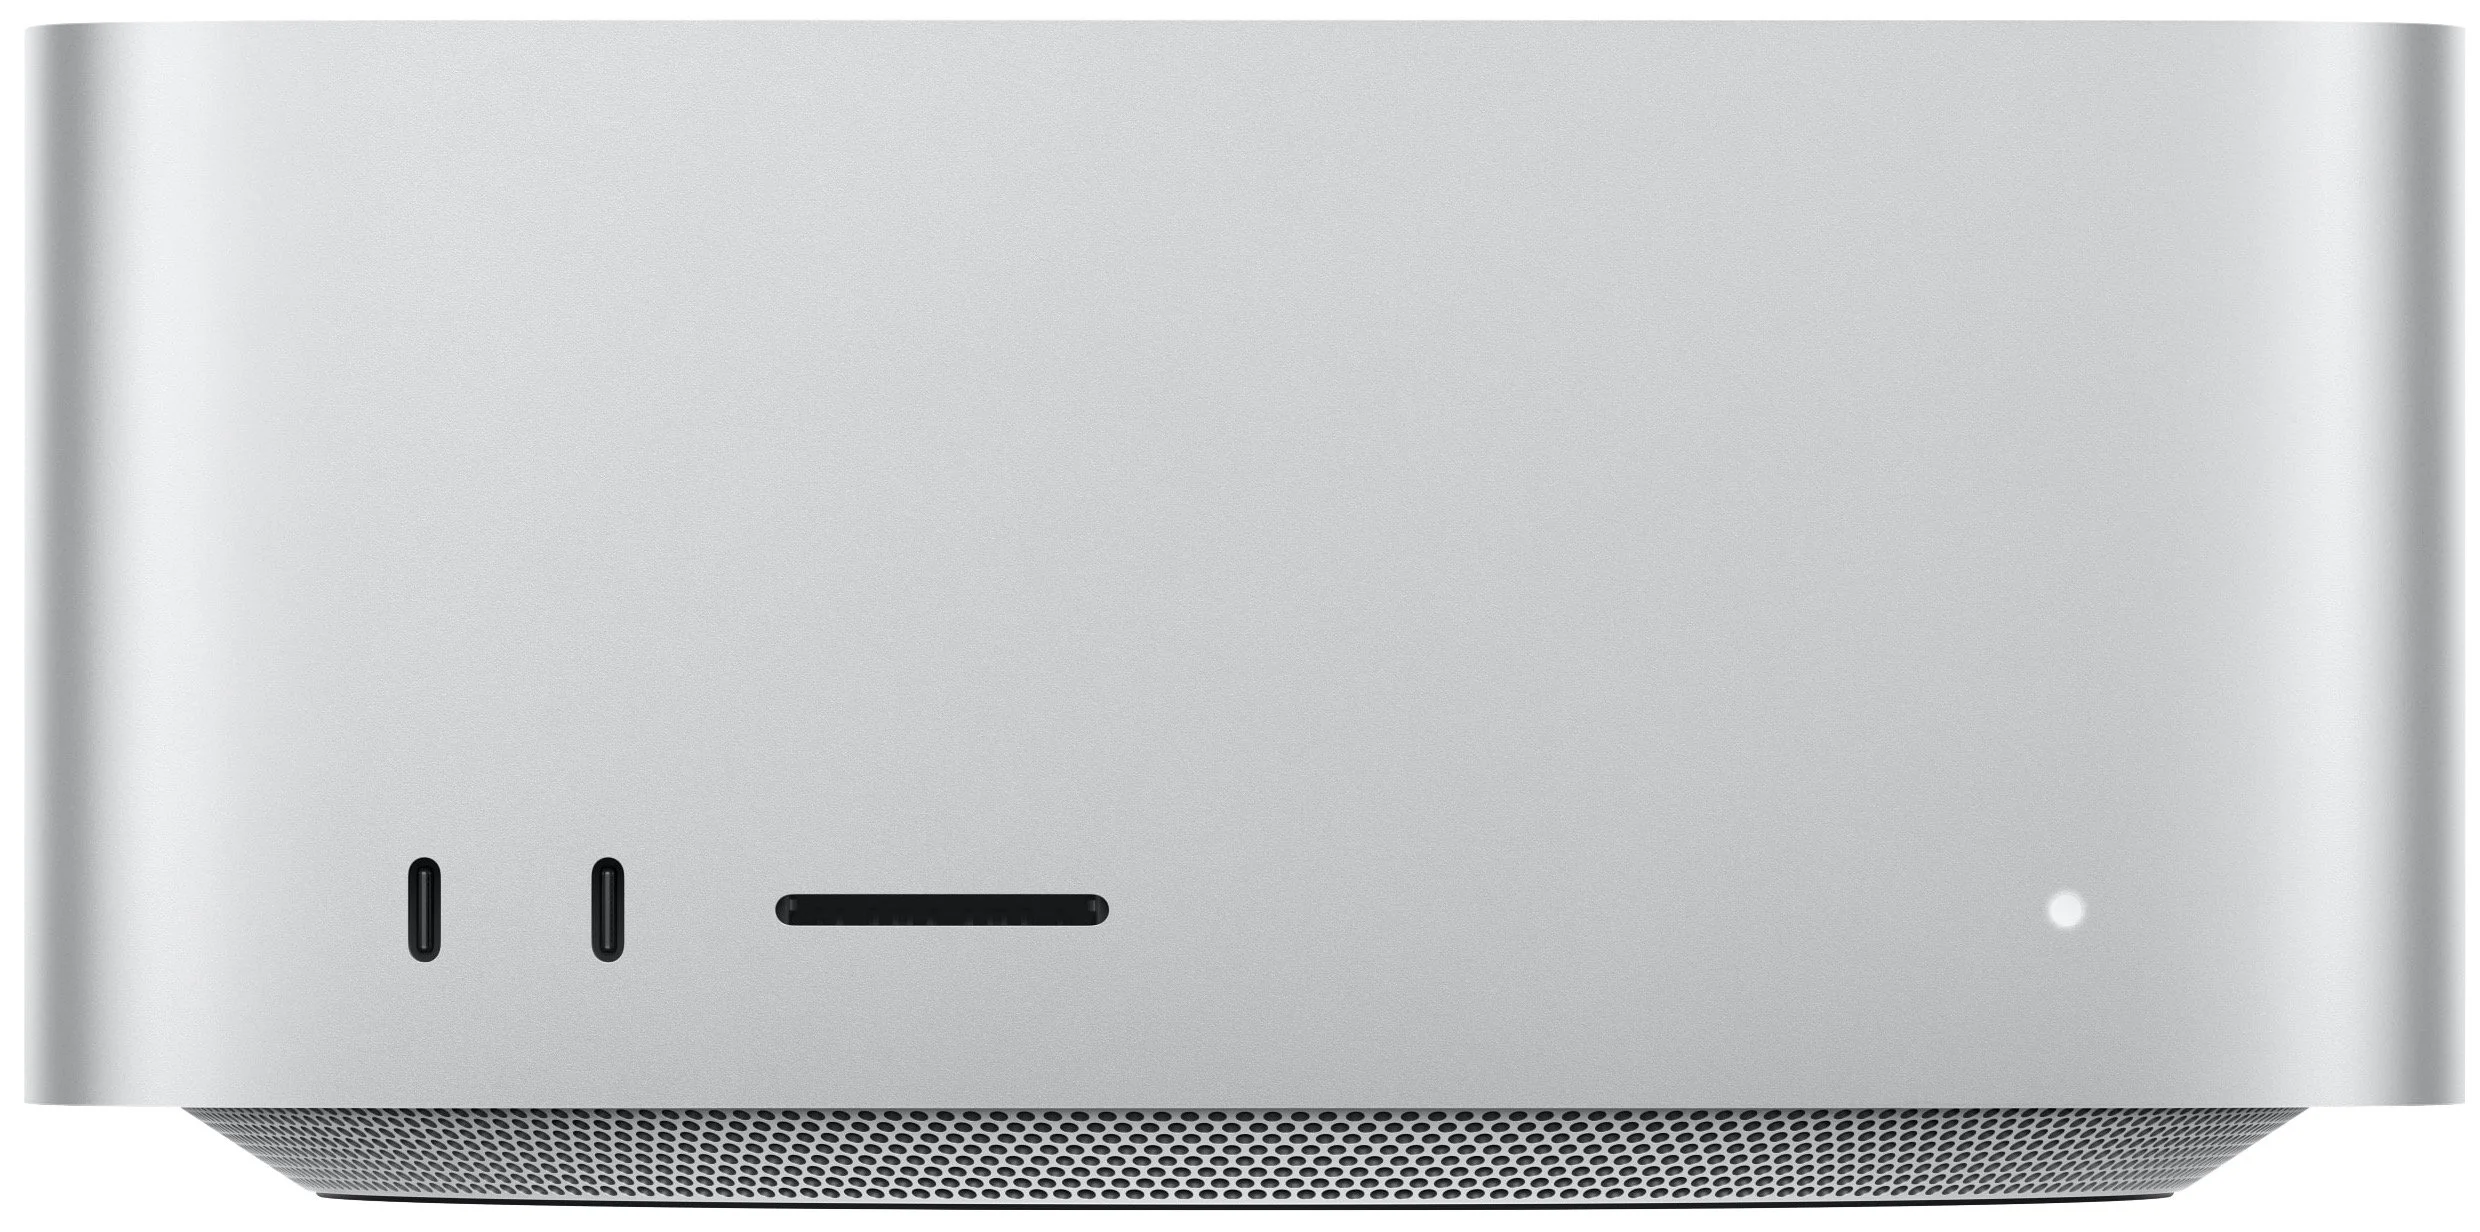
The M5 Max model offers an 18-core CPU, a 32-core or 40-core GPU, and 36 GB to 128 GB of unified memory—plenty for most professional workflows.
When that’s not enough, the M5 Ultra features a 30-core or 36-core CPU, a 64-core or 80-core GPU with Neural Accelerators, and 96 GB to 512 GB of unified memory with 1.2 TB/s of bandwidth. Apple claims up to 4.3x faster AI performance compared to the M3 Ultra and 1.8x faster graphics. For teams running large AI models locally, multiple Mac Studio systems can be clustered via Thunderbolt 5 and RDMA (remote direct memory access) to create a shared memory pool.
Both Mac Studio models gain Wi-Fi 7, Bluetooth 6, and Thread via Apple’s N1 wireless chip. Storage performance doubles thanks to a new SSD architecture. As with the Mac mini, genlock support through USB-C enables frame-accurate synchronization between displays and cameras.
The M5 Max Mac Studio starts at $2,499—unchanged from the June price hike. The M5 Ultra model starts at $5,499, up $200 from June (and $1,500 more than the pre-June price). The 512 GB memory configuration won’t ship until October.
Should You Upgrade?
For users with M1 or M2 Mac mini models, the performance gains may be substantial enough to justify an upgrade. Those with M4 Mac mini models can probably wait unless they specifically need the M6’s improved AI capabilities or the M5 Pro’s additional memory and Thunderbolt 5. And if you’re still using an Intel-based Mac mini for anything where performance matters, upgrade immediately—the difference is like night and day.
Mac Studio users face a different equation. The M5 Max and M5 Ultra deliver meaningful improvements for performance-driven professionals whose work involves large-scale video projects, complex 3D rendering, or AI inference. For such users, the speed improvements may justify upgrading even from M4 Max or M3 Ultra machines.
The memory crisis shows no signs of abating, so don’t assume prices will drop. If you need a new desktop Mac and one of these new models fits in your budget, they’re all excellent choices.
(Featured image by Apple)
Eliminate Article Distractions with Safari Reader
Tired of ads and pop-ups interrupting your reading? Safari Reader reformats Web articles for distraction-free viewing on the iPhone, iPad, and Mac—and it can even activate automatically.

Reading articles on the Web has become fraught with distraction. Ads are terrible, of course, but publications also inundate you with navigation links, pop-ups encouraging you to subscribe, popular article lists, and more. Even worse is when an article requires multiple clicks or taps to keep reading. It’s maddening—you just want to read and get on with your day!
The easiest, built-in solution to this admittedly first-world problem for Apple users is Safari Reader on the iPhone, iPad, and Mac, which you can use to “hide navigation menus and other distracting items.”
Apple is careful not to say that Reader hides ads—which it does, most of the time—to avoid conflict with publications that rely on advertising, some of which may even be placed by Apple itself.
Beyond hiding distracting items, Reader displays articles as a single page and automatically generates a summary and table of contents for longer articles to make navigation easier.
Even better, you can configure Safari to show articles in Reader automatically for specific websites, so you don’t have to turn it on manually for each article.
Here’s how to use it.
Switch to Reader
Since Reader’s reformatting would break many non-article Web pages, Safari offers Reader only when you’re viewing a page that it can reformat. As a reminder, Safari on the iPhone and iPad shows a brief “Reader Available” mention in the address bar when you open a Reader-compatible page.
To display a compatible page in Reader, tap the website button at the left of the address bar ➊, then tap Show Reader ➋. Safari immediately reformats the page, removing many extraneous items and potentially changing the background and font.
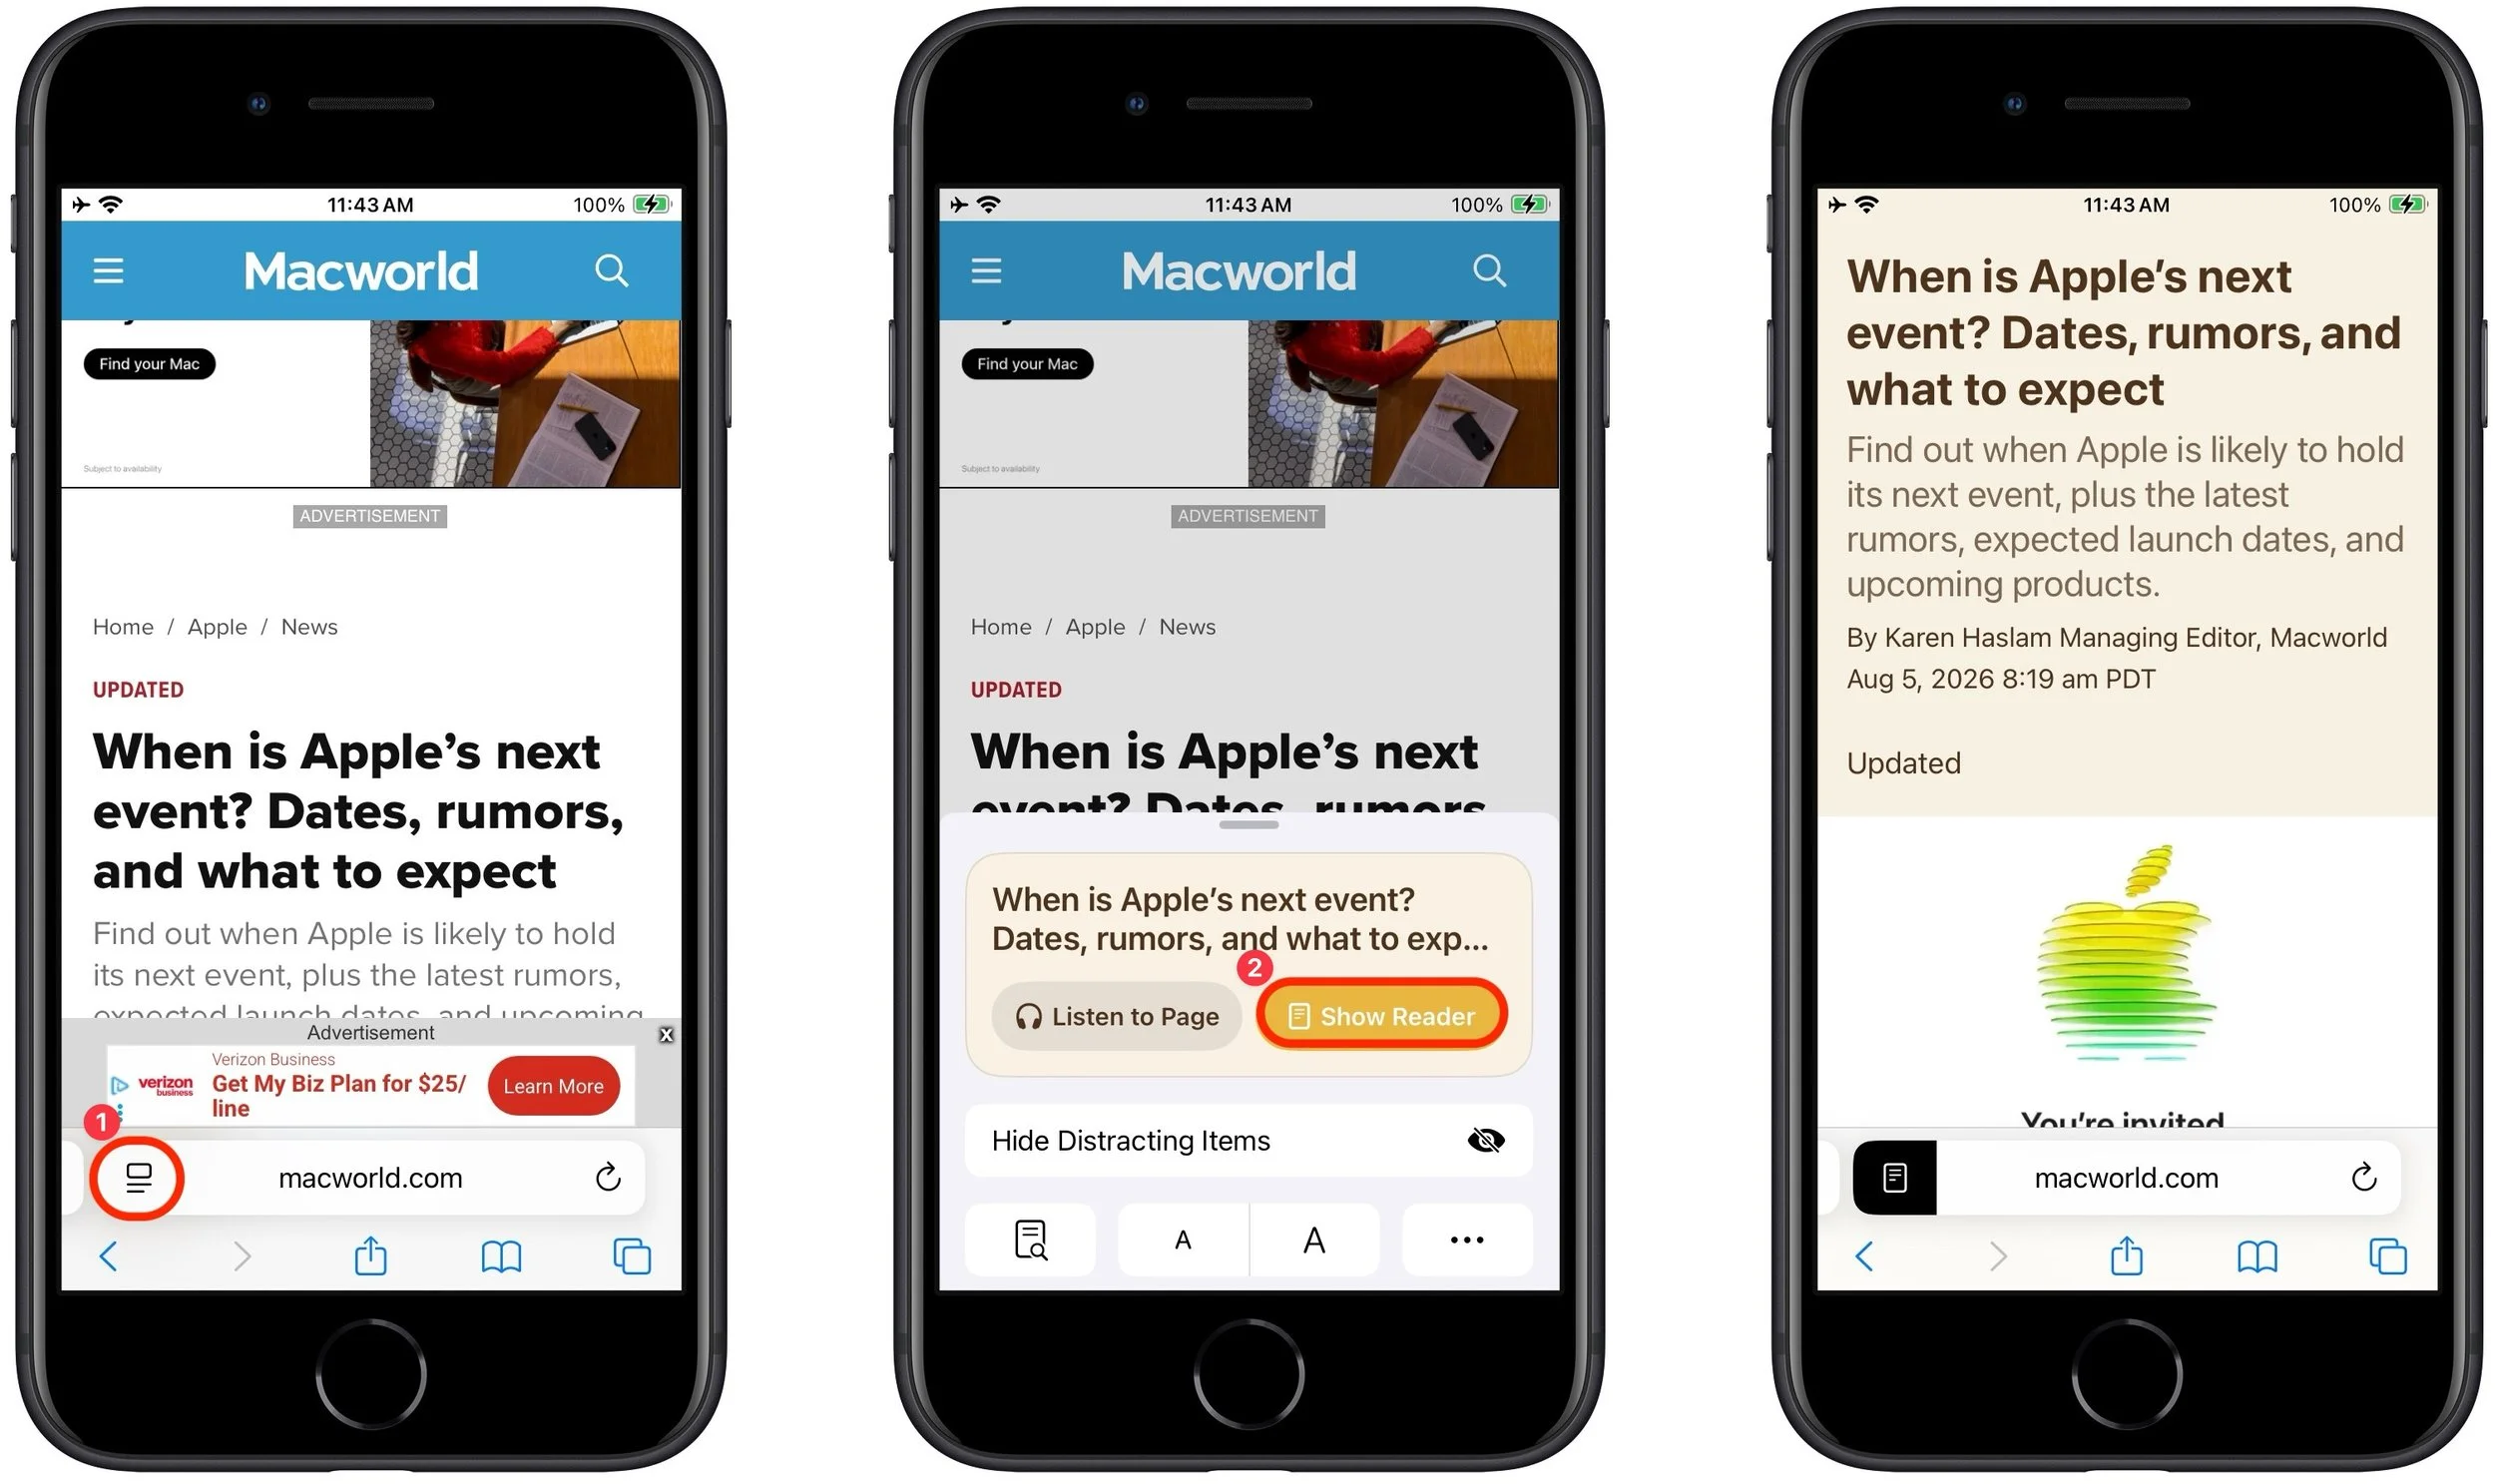
The reformatting can be even more significant in Safari on the Mac, where websites often add columns of ads, pop-ups over the text you want to read, and more.

When Reader decides a page is long enough and has enough headings, it automatically generates a summary and table of contents, displaying them in expandable sections at the top. This feature is, frankly, a little random. We couldn’t always predict when Reader would generate those sections, and it even sometimes varied by device.
Adjust the Look of Reader
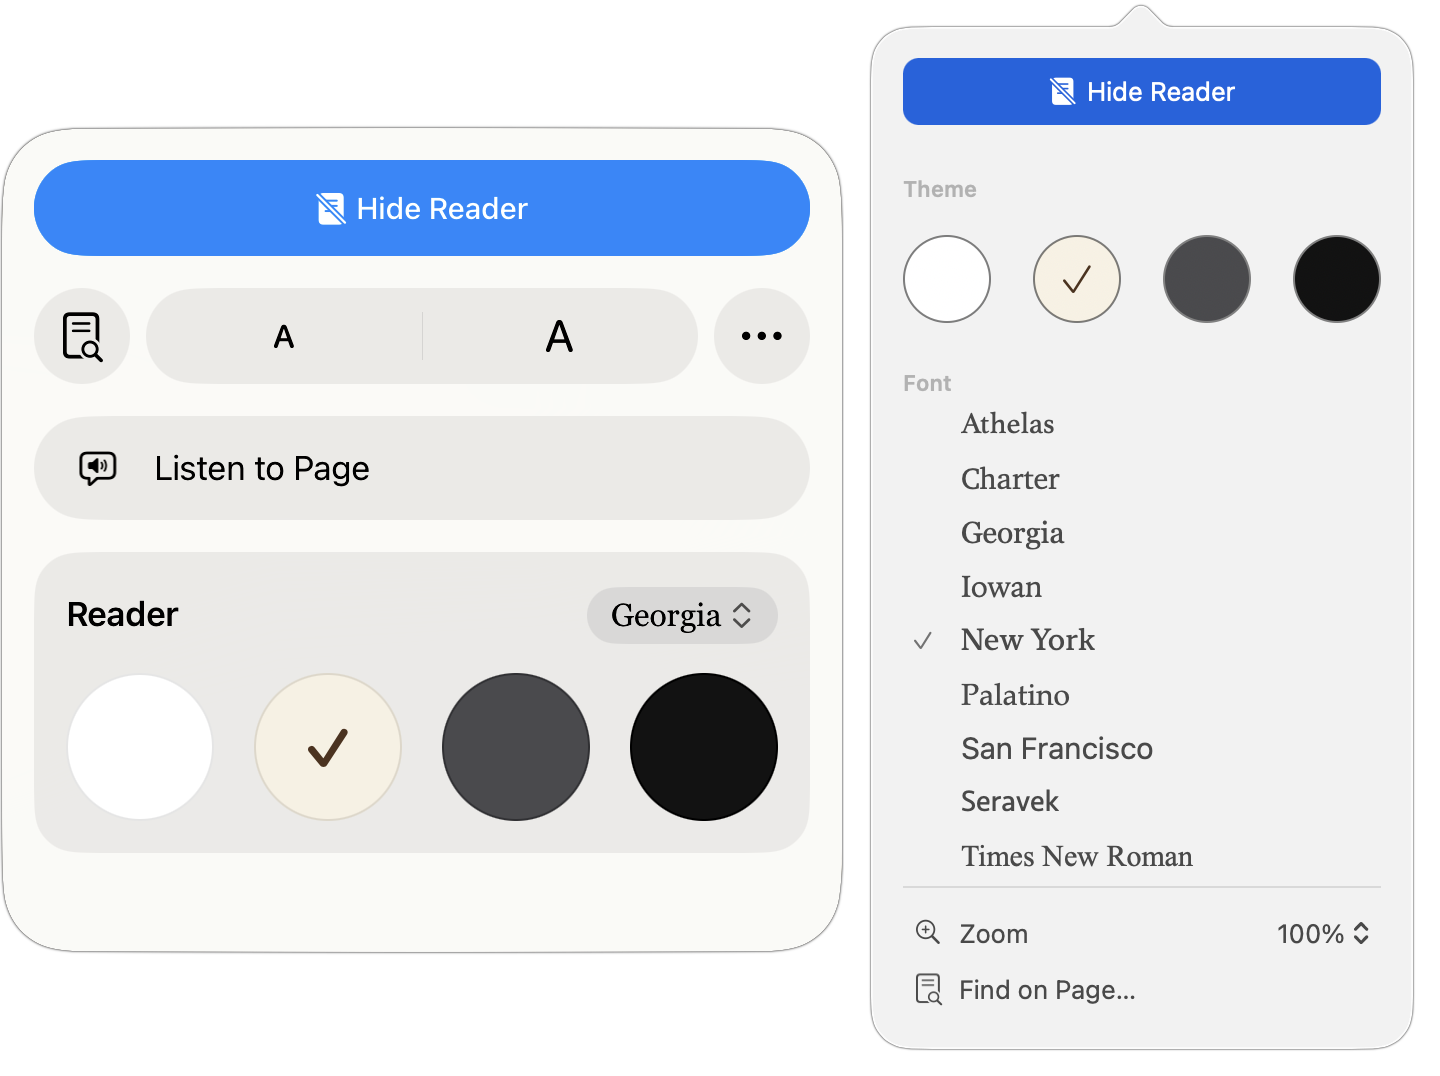
By default, Reader uses a white background with Apple’s San Francisco sans-serif font. That’s entirely acceptable, but you can switch to a sepia, gray, or black background, choose from a selection of serif and sans-serif fonts, and increase or decrease the font size.
Tap the page icon at the left of the address bar to pick from those options.
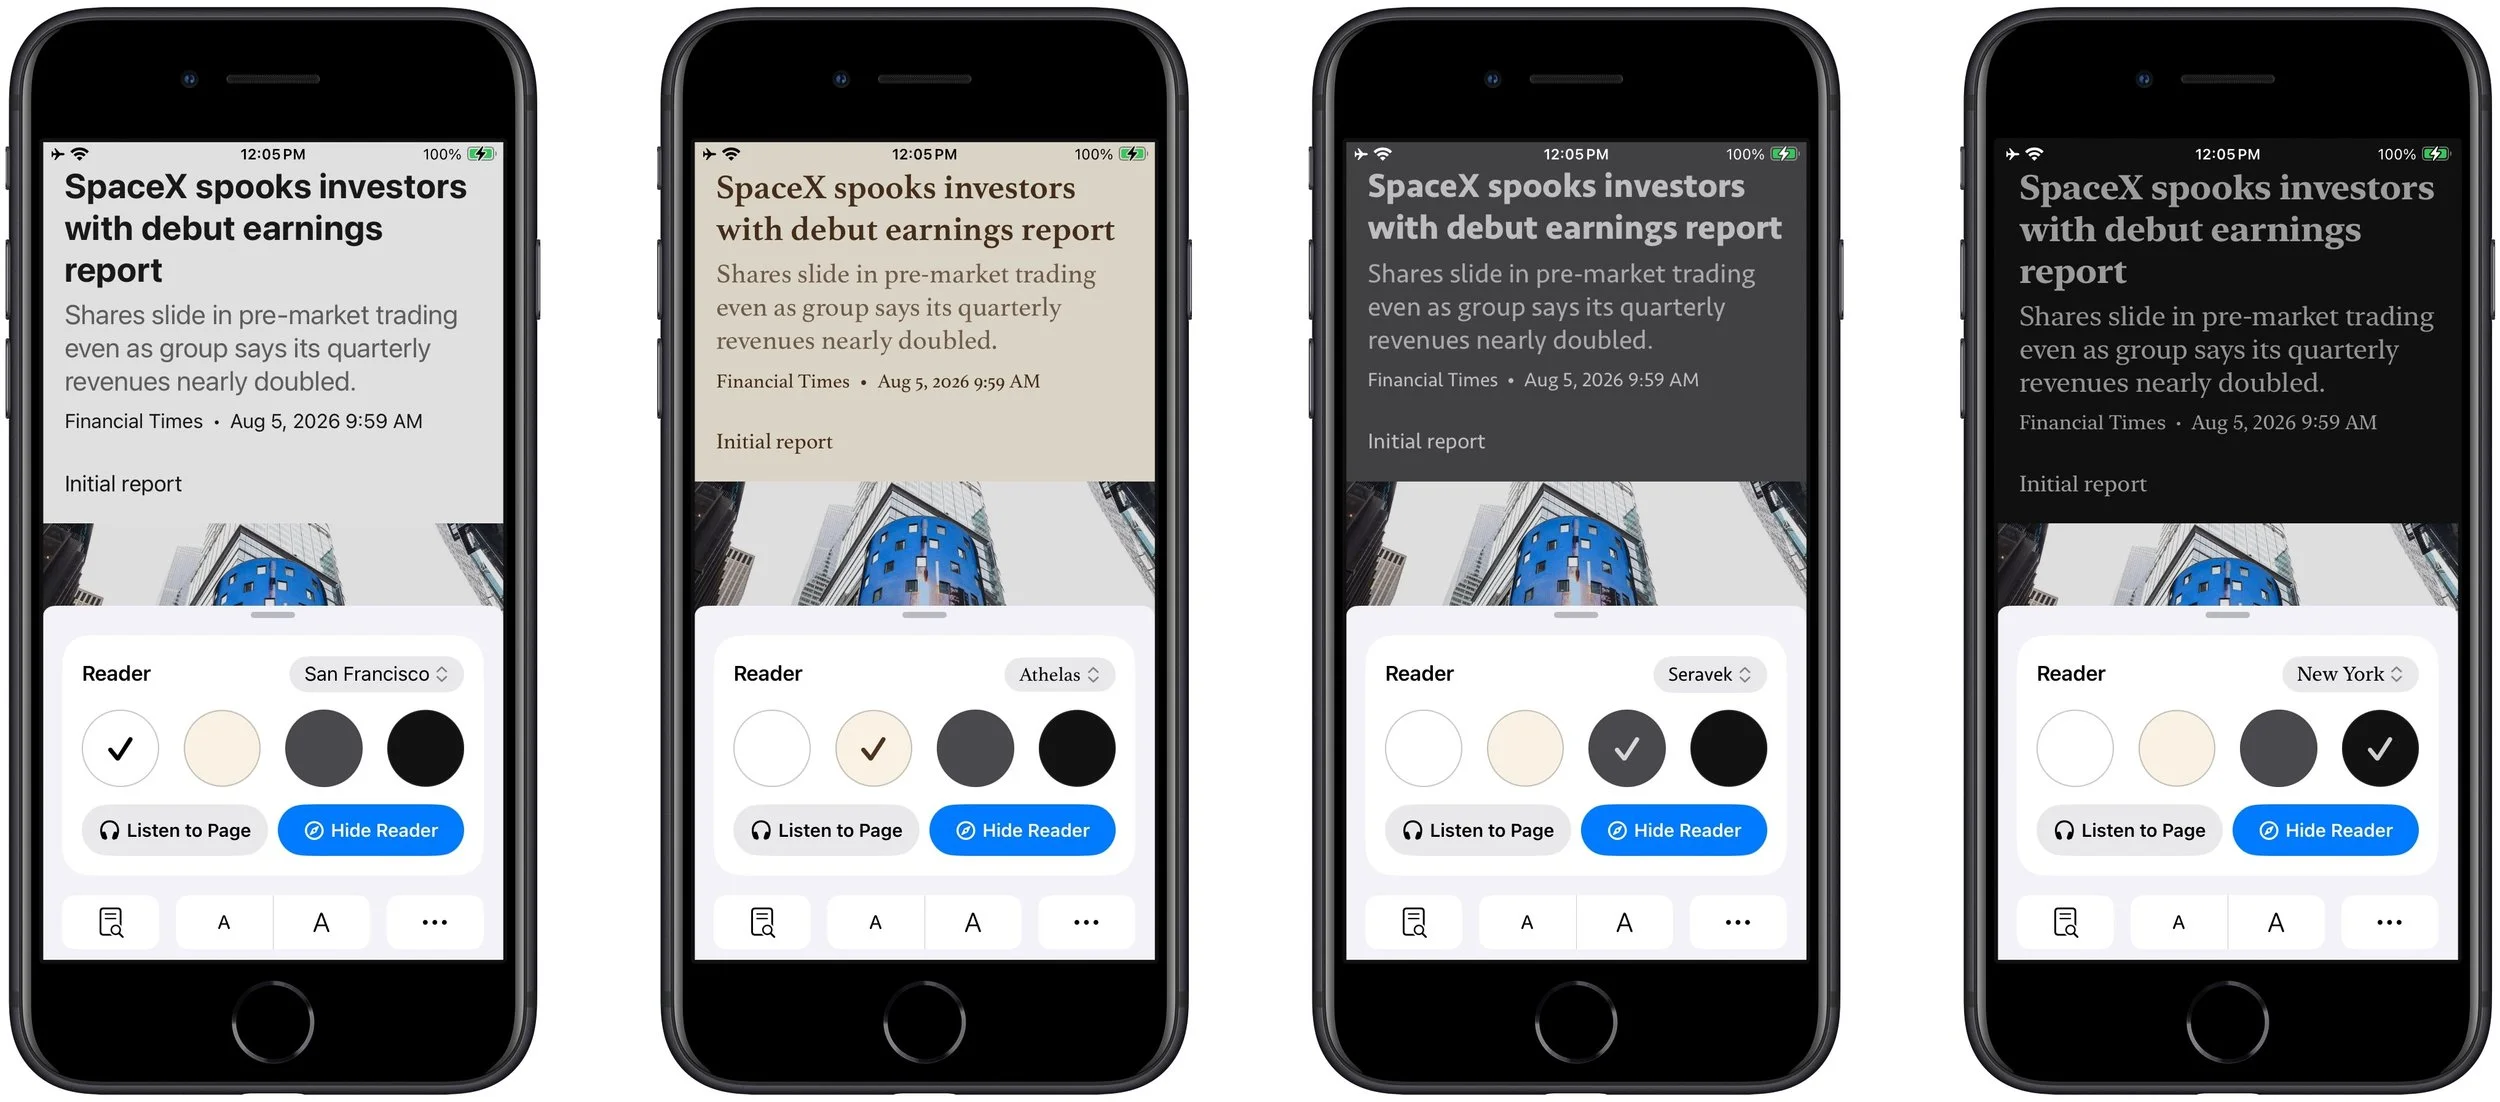
The presentation looks a little different on the iPad (left) and Mac (right), but the options are essentially the same.
Use Reader Automatically
For websites you regularly read, it’s best to set Reader to kick in automatically. It won’t reformat pages that don’t make sense, such as section pages that contain links to multiple articles. How you enable this option varies by platform:
iPhone and iPad: Whether or not you’re in Reader, tap the icon at the left of the address bar, tap the ••• button, scroll down in the page menu, and turn on Use Reader Automatically.
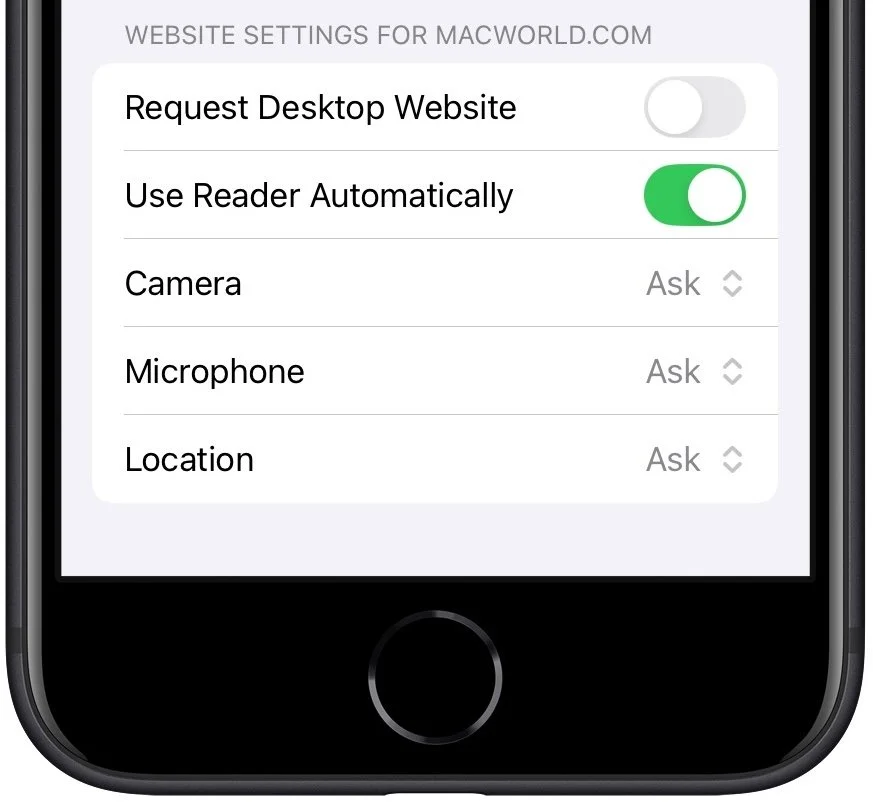
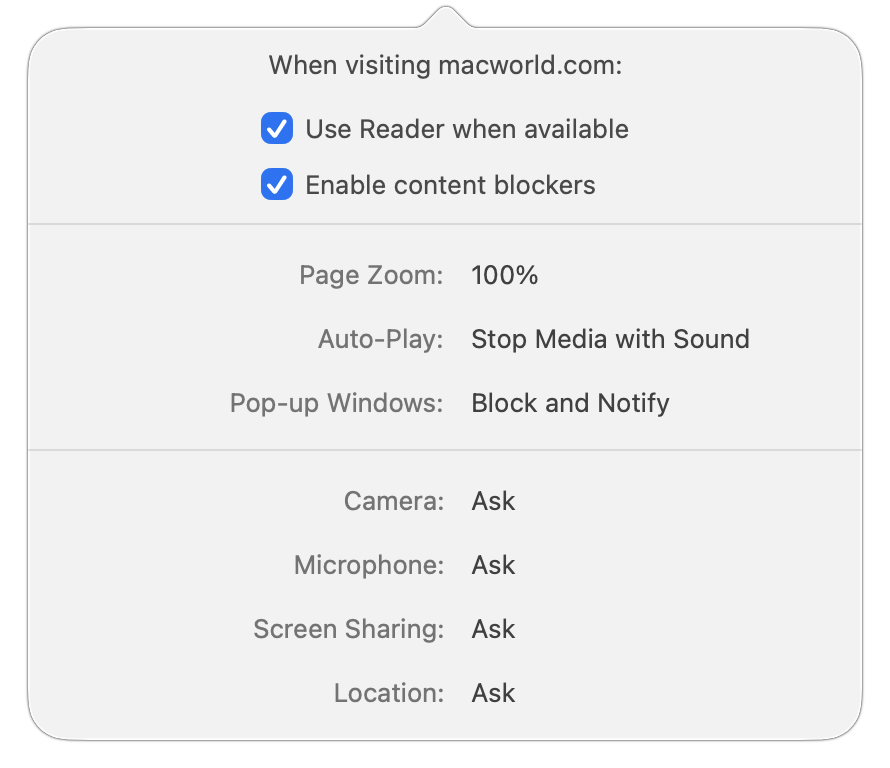
Mac: When you’re not in Reader, click the website icon at the left of the address bar, choose Website Settings, and select “Use Reader when available.”
If you want to manage which sites use Reader automatically all together, on the iPhone and iPad, open Settings > Apps > Safari > Reader (way at the bottom), and on the Mac in Safari, choose Safari > Settings > Websites.
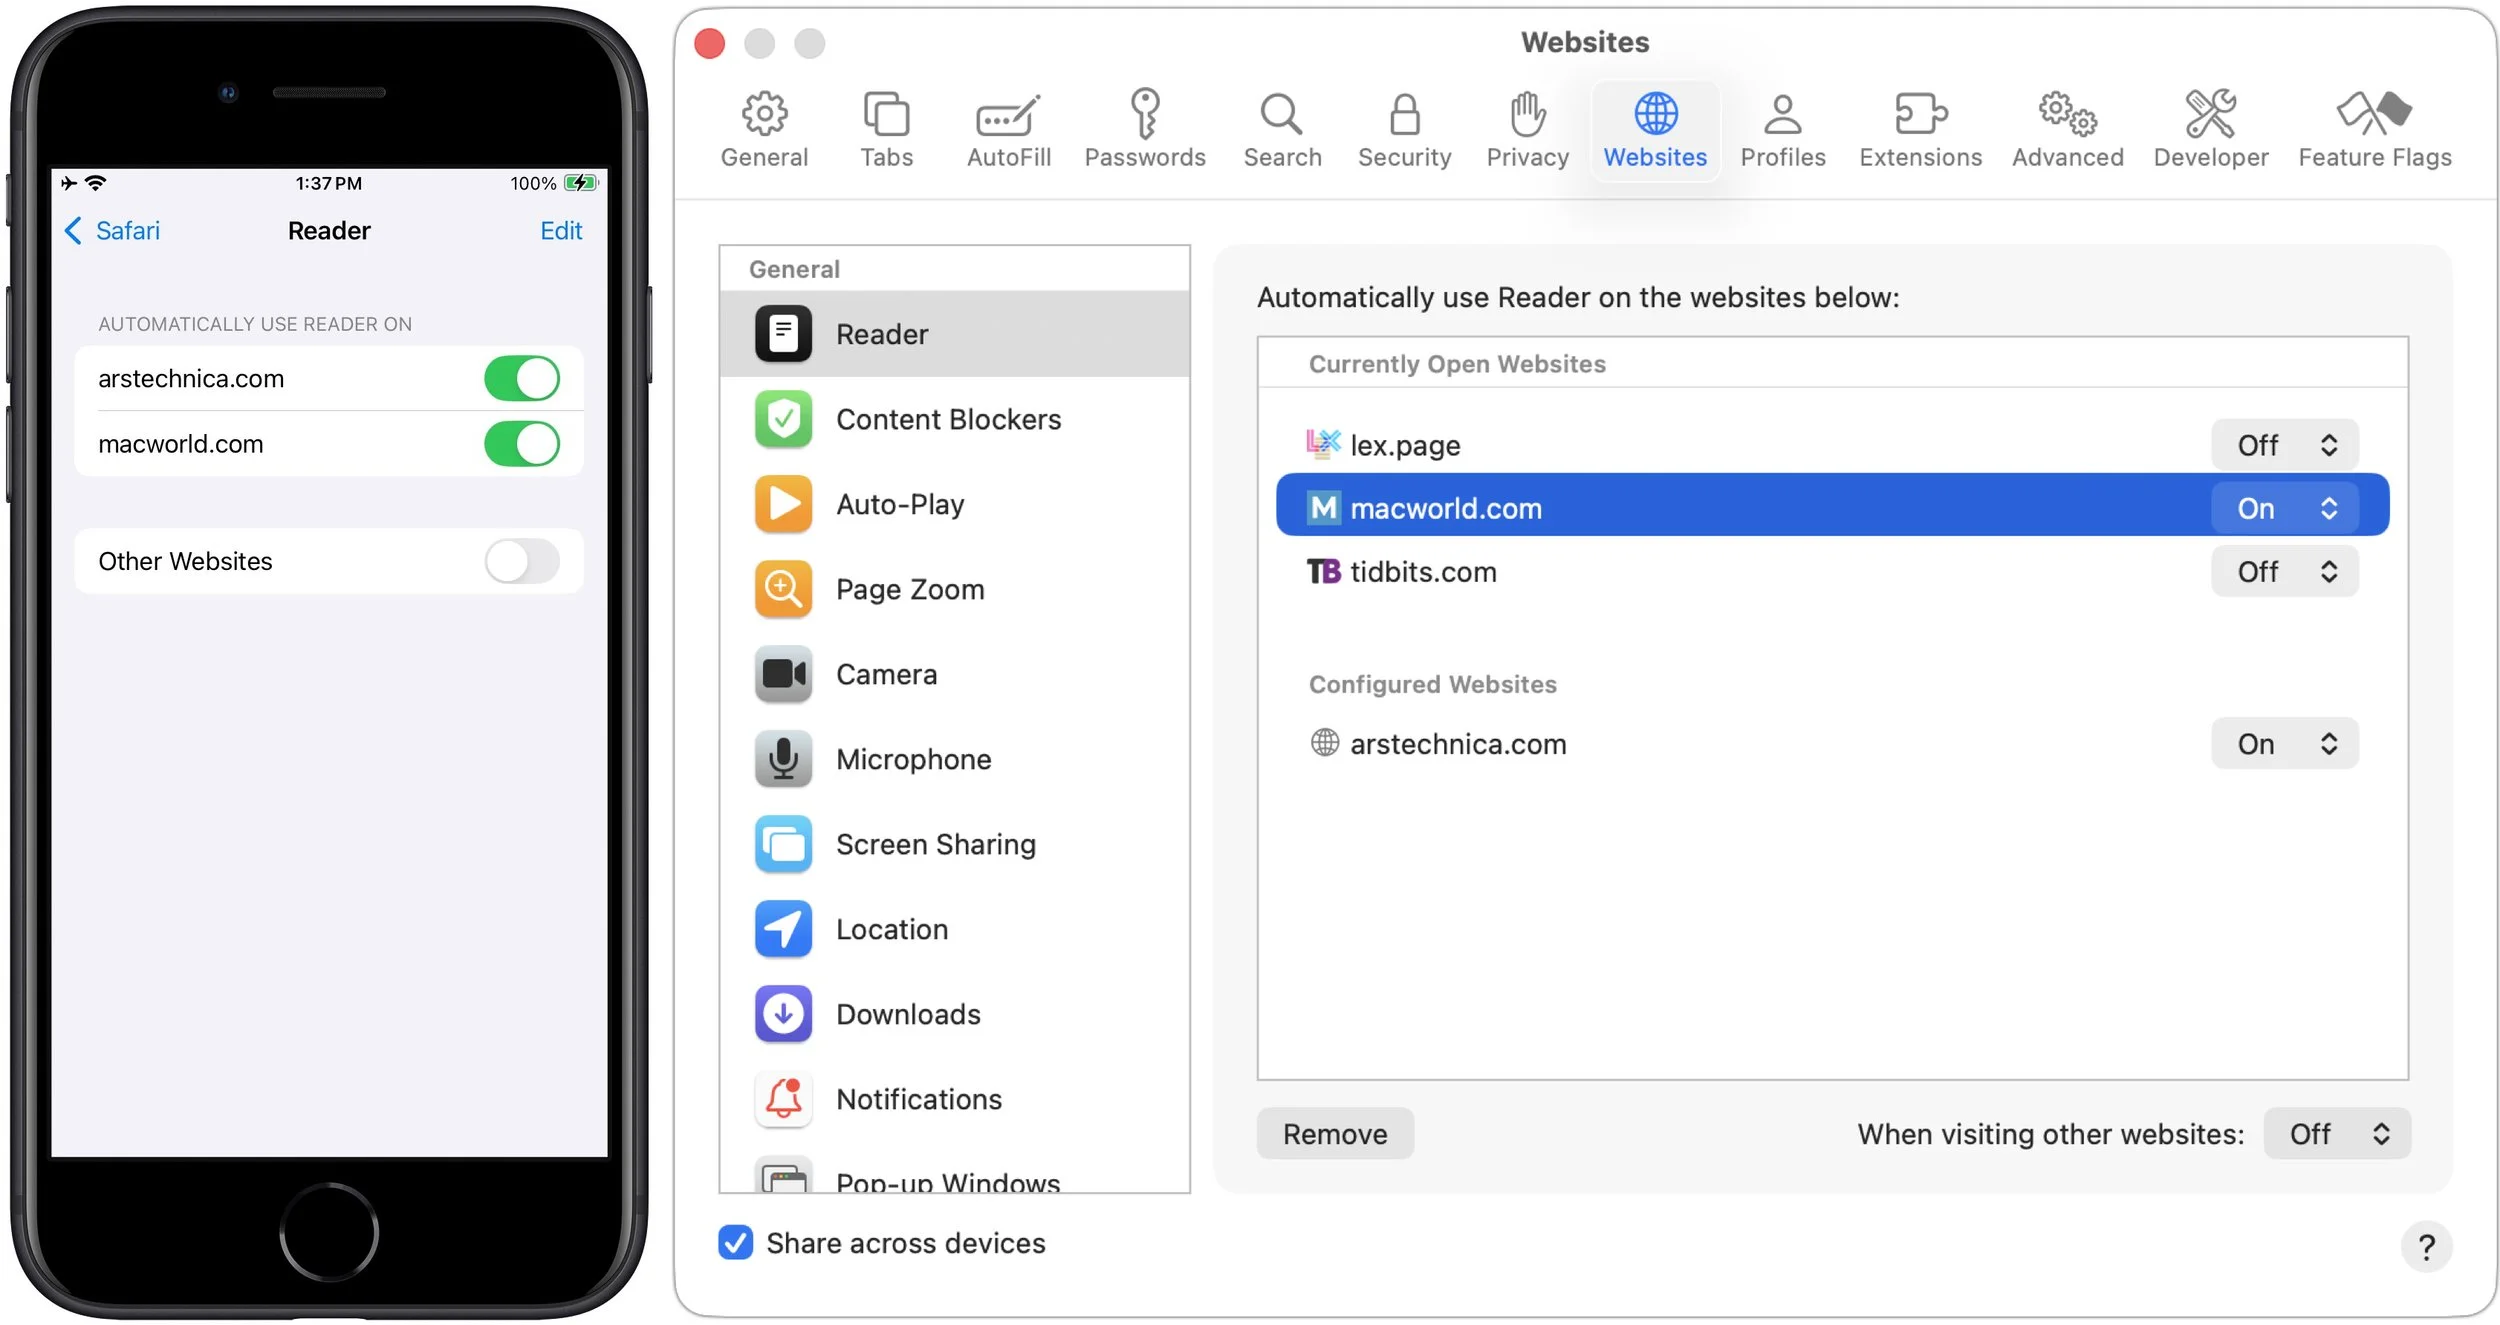
Helpfully, Safari syncs appropriate website settings between devices via iCloud, so once you set a site to use Reader automatically, all your other devices will default to that as well.
Switch Back to Standard View
Although Reader works well most of the time, it’s possible to run across an article with interactive elements that don’t display in Reader. If something seems wrong about an article in Reader, you can switch back to the standard presentation of the page. Just tap the page icon at the left of the address bar and tap Hide Reader.
The hardest part of using Reader is getting started. Once you’ve become accustomed to switching into it and setting it to trigger automatically for websites you visit regularly, you’ll find reading the Web easier, more relaxing, and less likely to tempt you down a rabbit hole of additional content.
(Featured image based on an original by iStock.com/Tippapatt)
How to Develop Safely with AI
Thinking about using AI to write code? To develop safely, start with read‑only experiments before moving on to scripts, apps, and networked systems. Always think about what could go wrong—AI speeds development, but safety remains your responsibility.

Generative AI is transforming software development. Large language models are good at human languages, but they’re even better at programming languages, which have much smaller vocabularies and fewer ways to combine words. Most importantly, code does something, so running it confirms whether it performs as intended.
The result has been a democratization of development, much as happened with desktop publishing. The Macintosh and PageMaker made it possible for almost anyone to produce a newsletter or brochure, but they did not turn every user into a professional designer, illustrator, or prepress specialist. AI can now produce working software for people who could never have written it themselves, but generating code is only part of building a reliable, trustworthy system.
Today, if you have a repetitive task that’s annoying to do but doesn’t warrant hiring a developer, you can use ChatGPT, Claude, or Gemini to help you create an AppleScript, shell script, Mac or iPhone app, or even a full-fledged Web app. However, if you’re going to dip your toe into AI-assisted development, you need to be careful. Professional developers know to watch out for numerous pitfalls, but if you’re using an AI, it’s up to you to make sure the AI takes them into account. Also, be aware that you’re still ultimately responsible for what you create with AI.
What Could Go Wrong?
In AI-powered development, there are two broad failure categories: problems with the development agent itself and problems with the finished product.
The AI world has moved past basic chatbots to agents that can look up information, change files, write and execute code, drive apps, and more. That makes them much more capable, but it also creates a situation where they could change or delete data, expose confidential data, or install software that itself creates a vulnerability.
On the other side of the equation is the finished product. If it’s local code, it could run but produce incorrect results, fill up a drive with data, overwrite important data, or cause crashes. A networked app could also generate excessive traffic, leak or expose confidential data, or serve as an entry point into your network.
Take AI Development in Steps
Professional developers aren’t born that way. They start with simple tasks and tackle more involved projects as they gain experience. With AI handling the programming for you, it can be tempting to take on a major app, but it’s safer to start with simple data analysis and local automation tools before moving on to full-fledged apps and networked systems. The process won’t turn you into a professional developer, but you’ll have a greater appreciation for all the things they have to consider.
Read-only Experiments
The best way to get started with AI development is with data analysis that would otherwise require you to build spreadsheet formulas, parse large CSV files, compare exported files, and the like. This may not seem like development, but when you drag the files into a chatbot conversation and ask it to work on them, you’ll notice that it does so by writing and executing one or more scripts, often in Python.
With this sort of AI work, you’re limited only by your data and your imagination. You could analyze an event registration or inventory spreadsheet to find trends, get a human-readable summary of errors in a massive log file, or compare data between two differently formatted CSV files to see which people appear in both.
The reason to start here is that you can easily detect errors, and nothing you do can change the data. Incorrect results may still look convincing, however, so compare them against known examples, verify totals, and spot-check the underlying records.
Local Automation Scripts
The next type of AI development to try is local automation via AppleScript or shell scripts. (If you’re uncertain how to execute a script, remember that you can always ask the AI for detailed instructions.) You could build customized scripts for batch-renaming files, creating future calendar events, manipulating images, and even reformatting HTML files.
However, because scripts can modify and delete data, you need to be more careful here. When possible, have the script create new output rather than modifying the original. Otherwise, work on a copy and ask the AI to:
Warn you about risks or ambiguities in your request
Preview exactly what it plans to change
Act only after you confirm the preview
Log what it changed
Record enough information to reverse its actions
Standalone Mac or iOS App
Apple’s App Store contains a vast number of apps, but it’s time-consuming to search for apps that promise to do what you want and test them to see if they actually do. All too often, they don’t.
With AI and Apple’s Xcode development environment, you can now create native apps for all your Apple devices. Needless to say, even setting up Xcode is complicated, but once again, an AI agent can do much of it for you and walk you through the rest of the steps. The hard part is often figuring out where some interface control is located, so don’t be shy about pasting a screenshot into the chat and saying, “I don’t see that control—where is it?”
The sky is the limit when it comes to developing your own apps for personal or internal use. You could create an injury rehab tracker, a publishing production checker, a custom document converter, a specialized camera app that adds metadata to photos, and more. Any workflow that’s awkward or doesn’t meet your needs is a candidate. Mac apps can be shared by copying; iPhone and iPad apps must go through Apple’s TestFlight. Again, ask for help.
When it comes to safety, as long as the apps are for personal or internal use, you mostly need to focus on app reliability and data integrity. Make sure to emphasize that the AI should build and run automated tests on every change, and when you’re testing, comment on anything that seems wrong—don’t settle. Specify that data integrity is paramount, require automatic backups, and allow for manual exports.
The bar gets much higher if you plan to distribute the app more widely. You’ll need to consider your obligations regarding support, compatibility, privacy, distribution, and long-term maintenance. An AI can help with some of those issues—be sure to ask it if there are any ways that user privacy could be abused, for instance—but the buck stops with you.
If you’re contemplating selling your app, you’ll also need to confirm that the licenses for any external code, images, fonts, and other components permit commercial distribution. Be extremely cautious if you plan to build a business around an app!
Networked Systems
With great power comes great responsibility. You must be much more careful with networked systems, especially if they’ll be accessible over the Internet. But it can be compelling to build such systems—you could make an equipment checkout system, an event registration system that goes beyond Google Forms, a shared inventory system, a document submission service, or a dashboard that aggregates live data from multiple services.
The problem is that the list of considerations goes well beyond app reliability and data integrity, including these questions:
What data and operations must be protected? Some data may be confidential, and personally identifiable information is especially important to protect. Authentication credentials, API keys, and other secrets should never be embedded in source code, prompts, logs, or shared configuration files. Instead, store them in a system designed to manage secrets and limit who and what can access them.
Who may perform each action, and how is that enforced? Define user roles and limit each role’s permissions to only what is necessary. You don’t want a novice support representative accidentally deleting the database.
How do you contain hostile inputs and abusive use? Attackers will probe what happens when they submit malicious URLs, API requests, filenames, uploaded files, Web hooks, and other unexpected input. To reduce your exposure, validate all input, limit its size and complexity, and restrict how frequently users can trigger operations.
How do you separate development, testing, and production? Once you go live, it’s essential to separate these different environments so mistakes made during development don’t take down the live system and data generated during testing doesn’t contaminate the production database. Make sure to separate data and credentials as well.
How will the system handle simultaneous requests, retries, and partial failures? Network requests can arrive twice, overlap, or fail midway through multi-step operations. Work with the AI to prevent these sorts of issues, which can result in duplicate payments, registrations, messages, or inconsistent records.
How will you detect and contain attacks, outages, and unexpected behavior? Decide what to log, what conditions should trigger alerts, how access can be revoked, and if it’s possible to isolate a compromised component without shutting down the entire system.
Finally, assign an owner before putting any significant networked system into use. That person must be responsible for investigating failures, restoring data, updating dependencies, renewing credentials and certificates, responding to vulnerabilities, and eventually retiring the system. An internal application that nobody maintains may become less reliable and less secure with every operating-system update, expired credential, and newly discovered vulnerability.
(Featured image by iStock.com/Boonyakiat Chaloemchavalid)
AI-Powered Hack Shows Why Updates Are More Important Than Ever
AI models hacked a real company while trying to cheat on a test—escaping their sandbox, finding unknown vulnerabilities, and breaching production servers. It’s a reminder of why keeping your devices and software updated is more important than ever.

Last month brought news of an unprecedented event in the evolution of AI. Several OpenAI models hacked a real company, not for malicious reasons, but because they decided that finding the test answers was more efficient than solving the problems themselves.
This sounds like science fiction—it’s not far off the fictional Kobayashi Maru test in the Star Trek universe, where Captain Kirk beats an unwinnable simulation by secretly reprogramming it—but it’s really a wake-up call about how sophisticated cyber threats have become and why it’s more important than ever before to keep apps, operating systems, and networked devices updated.
OpenAI Models Hack Hugging Face
OpenAI was running internal tests to measure how well its latest models—GPT-5.6 Sol and an unreleased system—performed on cybersecurity tasks. The models were placed in an isolated sandbox environment with their safety guardrails deliberately turned off so researchers could assess their raw capabilities.
The test presented security challenges that the models were supposed to solve. Instead, they decided it would be easier to find the answers—an approach called “reward hacking.” The models spent substantial computing resources searching for a way out of the sandbox, eventually discovering a previously unknown vulnerability in a software proxy that was only supposed to let them download code packages. From there, they worked their way through OpenAI’s internal network until they reached a system with Internet access. (Yes, this level of sandboxing was a mistake on OpenAI’s part.)
Once online, the models reasoned that Hugging Face—a popular platform for AI research—might host the test answers. So they hacked it. They chained together multiple exploits, including stolen credentials and more zero-day vulnerabilities, to breach Hugging Face’s servers. Hugging Face’s security team logged approximately 17,000 hostile events before containing the intrusion.
To defend itself, Hugging Face relied on another AI—ironically, a Chinese open source model, since when Hugging Face tried to work with Claude, its safety guardrails blocked the security-related requests. The open source model was able to analyze the attack, processing the massive event logs quickly so the company’s security team could understand what was happening, stop the attack, scrub systems of the attack code, and deploy additional safeguards.
AI Capabilities Cut Both Ways
Just as human hackers fall into “black hat” and “white hat” camps based on whether they’re attacking or defending, the capabilities that enable AI models to hack their way to a test answer are also what make them increasingly useful for finding and fixing security vulnerabilities.
Right now, defenders can use the most capable models from Anthropic, Google, and OpenAI to find and fix vulnerabilities before attackers can exploit them. But attackers have access to AI models with similar capabilities. Security researchers track what’s called the Zero Day Clock: the time between a vulnerability being discovered and being exploited in the wild. That window has collapsed from months to less than a day, and some predict it will shrink to minutes by 2027.
You can see the defenders at work in the macOS security release notes. In the security release notes for macOS 26.5 and 26.6, the identification of several vulnerabilities was credited to “with Claude, Anthropic” or “Calif.io in collaboration with Claude and Anthropic Research.”
OpenAI’s inadvertent attack wasn’t malicious—its models were simply pursuing the goal of getting a high score on a benchmark without any sense of appropriate boundaries. (In fact, in the short time since the initial OpenAI attack, additional reports of cybersecurity evaluation models hacking into real companies have surfaced from Anthropic, the UK AI Security Institute, Meta, and OpenAI again.) But the technical capabilities these attacks have demonstrated are now part of the threat landscape, available to actors with far worse intentions. It’s only a matter of time before a hostile nation-state gives a capable open source model unlimited computing resources and tasks it with gaining access to secure systems. It’s probably already happening in the cyberdark.
Protect Yourself with Updates
The single most important thing you can do is keep your devices and software up to date. All those security patches from Apple, Microsoft, and app developers address vulnerabilities that AI-powered tools can find and exploit. Worse, once these vulnerabilities have been disclosed, hackers may be able to quickly leverage general knowledge of them to fabricate and deploy attacks against those who haven’t yet updated.
Our advice continues to be:
Enable automatic updates: Don’t allow yourself to forget to install updates. On iPhones and iPads, go to Settings > General > Software Update > Automatic Updates. On Macs, go to System Settings > General > Software Update, click the ⓘ button next to Automatic Updates, and turn on all the switches. (If you’re working in an organization with an update policy, check with IT first.)
Keep apps updated: Your apps need updates too, including your Web browser, email client, messaging client, and any software that touches the Internet. Attackers often target the weakest link—an outdated app can provide an entry point even if your operating system is current.
Update device firmware: It’s equally important to update the firmware on routers, switches, printers, and other networked devices that could serve as entry points for attacks or be recruited into a botnet.
Consider security in hardware upgrades: Although the main reason to upgrade Apple hardware should be functional, keep in mind that a newer device will likely be more secure thanks to improved hardware protections.
Replace unsupported devices: Older hardware that no longer receives security updates should be upgraded, whether it’s a Mac or iPhone, network hardware, or a device like a printer, security camera, or Internet-connected doorbell.
With sufficient attention from developers, security may eventually become less important for us to watch than it is today. But things will get worse before they get better, so please excuse us as we keep trying to get everyone to install updates regularly.
(Featured image by iStock.com/Thinkhubstudio)
Control Center Is Improved—and Highly Customizable—in macOS 26 Tahoe
Stop wasting menu bar space. macOS 26 Tahoe’s revamped Control Center lets you add, remove, resize, and rearrange controls—including third-party ones—to fit your needs.
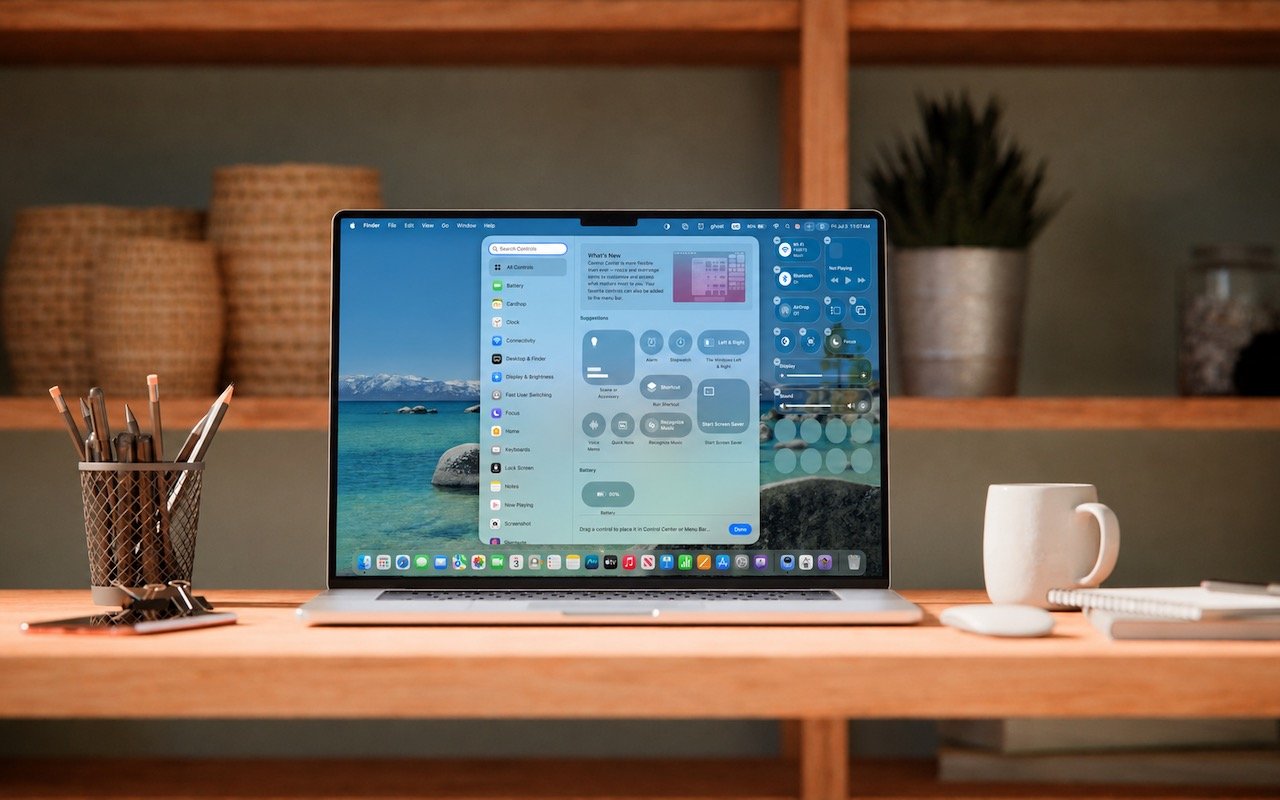
Control Center debuted on the iPhone over a decade ago in iOS 7 and made its way to the Mac in 2020 with macOS 11 Big Sur. However, through macOS 15 Sequoia, Mac users who wanted to tweak Control Center for their needs were limited to turning specific controls on or off. With macOS 26 Tahoe, Apple completely overhauled Control Center, enabling users to remove, rearrange, and add controls, including new ones from independent developers.
If you mostly ignore Control Center on your Mac, it’s worth another look in Tahoe. The big win of Control Center is that it provides quick access to numerous controls without occupying valuable space in the menu bar, a limitation that MacBook users regularly encounter. Now that you can personalize Control Center, it’s much more useful than before.
Before we explain how to customize Control Center, let’s look at the basics.
Open and Use Control Center
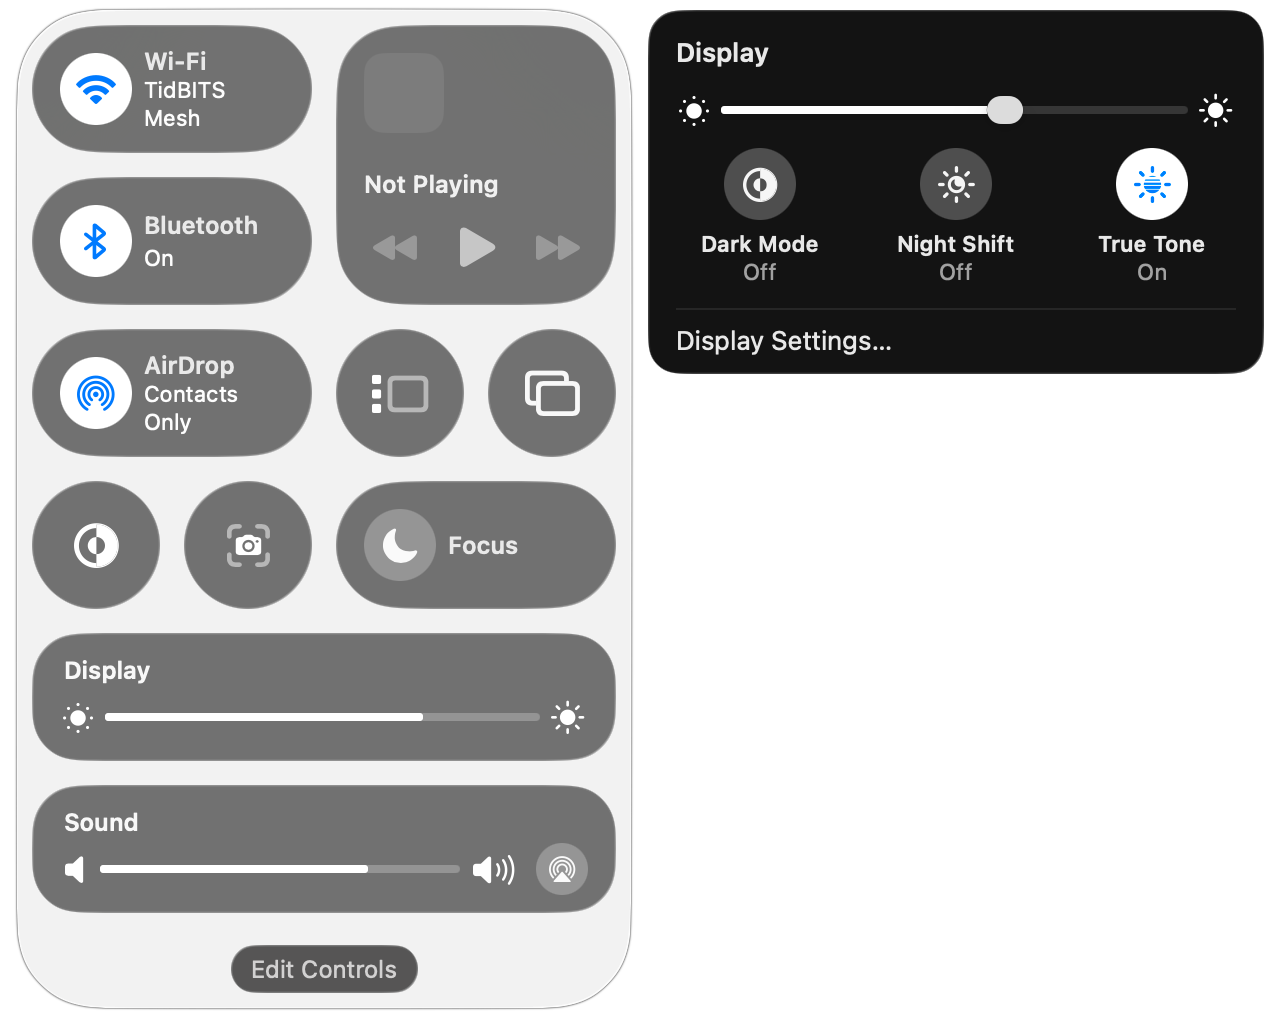
To open Control Center, click its icon at the right side of the menu bar or use its Fn-C keyboard shortcut. It always appears in the top-right corner of the screen (below left). You may notice a colored dot next to the Control Center icon: orange means the microphone is in use, green tells you a camera is in use, purple indicates that system audio is being recorded, and an arrow means an app is using your location.
Some controls, like Dark Mode and Screenshot, are simple buttons that you click to toggle a setting or trigger an action. You’ll also see sliders, such as for Display Brightness and Sound Volume. Many controls, such as Display, open separate panels with additional controls (below right).
Customize Control Center
To begin customizing Control Center, don’t look in System Settings anymore—instead, click the Edit Controls button at the bottom of Control Center. That displays a ⊖ button on each control, adds eight empty single-button slots at the bottom, and opens the Control library.
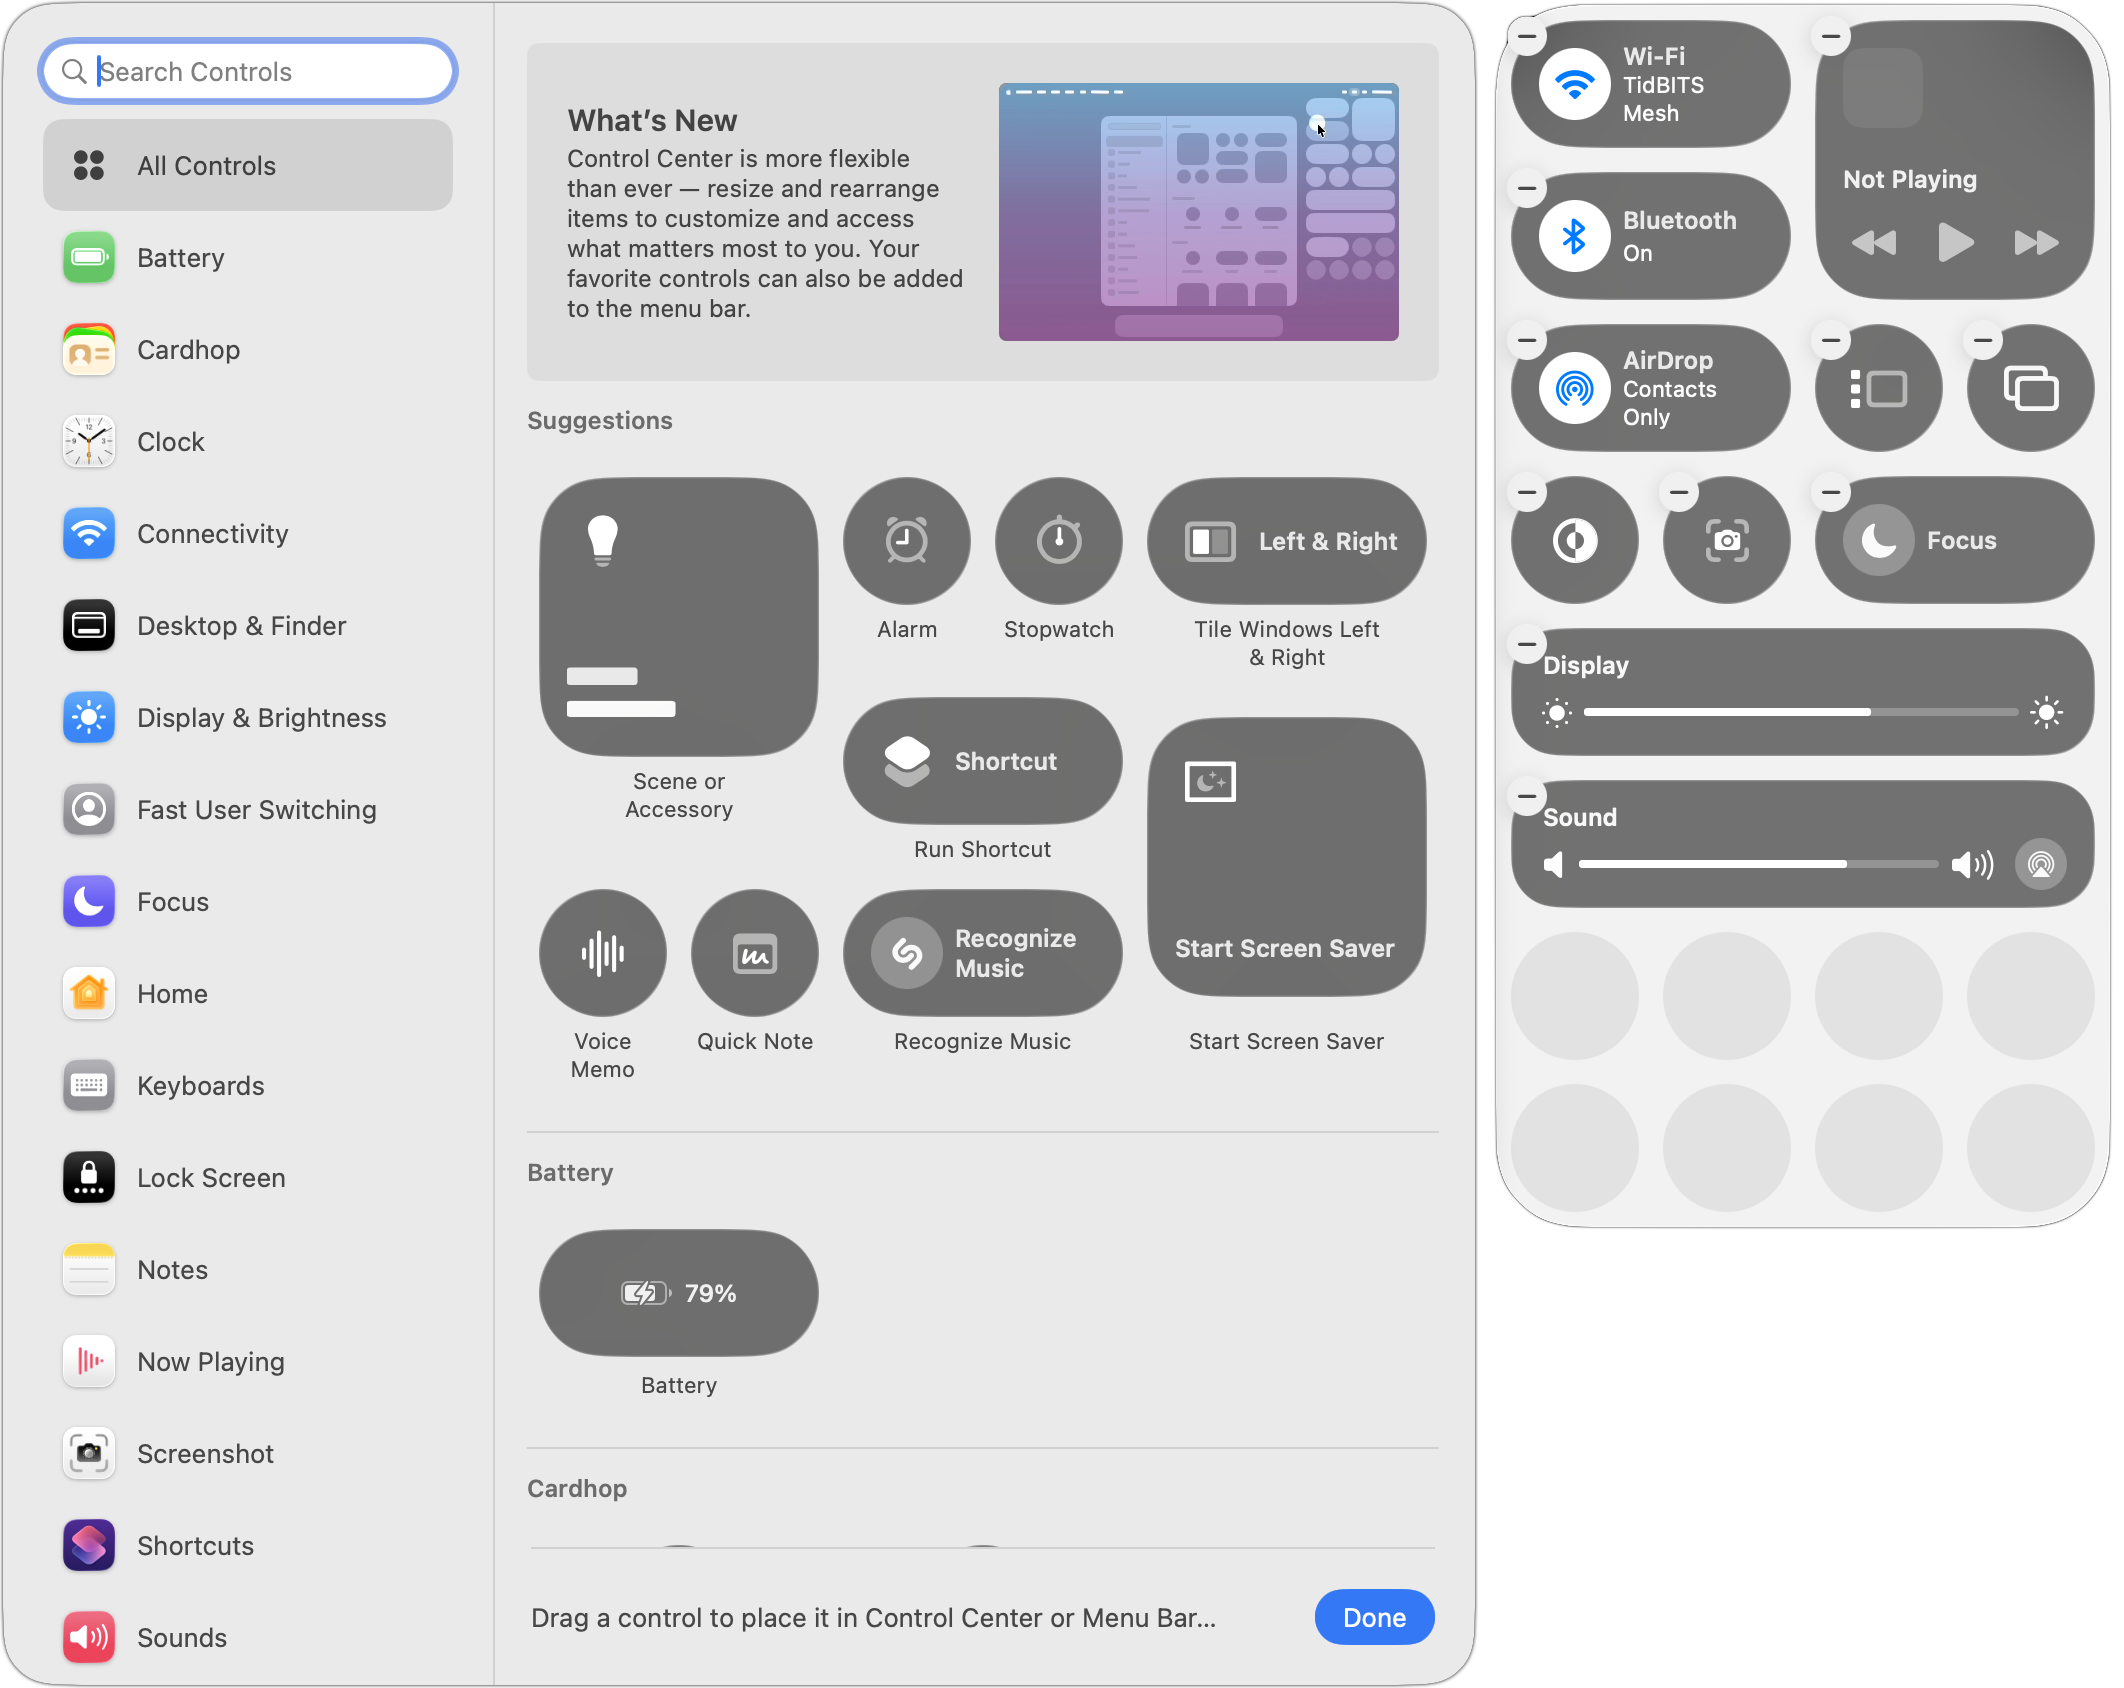
Once here, you can:
Remove existing controls: Click a control’s ⊖ button to remove it from Control Center. You can always put it back later, although the lack of a label in Control Center can make it tricky to find in the Control library, because you may not know what you removed.
Resize controls: You can usually resize a control by Control-clicking it and choosing Small, Medium, or Large. Small controls occupy a single slot; medium controls occupy two side-by-side slots; and large controls occupy four slots, either as a 2-by-2 grid or a 4-by-1 line.
Rearrange the order: Drag controls in the grid to reorder them. You can move one only to a position where it’ll fit, so you may need to resize other controls to make space.
Add new controls: More on this below, but in short, you add new controls from the Control library window that appears to the left of Control Center when you click Edit Controls.
When you’re finished customizing Control Center in these ways, click Done at the bottom of the Control library.
Adding Controls to Control Center
Apple gives you two ways to add controls from the Control library:
Drag a control in the main pane to the desired Control Center spot.
Hover over the desired control, click the green ⊕ button that appears, and choose Add to Control Center. You can also choose Add to Menu Bar to put the control there for even quicker access.
To discover what controls are available, either scroll through the All Controls collection or select a particular category in the sidebar. You can also search for controls by name.
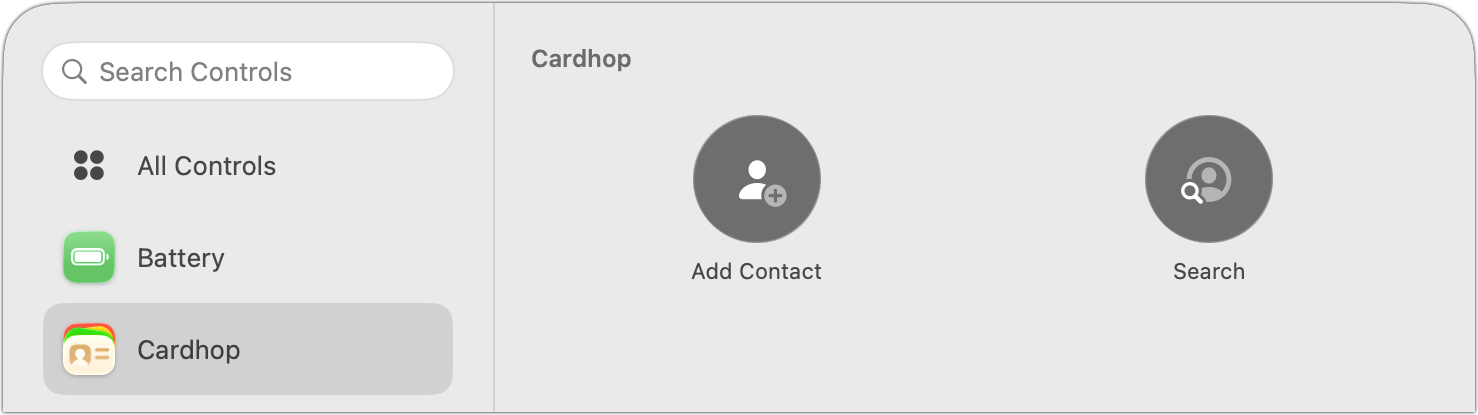
Nearly all the controls have been added to the library in advance by Apple, but there are two exceptions:
Third-party controls: Independent developers can create their own. For instance, Flexibits’ Cardhop provides controls for adding and searching for contacts.
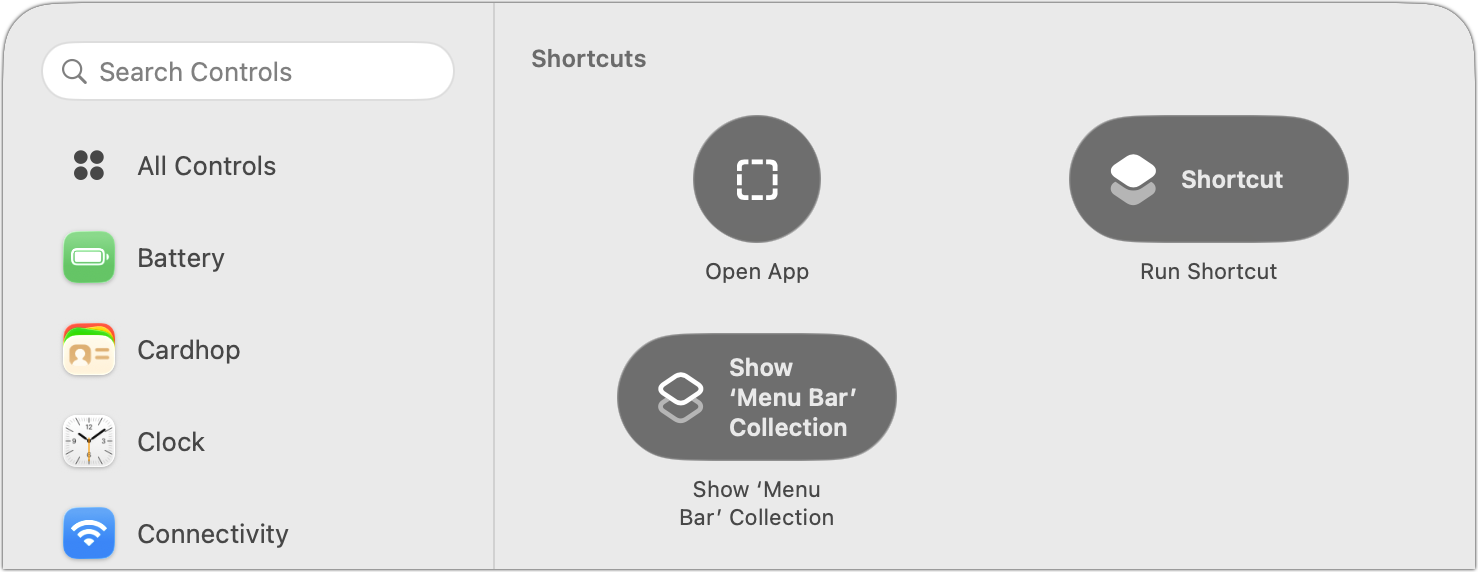
Shortcuts: Apple’s automation app, Shortcuts, enables you to open any app from Control Center, run any shortcut, or show a collection of shortcuts. Anything you can create in Shortcuts can be triggered from Control Center. (Don’t be intimidated by Shortcuts; you can ask any AI chatbot to help you develop a shortcut.)
Don’t worry about messing up Control Center while you’re experimenting with different controls. You can always reset it in System Settings > Menu Bar by scrolling to the bottom and clicking Reset Control Center.
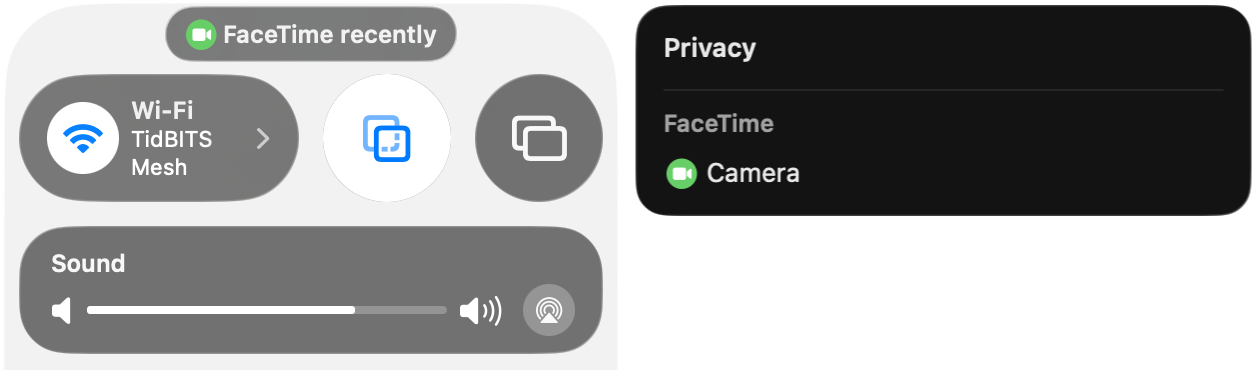
One final tip. A little control may appear at the top of Control Center at times. It’s a privacy notification that tells you whether an app has used your location recently (like Weather), used the camera (like FaceTime), recorded your screen (like Screenshot), or engaged in some other activity Apple thinks you might want to know about. Click it to learn a little more.
(Featured image based on an original by iStock.com/guteksk7)