What to Do If You’re a Mac User Who Needs Some Windows Software
You use a Mac for nearly everything but still need to run Windows software occasionally. Here’s how you can do that in 2023 on either an Intel-based Mac or an M-series Mac.
For the most part, the days of Mac versus PC are over. Common apps now exist on both platforms, and when they don’t, there are plenty of alternatives in nearly every app category. Plus, many apps either run entirely on the Web in any browser. Large organizations now regularly run “employee choice” programs that allow people to pick the platform where they’re the most comfortable.
But the fact remains that there are many more Windows-based PCs out there than Macs, and particularly for an old or unusual app, or for software needed for specific hardware peripherals, sometimes the only available option is a Windows app. What’s a modern Mac user to do? Here are a few possibilities.
Use Boot Camp on an Intel-based Mac
The cheapest approach to running Windows software on a Mac is to use Apple’s free Boot Camp. However, it comes with a number of limitations compared with the virtualization software we’ll discuss next:
Boot Camp works only on Intel-based Macs; it’s not available for M-series Macs.
You must choose between macOS and Windows every time you turn on or restart your Mac, rather than being able to run both side-by-side.
Boot Camp creates its own partition on your drive, and you can’t resize it later. You must guess how much space you need and leave enough for future expansion, all without wasting too much available space.
Installing Windows 11 is involved and can’t be accomplished on a Mac with a Touch Bar. You can install Windows 10 and then update it to Windows 11.
The main advantage of Boot Camp over virtualization software is that it provides the best performance for Windows apps because no resources are being shared with macOS. Also, a few apps, primarily games, won’t run on a virtual machine.
Given that Intel-based Macs are on the way out, we recommend the Boot Camp approach mostly if you have an extra Intel-based Mac that can be dedicated to your Windows task.
Use Virtualization Software on an Intel-based Mac
Shortly after Apple switched Macs from PowerPC processors to Intel chips in 2006, virtualization apps appeared, notably Parallels Desktop, VMware Fusion, and VirtualBox. Because Windows runs natively on those same Intel chips, virtualization software can create a virtual machine (VM) that Windows runs on just as though it were running on a physical PC. A few of the significant advantages of virtualization software include:
You can run Windows apps alongside Mac apps, switching back and forth with a click.
You can install Windows on a disk image that you can resize as necessary.
You can move data from macOS to Windows with copy-and-paste and by drag-ging files, plus you can specify a shared folder whose contents are accessible to both macOS and Windows.
You can install different versions of Windows or other Intel-compatible operating systems, and maintain multiple virtual machines for testing.
The main downside of virtualization software is that its performance can’t be quite as good as Boot Camp because it must share some CPU and RAM resources with macOS. Plus, Parallels Desktop and VMware Fusion aren’t free, although VMware Fusion offers a free personal license. VirtualBox is free but more complicated, and it’s not yet compatible with macOS 13 Ventura.
Parallels Desktop (starting at $99.99) and VMware Fusion (starting at $149; free for personal use) provide the best user experience for most Windows needs if you have an Intel-based Mac.
Use Parallels Desktop on an M-series Mac
When Apple introduced the first Macs based on Apple silicon, people wondered what would happen to virtualization software, which could no longer just pass the software commands down to an Intel chip. The solution was to create a new virtualization engine that leverages the M-series chips’ hardware-assisted virtualization to run Arm-based virtual machines. (Apple’s M-series chips are based on the Arm architecture, which differs from the x86 architecture used by Intel chips.)
The upshot is that the latest versions of Parallels Desktop and VMware Fusion can run on M-series Macs, but you can install only Arm-based operating systems, not Intel-based operating systems. Luckily, Microsoft makes Windows 11 on Arm, a full-fledged version of Windows that can run most Windows apps, even those designed for Intel chips.
In early 2023, Microsoft announced that it is officially supporting Windows 11 on M-series Macs when run in Parallels Desktop. Although VMware Fusion can run Windows 11 on Arm Insider Preview—a beta version—installation is challenging. We recommend sticking with Parallels Desktop for an experience that’s significantly easier and officially supported.
Use a Windows 365 Cloud PC
Virtualization enables you to run Windows not just on a Mac, but also in the cloud. Microsoft’s Windows 365 service is another alternative that lets you stream Windows to any device with a Web browser. While the concept of Windows 365 is compelling, the pricing is not. The cheapest plan costs $31 per user per month, or $372 per year, for a virtual PC with 2 CPUs, 4 GB of RAM, and 128 GB of storage. Parallels Desktop is about a quarter the price.
Buy a Cheap PC
We know, we know. The entire point of running Windows on a Mac is so you don’t have to buy a PC. But there are situations where it makes more sense to purchase an inexpensive PC than to fuss with virtualizing Windows on a Mac. Perhaps multiple people in your office need access to your essential Windows app, or maybe some hardware device can be controlled only from a PC. In such cases, a dedicated PC may be the better part of valor. Contact us for configuration and buying advice—the PC world can be a confusing place for those accustomed to buying from Apple.
(Featured image based on originals by iStock.com/manaemedia)
Apple Starts Releasing Rapid Security Responses for the iPhone, iPad, and Mac
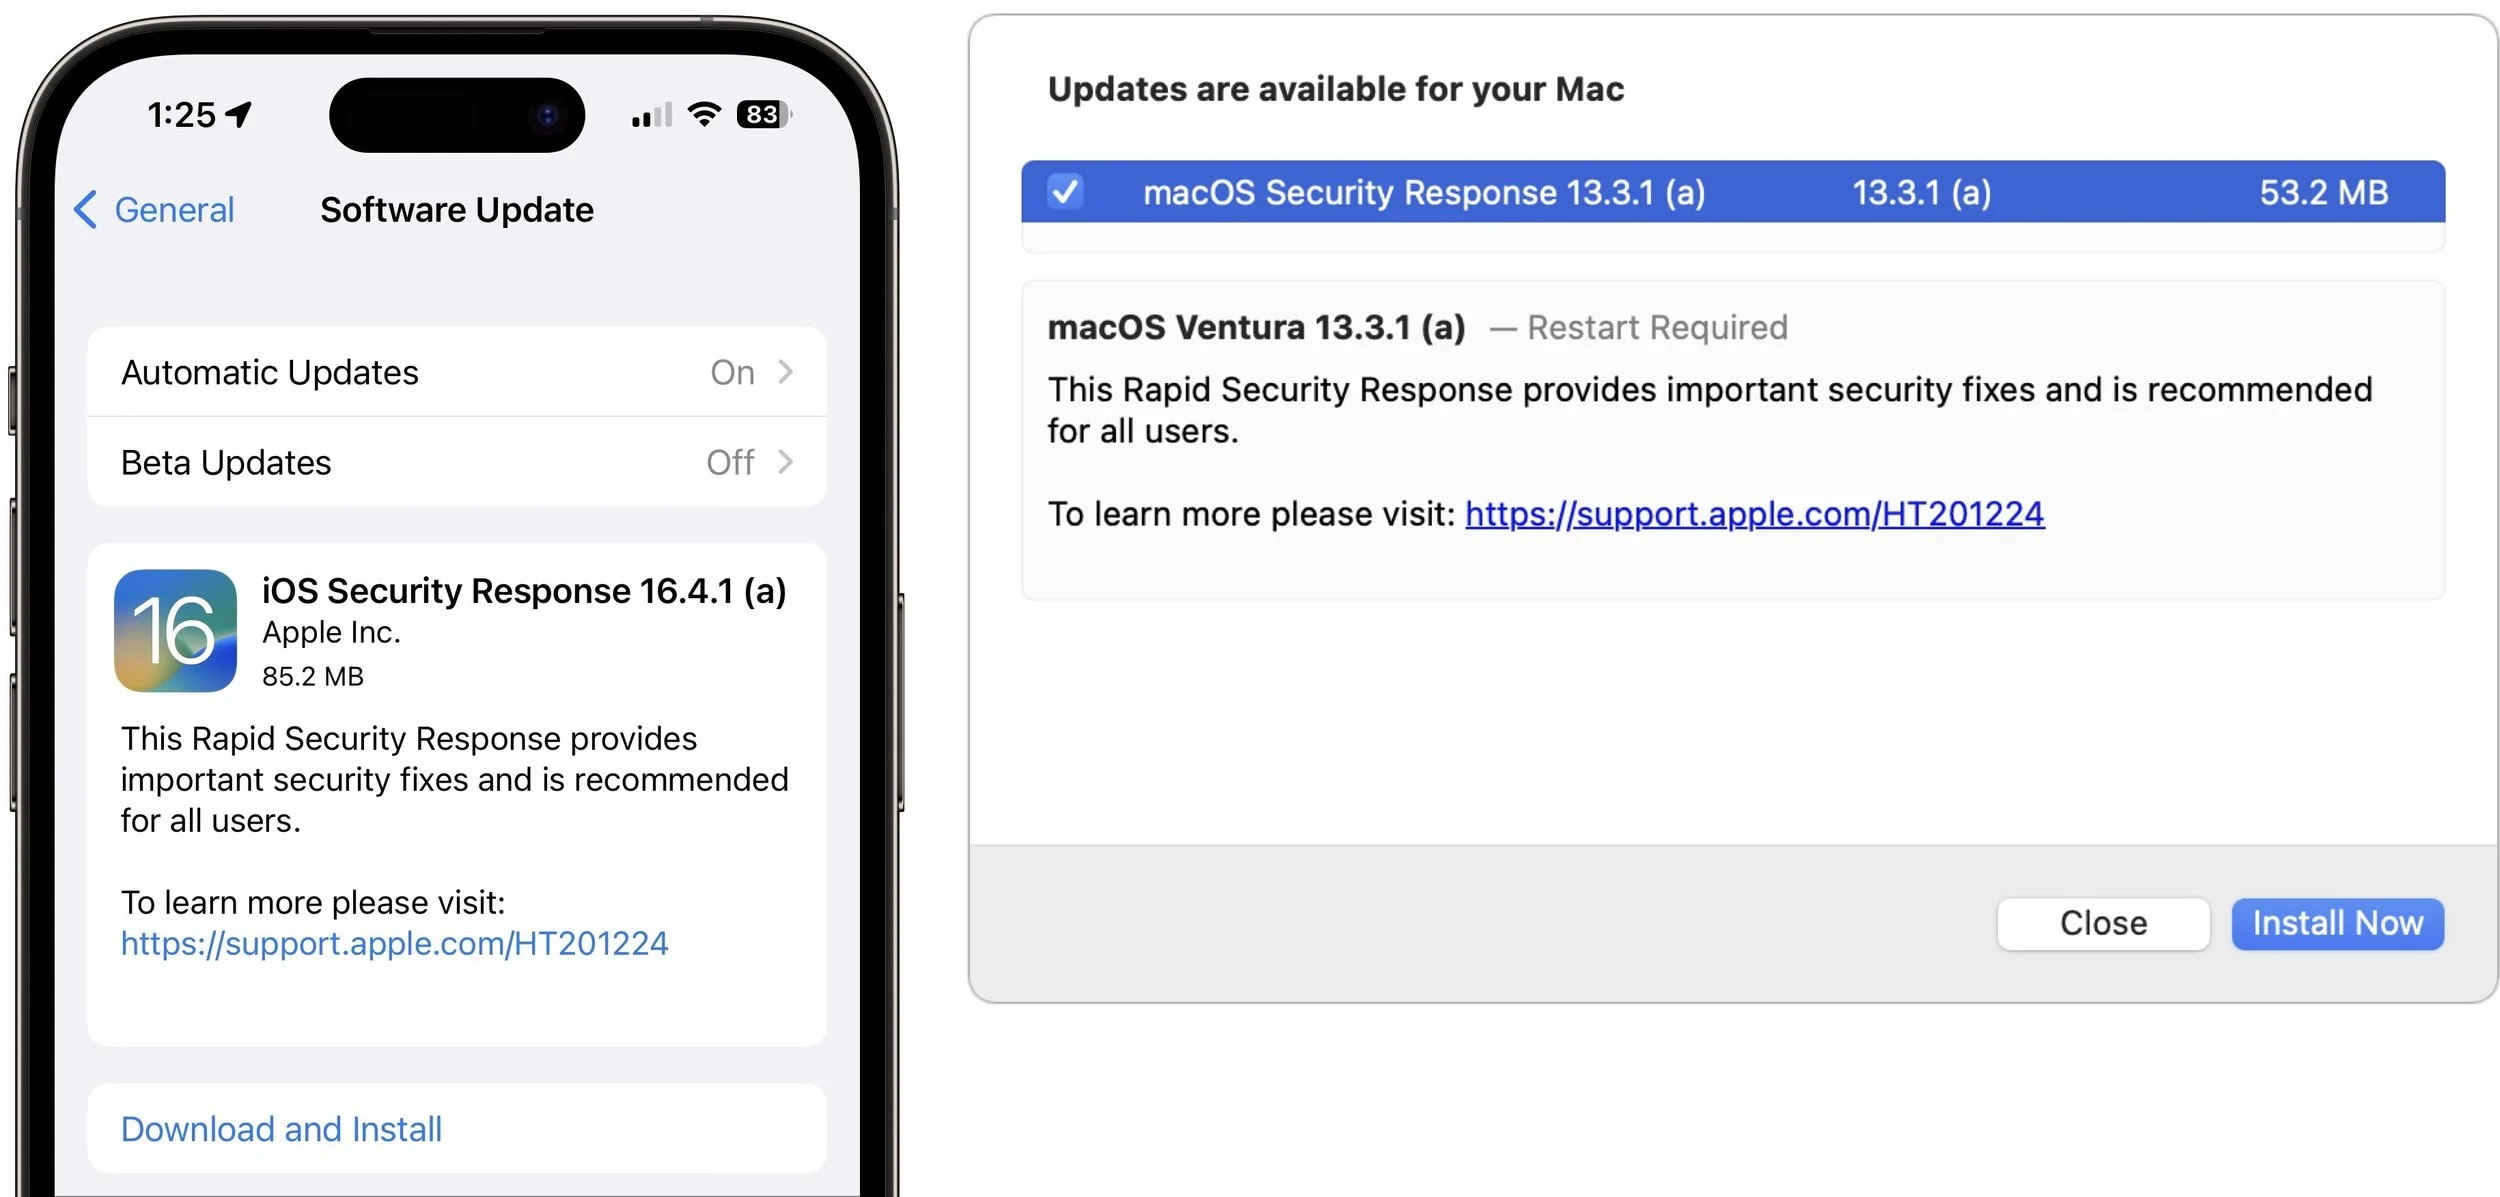
In an effort to protect users from security vulnerabilities that are being actively exploited, Apple has introduced Rapid Security Responses, which are security updates that are quick to download, quick to install, and easily removed if necessary.

By now, you’ve probably seen a new form of update for iOS, iPadOS, and macOS: the Rapid Security Response. Early in May, Apple released the first instances of these updates, which the company had promised for iOS 16, iPadOS 16, and macOS 13 Ventura when those operating systems were first announced. Let’s answer some of the questions we’ve been hearing.
What are Rapid Security Responses?
Rapid Security Responses are security updates that Apple wants to distribute as quickly and broadly as possible. Users often delay installing standard operating system updates because they’re huge downloads, interrupt work for a long time while installing, and occasionally cause new problems.
To address these concerns, Rapid Security Responses are much smaller, install far more quickly (sometimes without a restart), and can easily be removed if they cause problems.
What security vulnerabilities do Rapid Security Responses address?
Apple released no security notes for its first set of Rapid Security Responses, and we don’t anticipate that changing for future releases. The point of a Rapid Security Response is to block a serious vulnerability that’s likely being exploited in the wild, and Apple doesn’t describe such fixes until it has patched vulnerable operating systems, including older versions, tvOS, and watchOS, none of which can take advantage of Rapid Security Responses. If this last set of updates is any indication, Apple will identify the Rapid Security Response fixes in security notes for the next full operating system update, which will also include the same fixes.
How do I install a Rapid Security Response?
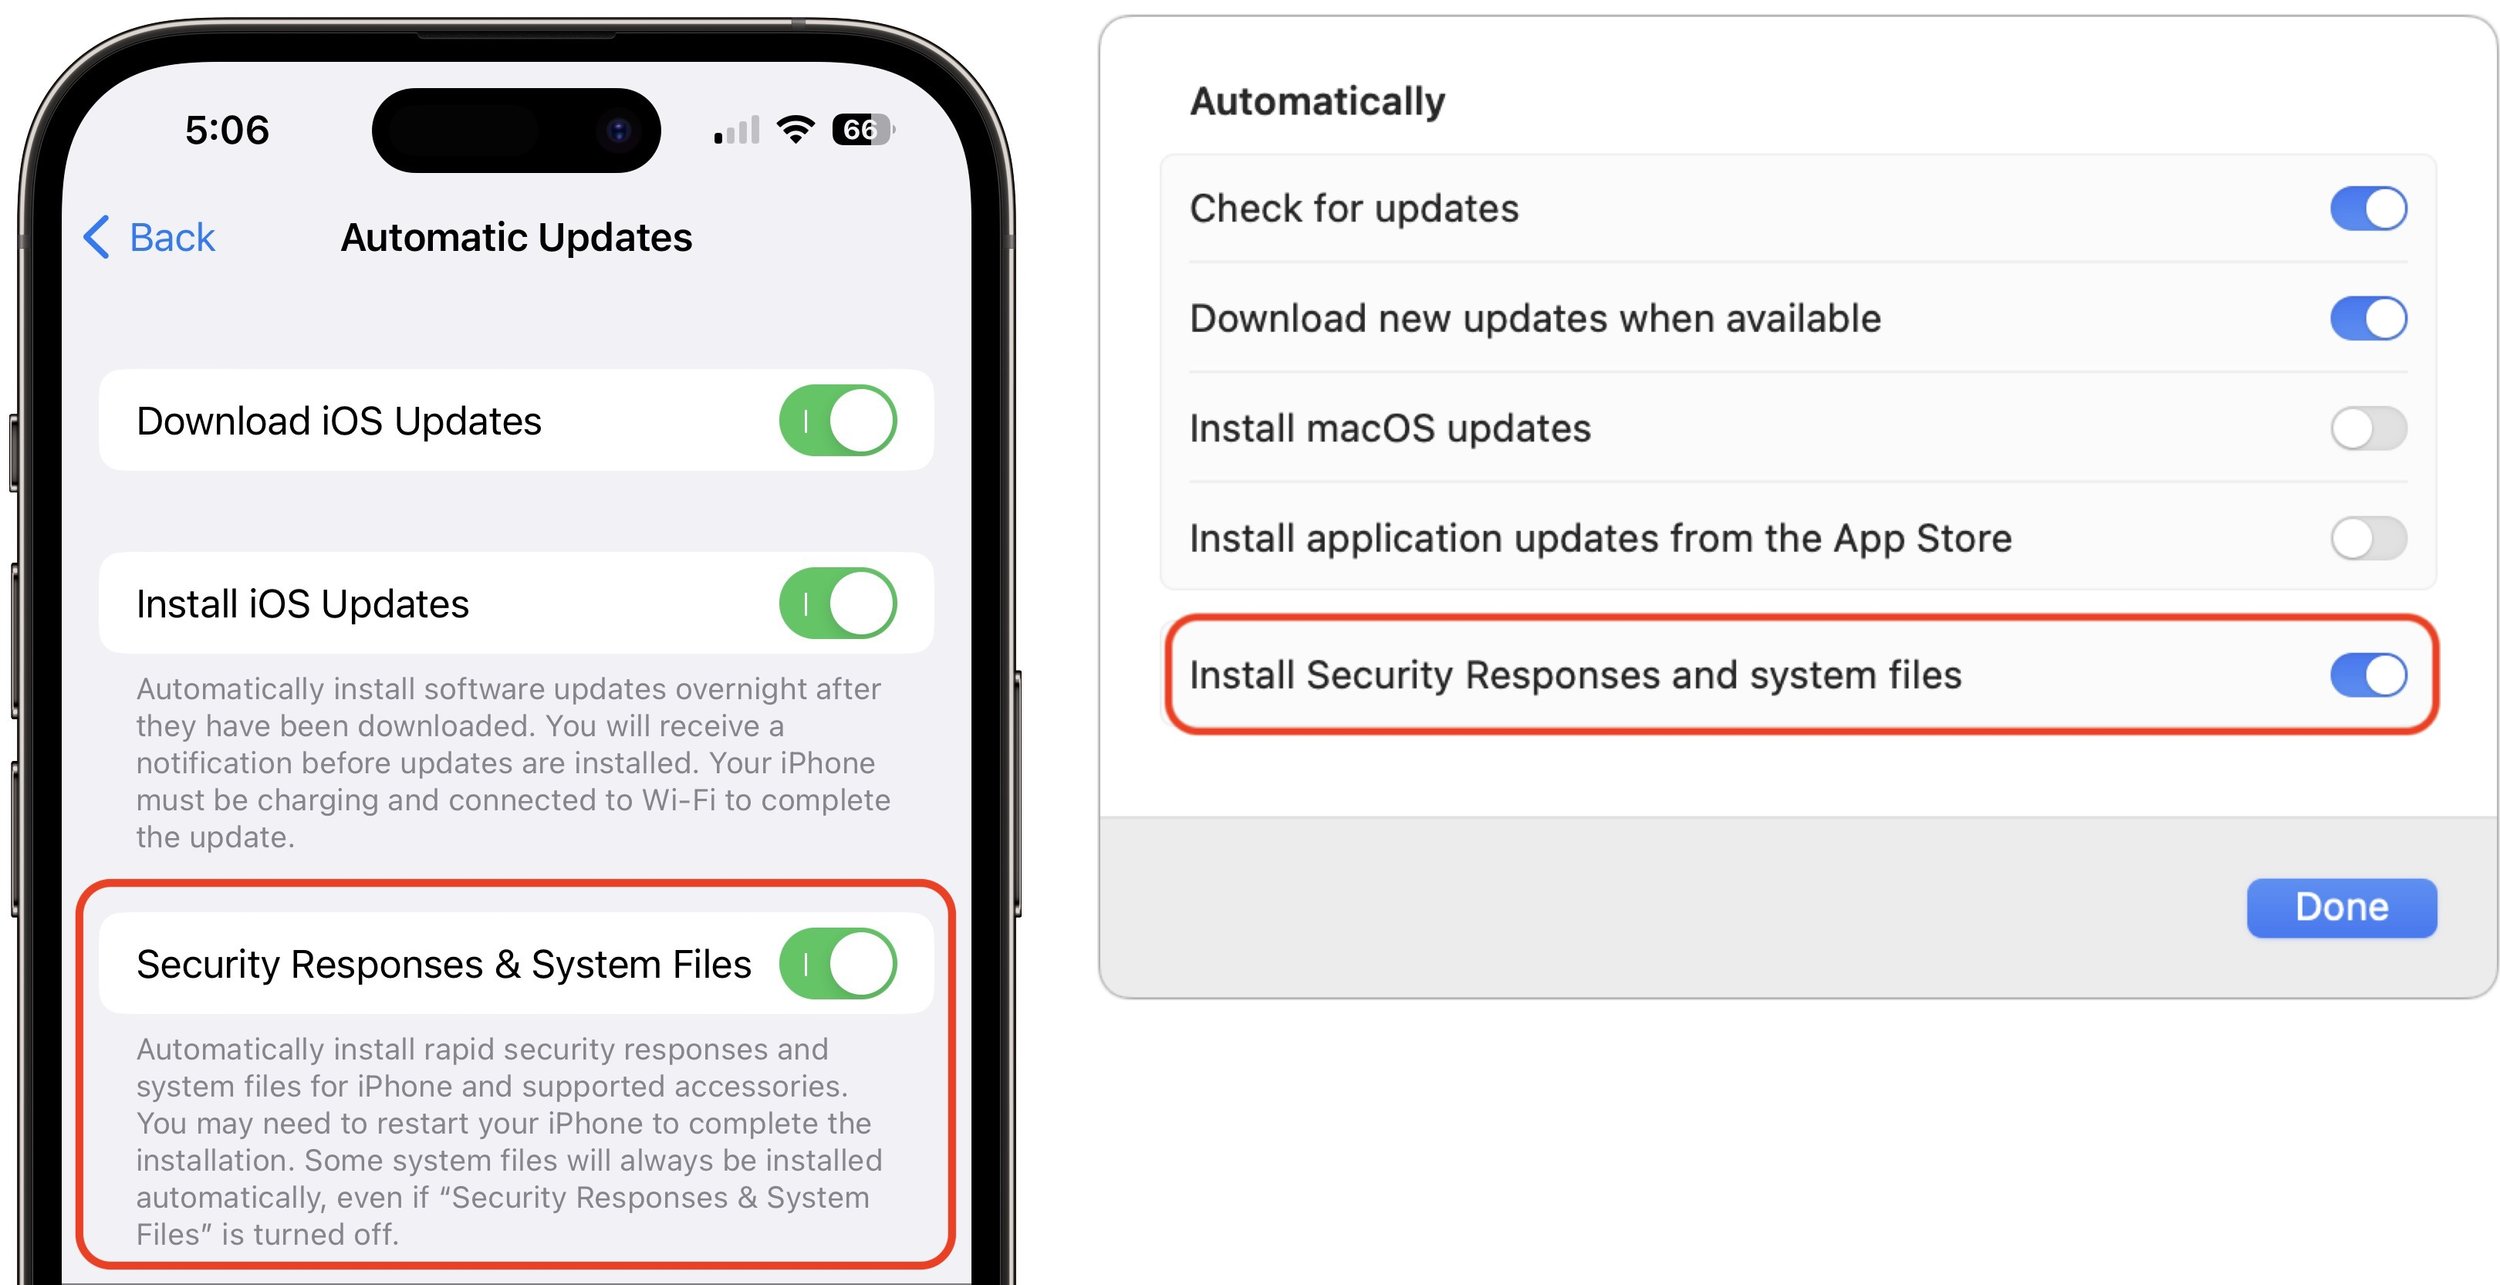
Rapid Security Responses use the same software update mechanism as Apple’s other operating system updates. You can and generally should let Rapid Security Responses install automatically. That’s the default, but check to make sure.
iOS/iPadOS: Go to Settings > General > Software Update > Automatic Updates, and look at “Security Responses & System Files.”
macOS: Go to System Settings > General > Software Update, and click the ⓘ next to Automatic Updates. Then look at “Install Security Responses and system files.”
On recent iPhones and Macs, the installation time was quick, with the device being ready to use again within 2–4 minutes, including a restart. Older devices took longer, and future Rapid Security Responses may take more or less time.
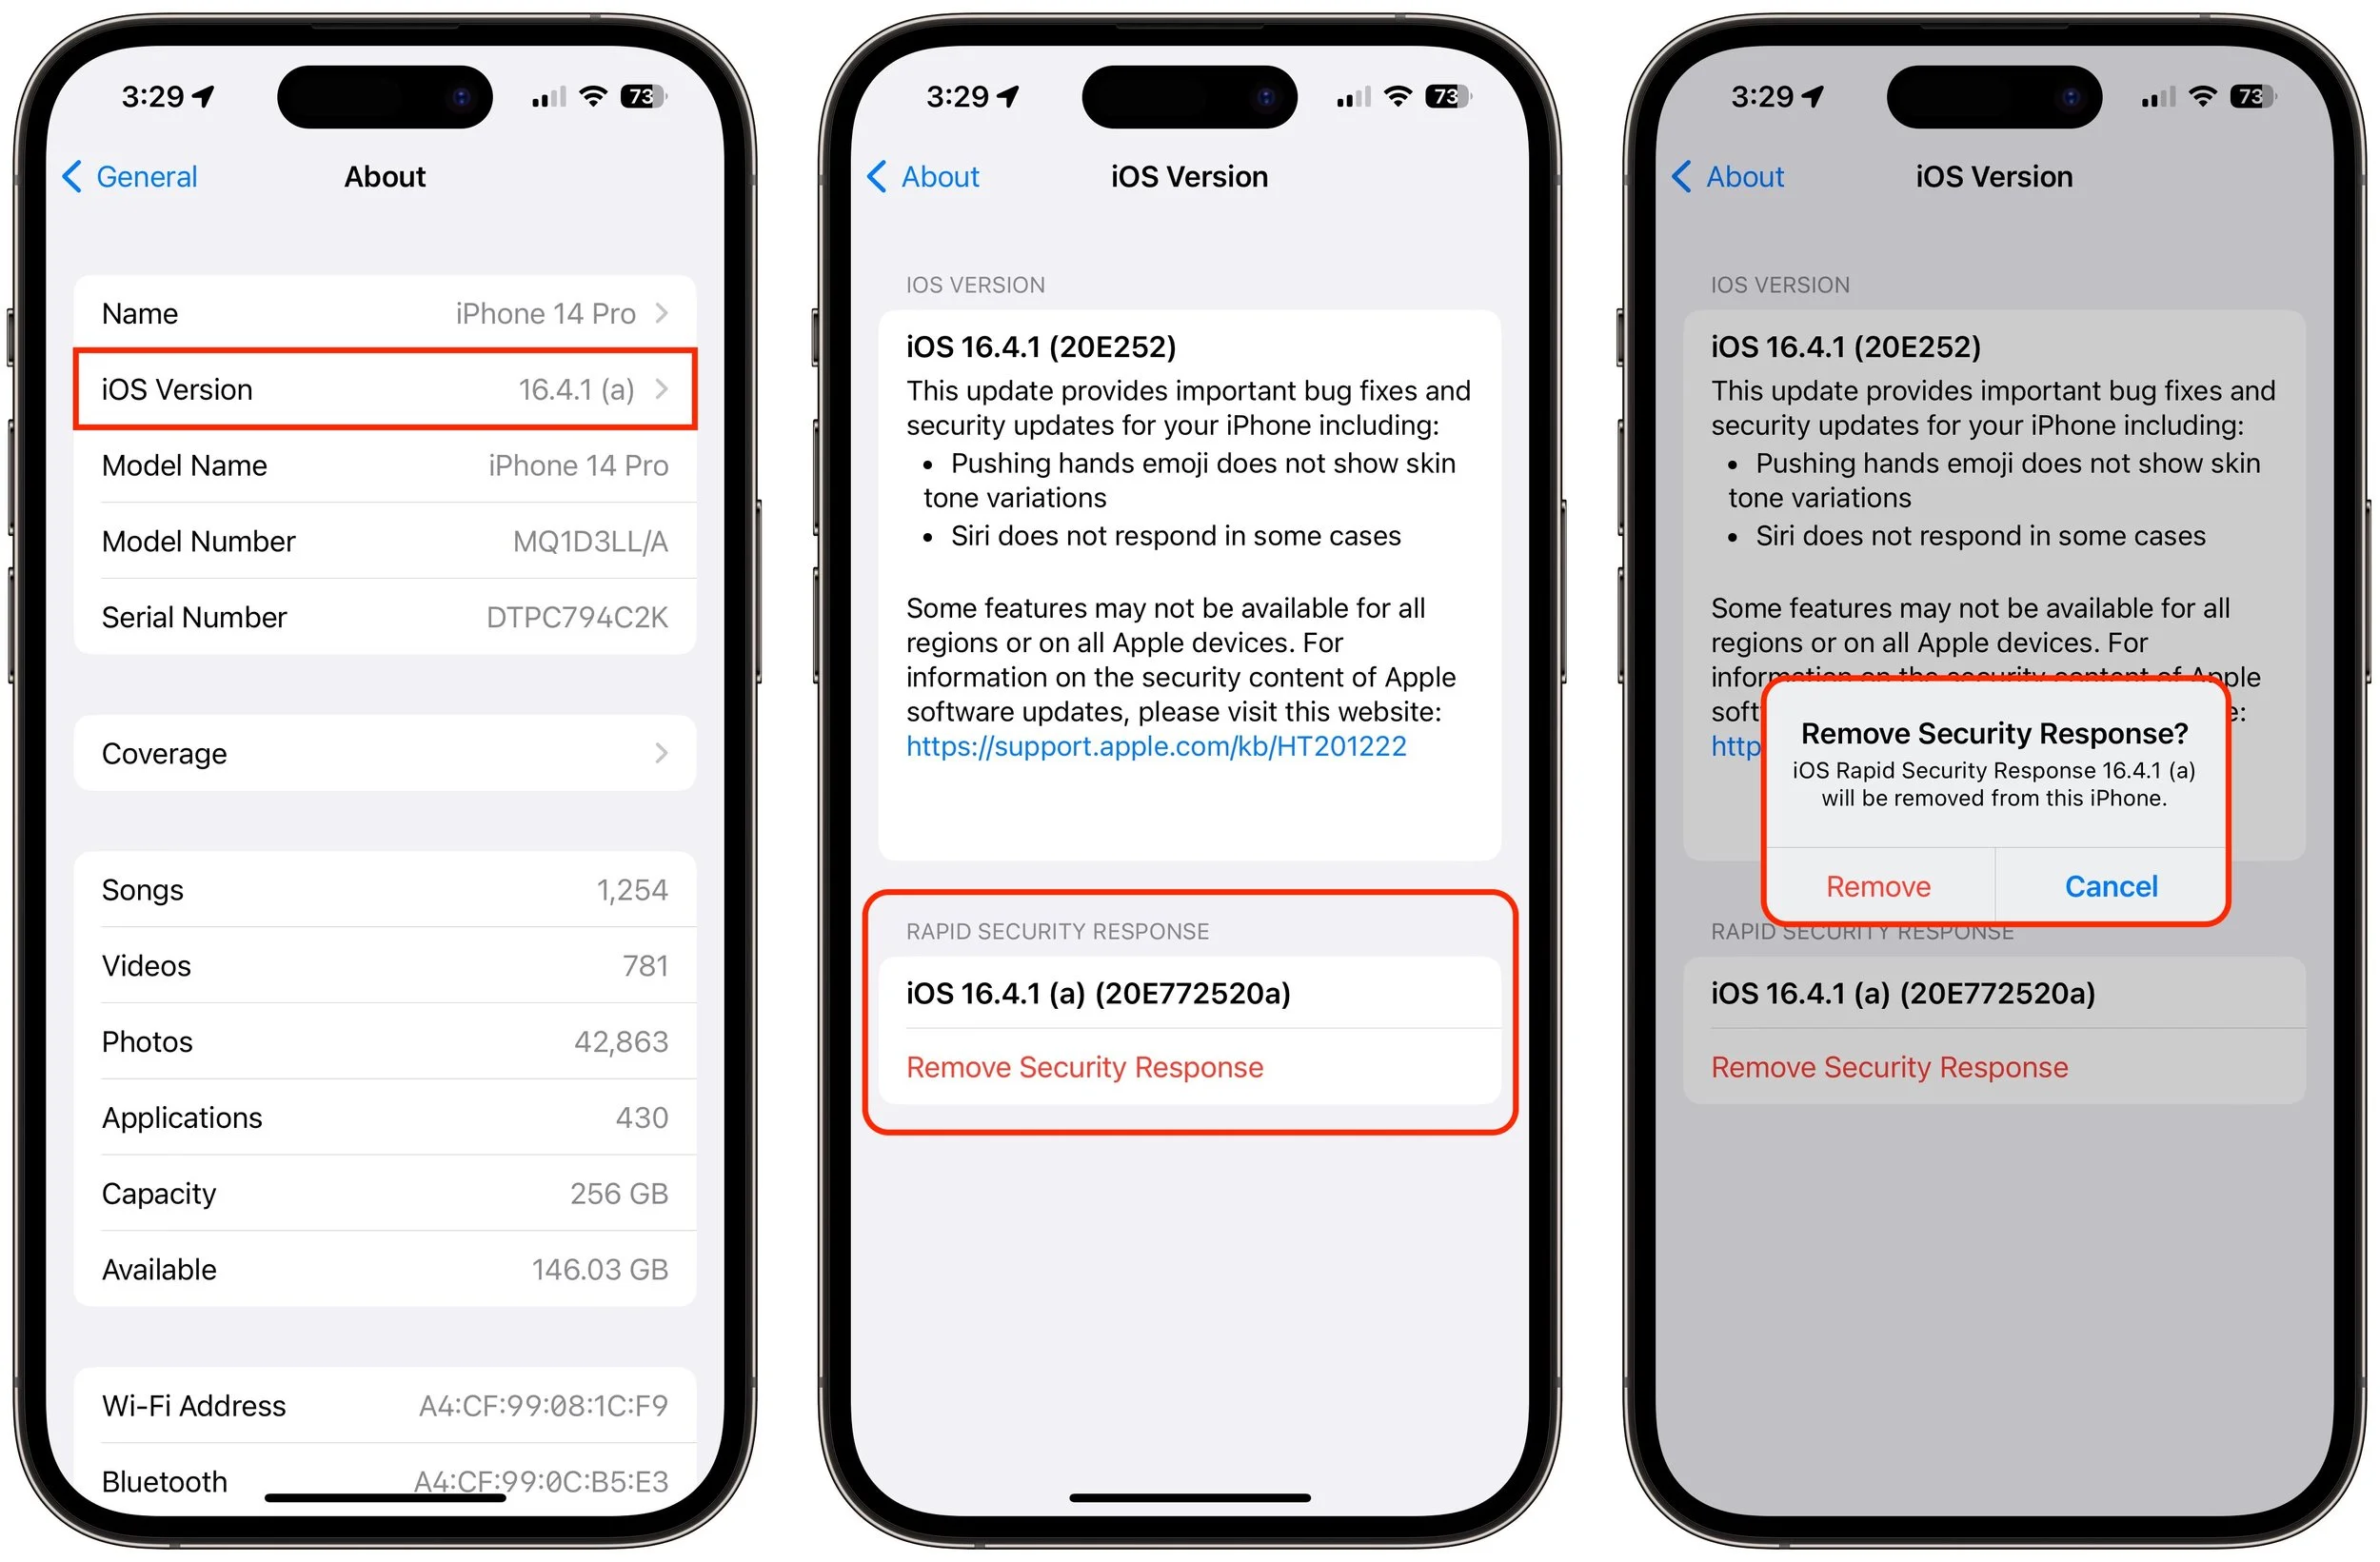
How can I revert if a Rapid Security Response causes a problem?
Apple makes this easy in both iOS/iPadOS and macOS, with the amount of time being roughly similar to how long the Rapid Security Response took to install:
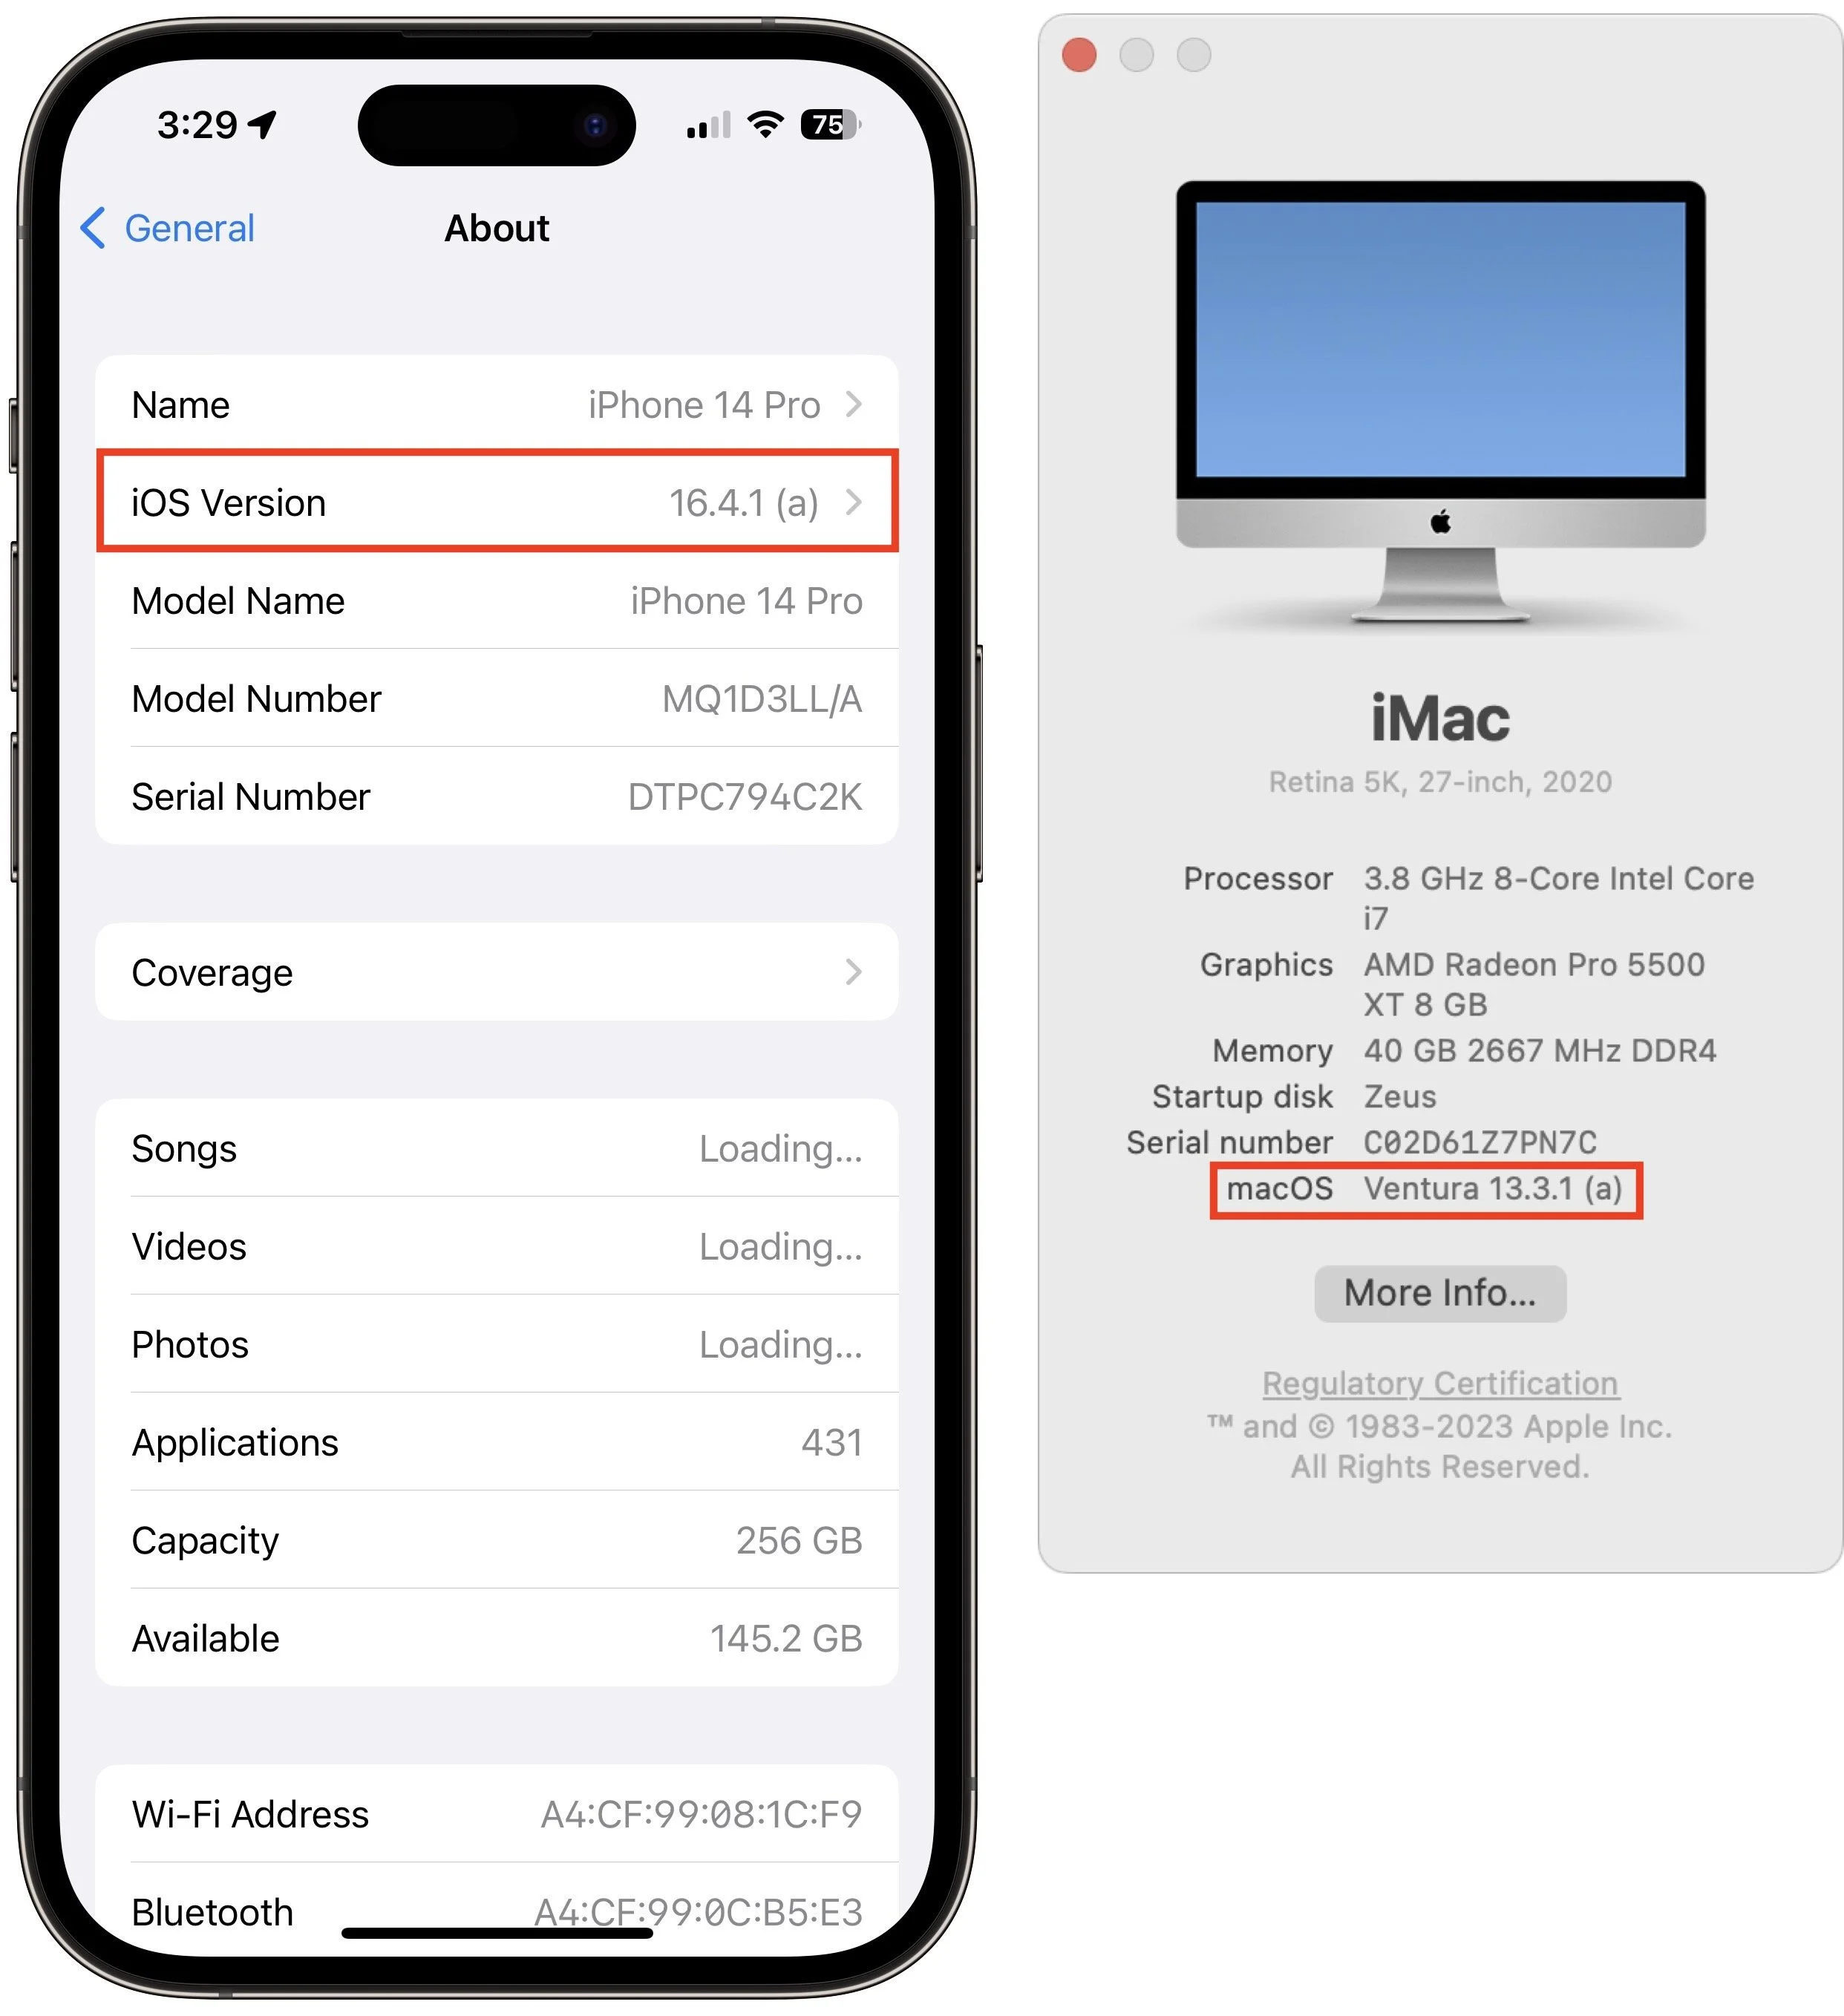
iOS/iPadOS: Go to Settings > General > About > iOS/iPadOS Version, tap Remove Security Response, and confirm the action.
macOS: Go to System Settings > General > About, click the ⓘ next to the macOS version, click Remove & Restart, and confirm the action.

How can I tell if I’m running a Rapid Security Response?
With this first Rapid Security Response, iOS and iPadOS both posted a notification informing the user of the update; macOS did not.

More generally, devices updated with a Rapid Security Response will have a letter after their version number, such as 16.4.1 (a), and the letter will disappear with the next full update, such as iOS 16.5. To determine what version your devices are running:
iOS/iPadOS: Go to Settings > General > About, and look at the iOS/iPadOS Version line.
macOS: Choose About This Mac from the Apple menu, and look at the macOS line.
Given what we know now, we recommend that everyone install Rapid Security Responses as soon as they’re available. If you notice a problem afterward, you can remove it. The only caveat is that if your employer manages your device, they may prefer to delay the Rapid Security Response installation until they’re comfortable with the changes.
(Featured image by iStock.com/champpixs)
Which Should You Use—a Mac, iPhone or iPad, or Web App?
Given the choice, should you use a native Mac app, an iPhone or iPad app, or a Web app that’s accessible in any standard Web browser? All have advantages, so the takeaway is that you should be ready to use whichever makes the most sense in the moment.

Apps are everywhere these days, but it can be hard to remember that many exist in multiple versions. You can often run the same app on a Mac, an iPhone or iPad, and in a Web browser, each of which has benefits.
Generally speaking, Mac apps:
Have better-designed, more obvious interfaces that improve the user experience
Are easily switched to and managed among many other apps
Lend themselves to automation through Shortcuts, AppleScript, and Keyboard Maestro
Work best for processor-intensive, text-heavy, and large-screen tasks
iPhone and iPad apps:
Give you quick access to functionality away from your desk and on the go
Offer small-screen touch interfaces that can be superior for some tasks
Web apps:
Are accessible from any computer and many smartphones
Can be linked to other Web apps using services like IFTTT and Zapier
Can be used in any Web browser instantly without having to download any-thing
The key takeaway is that there’s no either/or situation here. For any app you depend on, it’s usually best to use the native Mac app on your Mac, the native iOS app on your iPhone or iPad, and the Web app whenever the native Mac or iOS app doesn’t fit the bill. Web apps are particularly welcome when you’re away from your Mac and need a full-fledged interface with a keyboard such that an iPhone version won’t suffice. Web apps can also be lifesavers when you need to get something done but are having trouble with the native versions.
Here is a list of apps that run natively on your Apple devices and are accessible in any standard Web browser. It’s far from comprehensive but should give you a feel for what apps you can use in different forms, often with almost no loss of functionality or access to stored data. Note that you’ll almost always need to log in to use a Web app, so make sure you have access to your stored credentials in a password manager.
Before we get into the list, we want to call out two special categories:
Email: Most IMAP-based email services that you can use in Apple’s Mail or another email client also provide access to your stored mail through a Web app.
iCloud: Many of the apps that Apple bundles with macOS, iOS, and iPadOS are also available as Web apps at iCloud.com. That list includes Calendar, Contacts, Find My, iCloud Drive, Mail, Notes, Photos, and Reminders.

Again, this list is by no means comprehensive, but you can use it as a starting point for thinking about the apps you use. If you’ve been relying solely on a Web app, some quick searches should reveal whether it has a native Mac or iOS version that might be faster and smoother. It’s also equally worth investigating if one of your native apps has a Web version that you could turn to in a pinch.
(Featured image by iStock.com/Rudzhan Nagiev)
At WWDC23, Apple Releases New Macs, Previews New OS Features, and Unveils Vision Pro
At WWDC, Apple announced new Macs and new features in the upcoming macOS Sonoma, iOS 17, iPadOS 17, watchOS 10, and tvOS 17. It also unveiled the Vision Pro mixed-reality headset, which offers a glimpse at Apple’s vision for the future of computing.

Apple’s Worldwide Developer Conference keynote (full video or 2-minute recap) is primarily an opportunity for Apple to give developers a first look at new features coming in its operating systems, and this year was no exception. However, Apple sandwiched those feature reveals between announcements of new Macs and the unveiling of its mixed-reality Vision Pro headset, due next year. Here’s what you should know.
New Macs Complete the Transition to Apple Silicon
Apple introduced three new Macs, the 15-inch MacBook Air, Mac Studio models with faster chips, and the first Apple silicon Mac Pro, all of which are available to order now and start shipping on June 13.
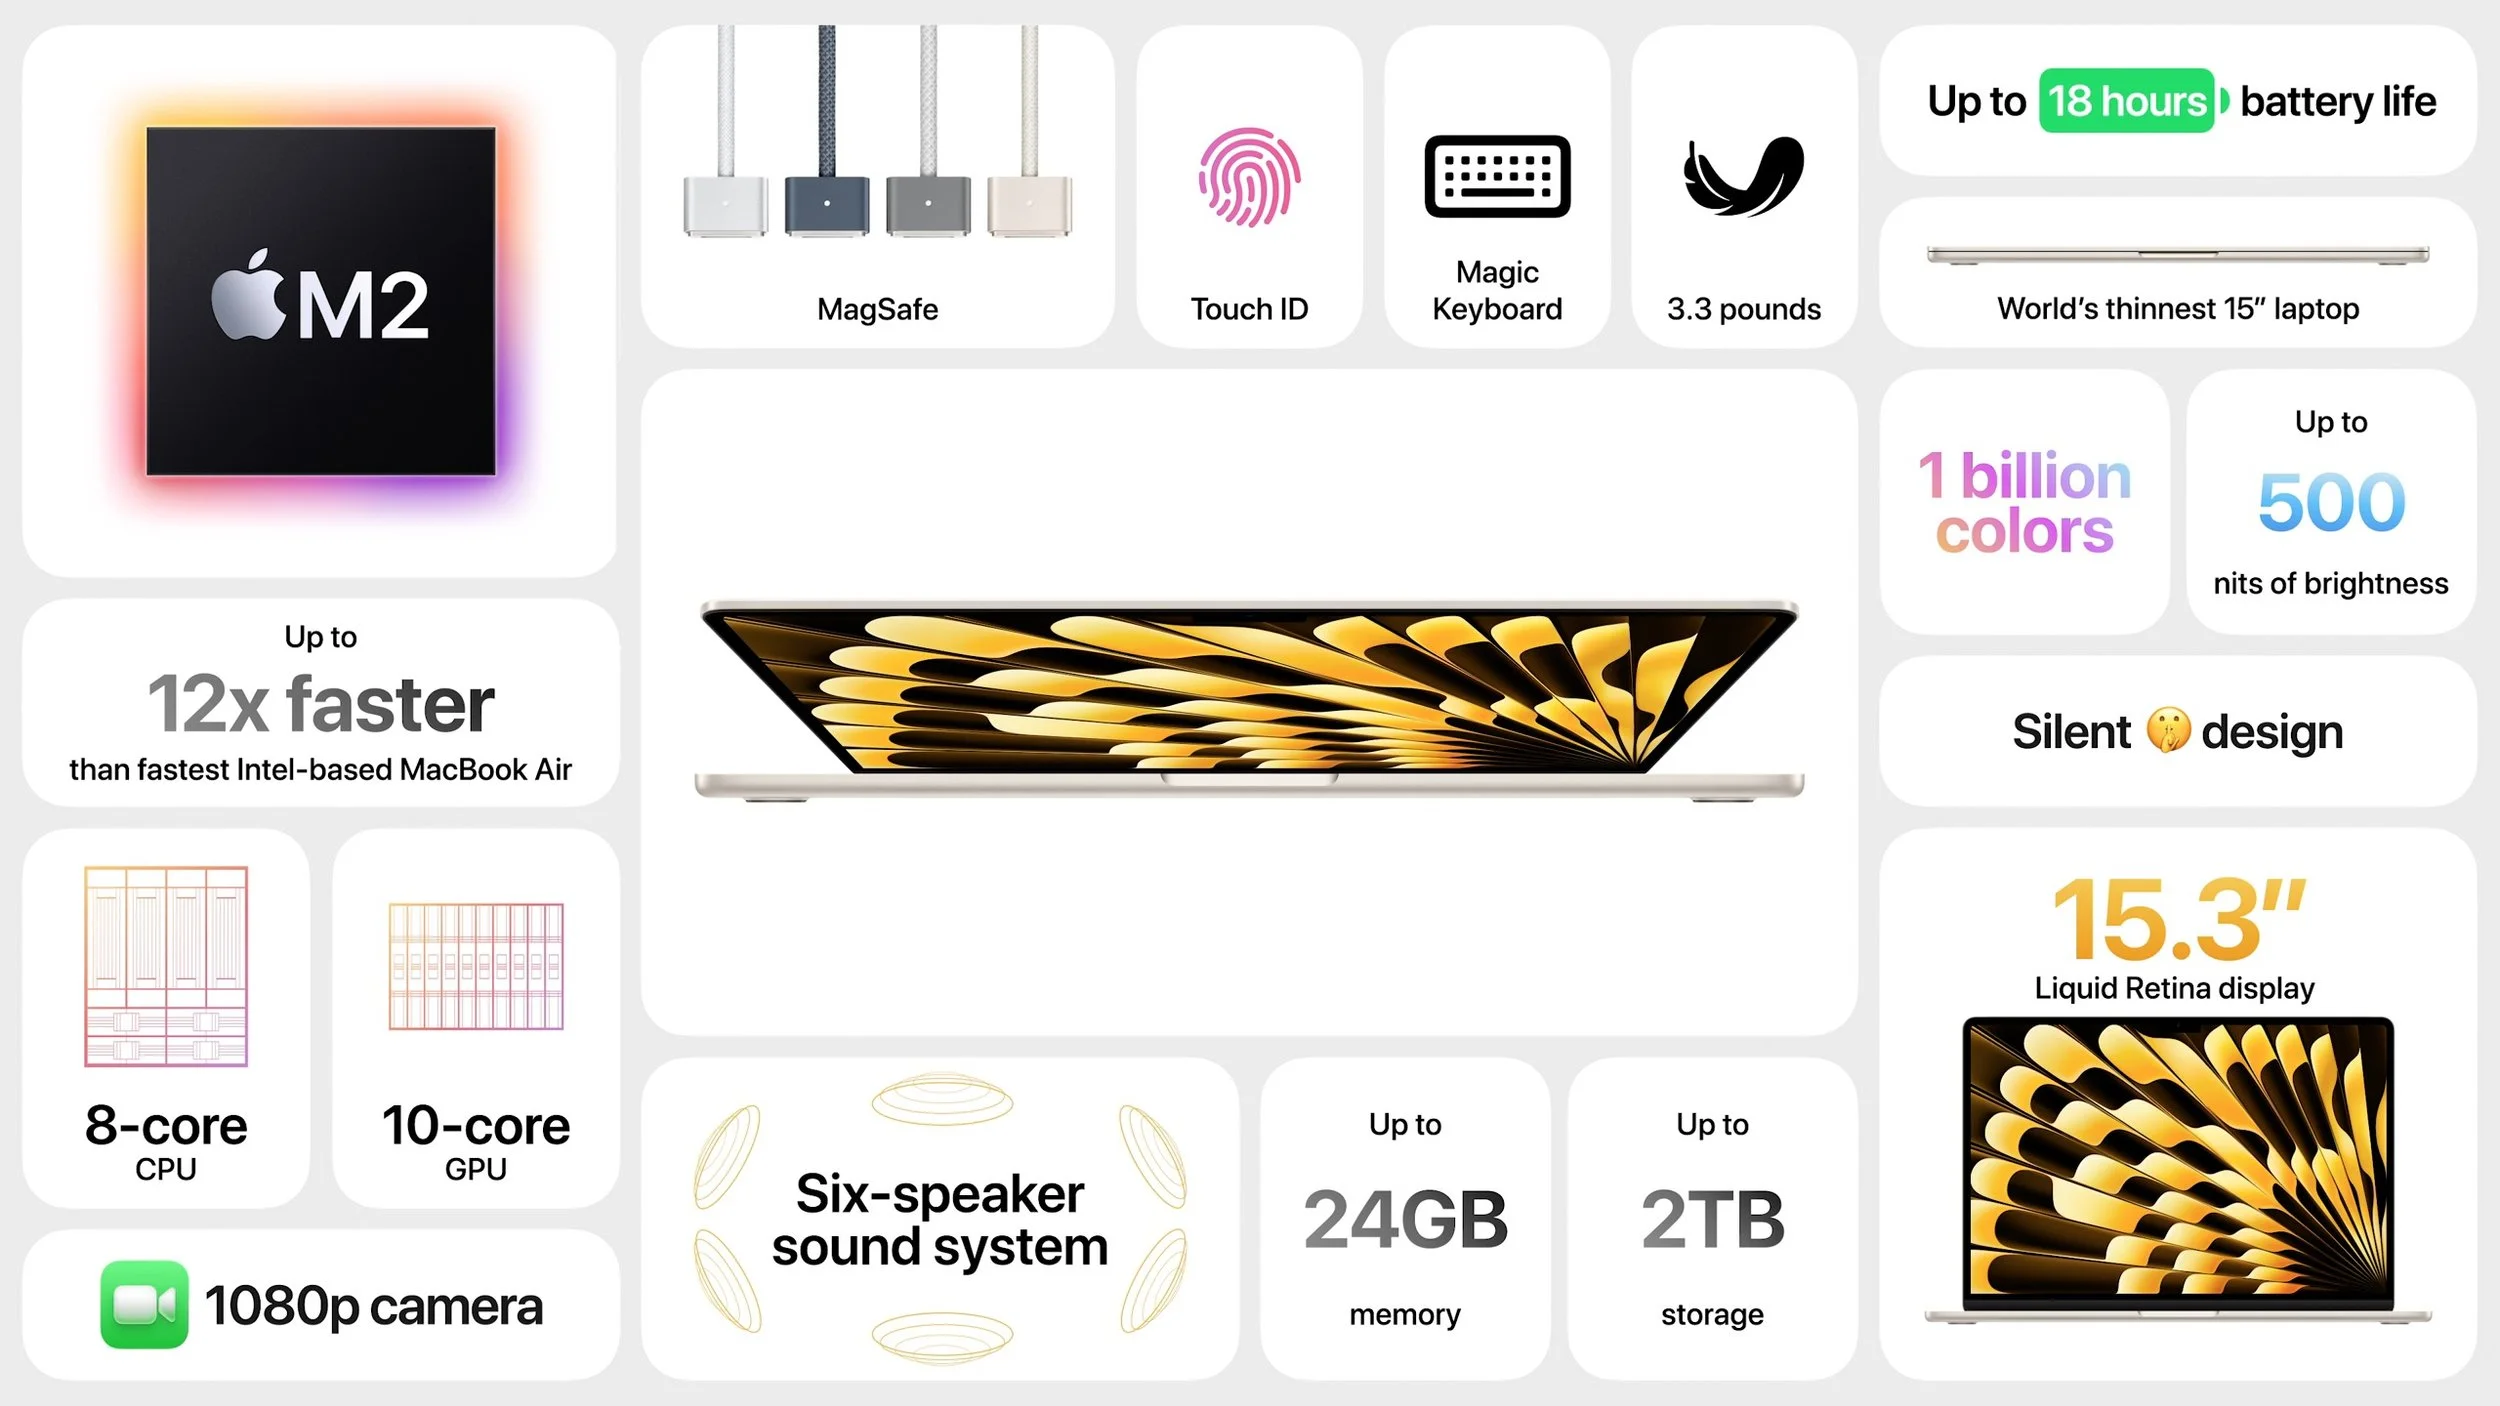
15-inch M2 MacBook Air: This new consumer-level laptop is nearly identical to the 13-inch M2 MacBook Air, apart from its 15.3-inch screen and array of six speakers. It starts at just $1299, and the 13-inch model drops $100 to start at $1099. It’s an excellent machine for students or anyone who wants a highly capable laptop with a larger screen for less than the 14-inch or 16-inch MacBook Pro.
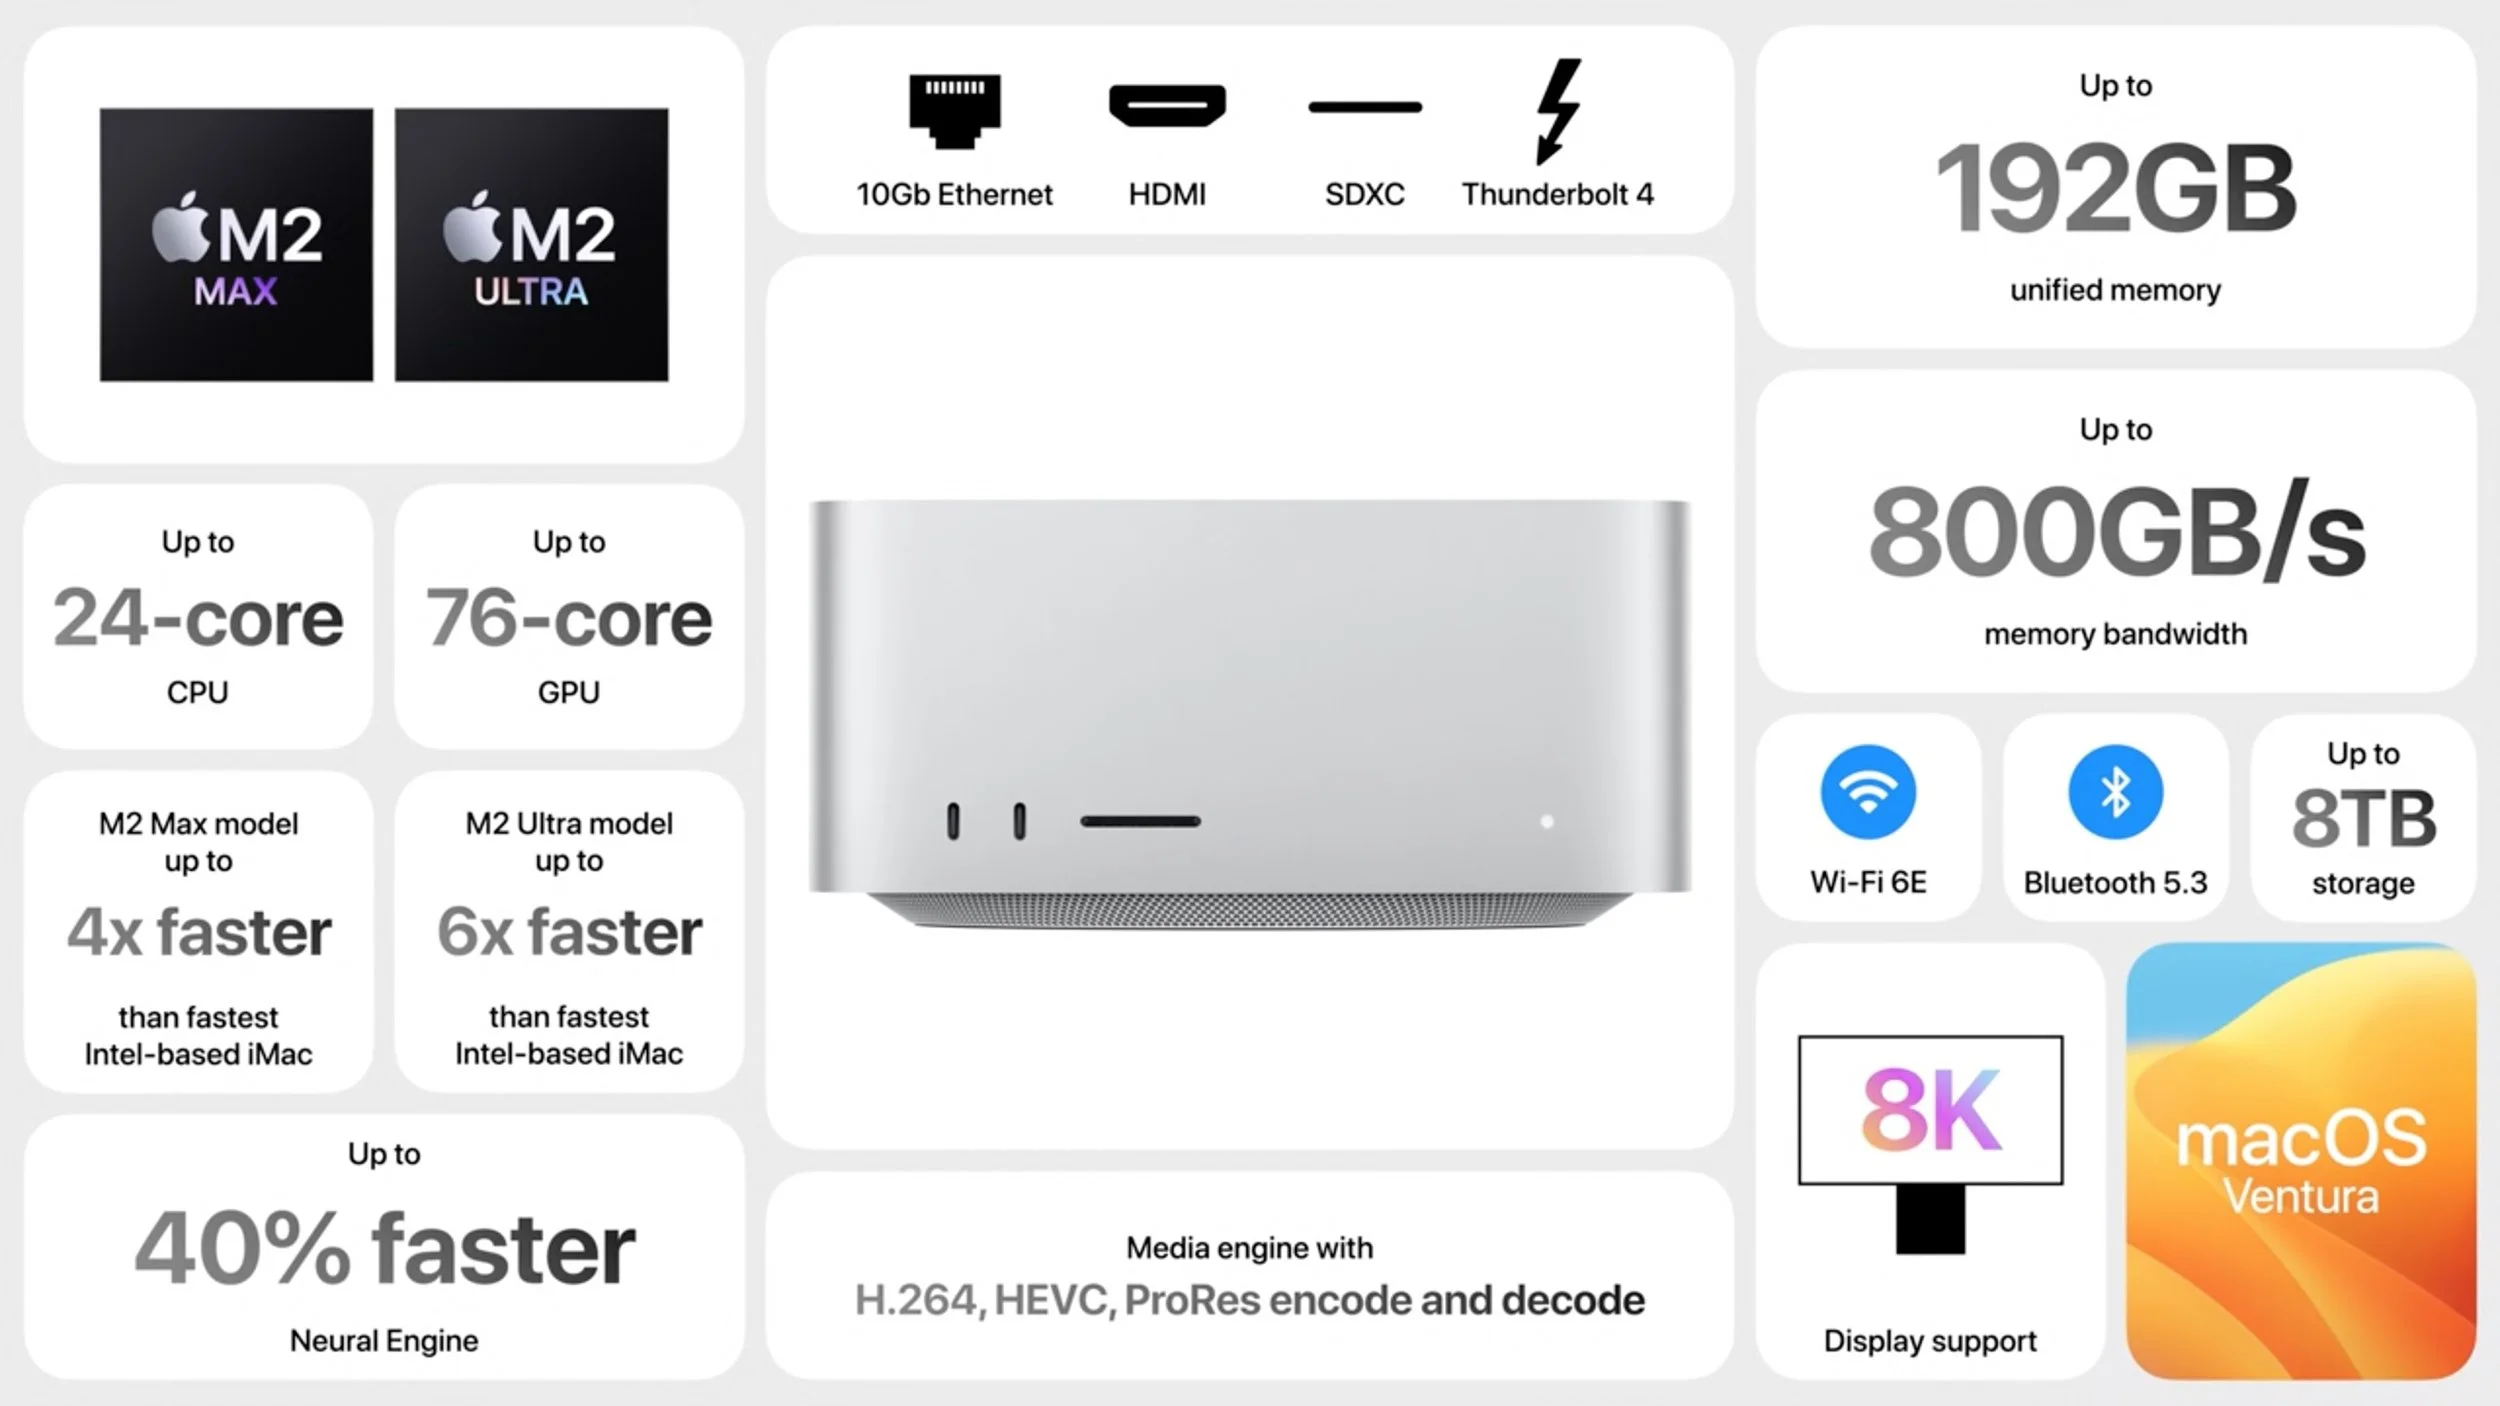
Mac Studio: The new Mac Studio is unchanged other than swapping last year’s M1 Max and M1 Ultra chips for the higher-performance M2 Max and new M2 Ultra, which combines two M2 Max chips. The M2 Ultra boasts a 24-core CPU, lets you choose between 60-core and 76-core GPU models, offers a higher unified memory ceiling of 192 GB, and can drive up to eight displays. The improvements may not be worth replacing an M1-based Mac Studio, but the gains over an Intel-based iMac or Mac Pro are significant. Pricing starts at $1999 for the M2 Max and $3999 for the M2 Ultra.
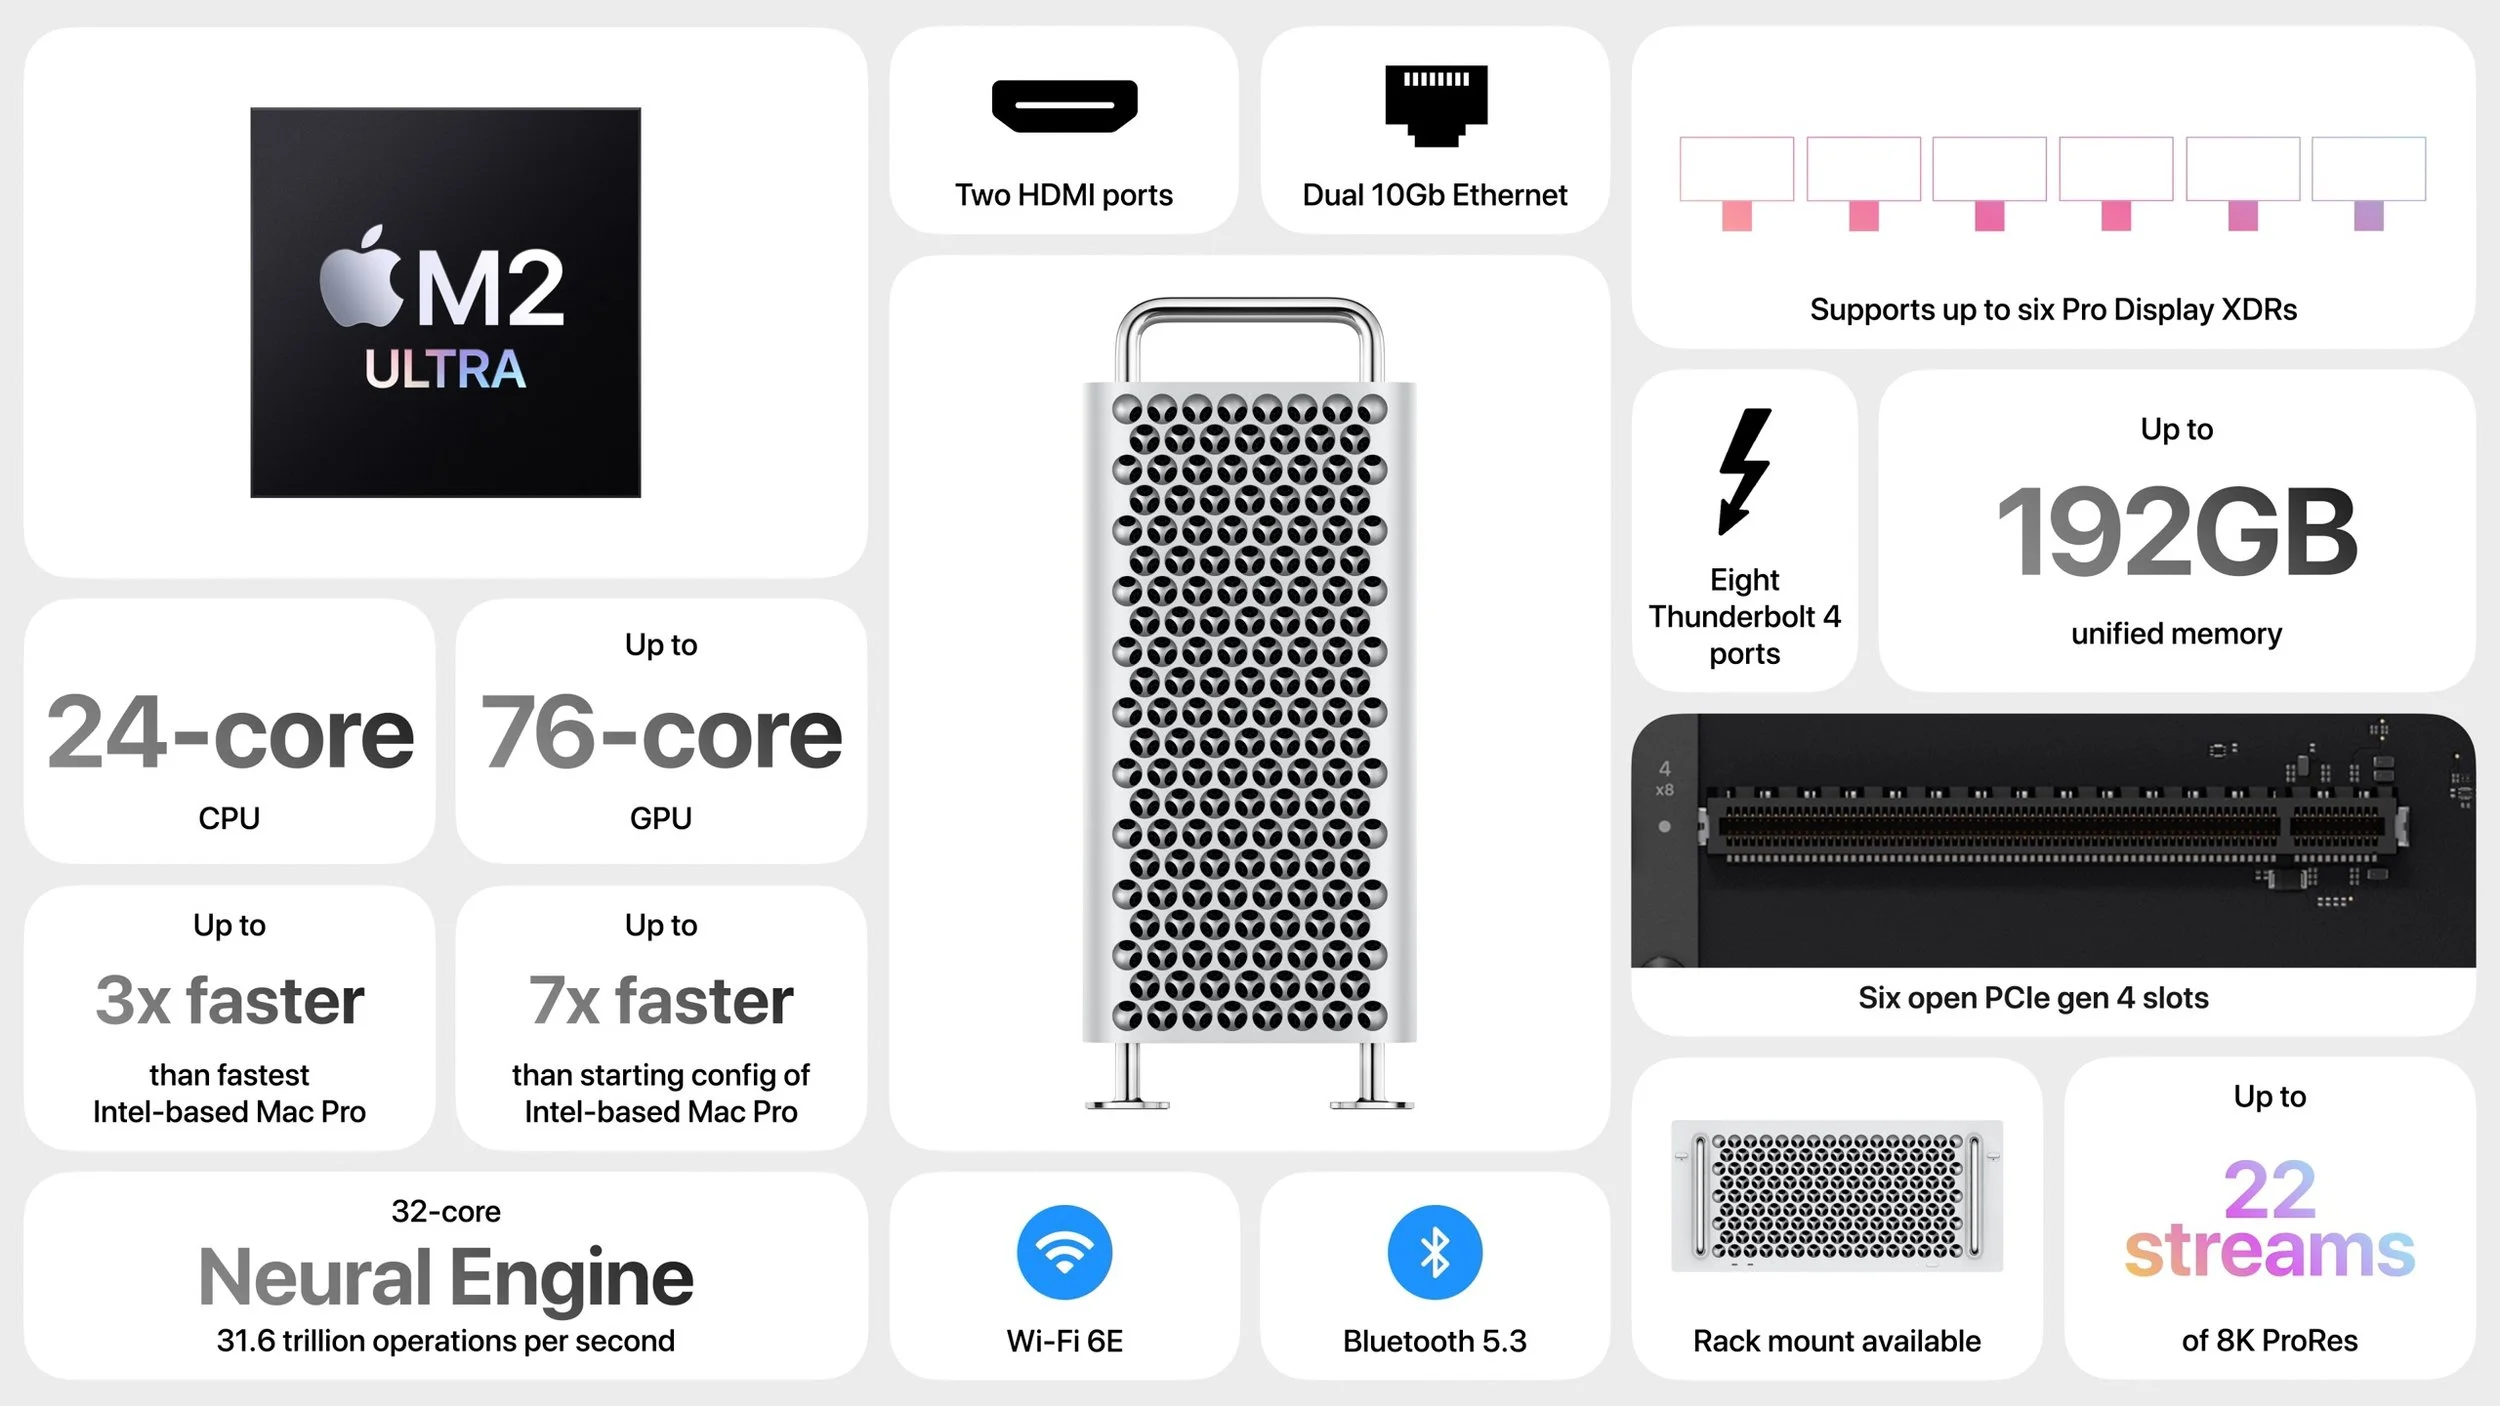
Mac Pro: The long-awaited Mac Pro retains the form factor of the last Intel-based Mac Pro—complete with $400 optional wheels—but differs radically inside. It relies on the same M2 Ultra chip as in the Mac Studio but has open slots for six full-length PCI Express gen 4 cards and provides eight built-in Thunderbolt 4 ports. Apple claims it is 3–7 times faster than the Intel-based Mac Pro, but the details will likely vary by situation. For instance, the M2 Ultra reportedly provides the performance of seven of Apple’s $2000 Afterburner cards for accelerating ProRes and ProRes RAW video codecs. But the M2 Ultra maxes out at 192 GB of unified memory that’s faster and more efficiently used, whereas the Intel-based Mac Pro could accept up to 1.5 TB of traditional RAM. Pricing starts at $6999 for a tower enclosure and $7499 for a rack enclosure. It’s big iron for demanding workflows.
With the release of the Mac Pro, Apple dropped the last Intel-based Mac from its lineup. That doesn’t mean the company will stop supporting recent Intel-based iMacs in the next version or two of macOS, but that will happen sometime in the next few years. Plan to replace Intel-based Macs eventually—you’ll appreciate the significant performance gains from Apple’s M-series Macs.
Top New Operating System Features Coming in 2023
As always, Apple previewed oodles of new features while covering many more on its website. We’ll focus on those we think will make the biggest splash in your Apple experience, but take a moment to scroll through Apple’s pages for each operating system to see the full list of what’s coming. Those are linked below, along with their basic system requirements so you can see if your devices will be eligible to upgrade (not all features will be available on all devices):
macOS Sonoma: iMac Pro from 2017. MacBook Air, MacBook Pro, and Mac mini from 2018 and later. iMac and Mac Pro from 2019 and later. Mac Studio from 2022 and later.
iOS 17: Second-generation iPhone SE, iPhone XR, and later
iPadOS 17: Sixth-generation iPad and later, fifth-generation iPad mini and later, third-generation iPad Air and later, and second-generation iPad Pro and later
watchOS 10: Apple Watch Series 4 and newer, including the Apple Watch SE
tvOS 17: Apple TV 4K, with fewer features on the older Apple TV HD
Here are some new features we think will most impact your Apple experience.
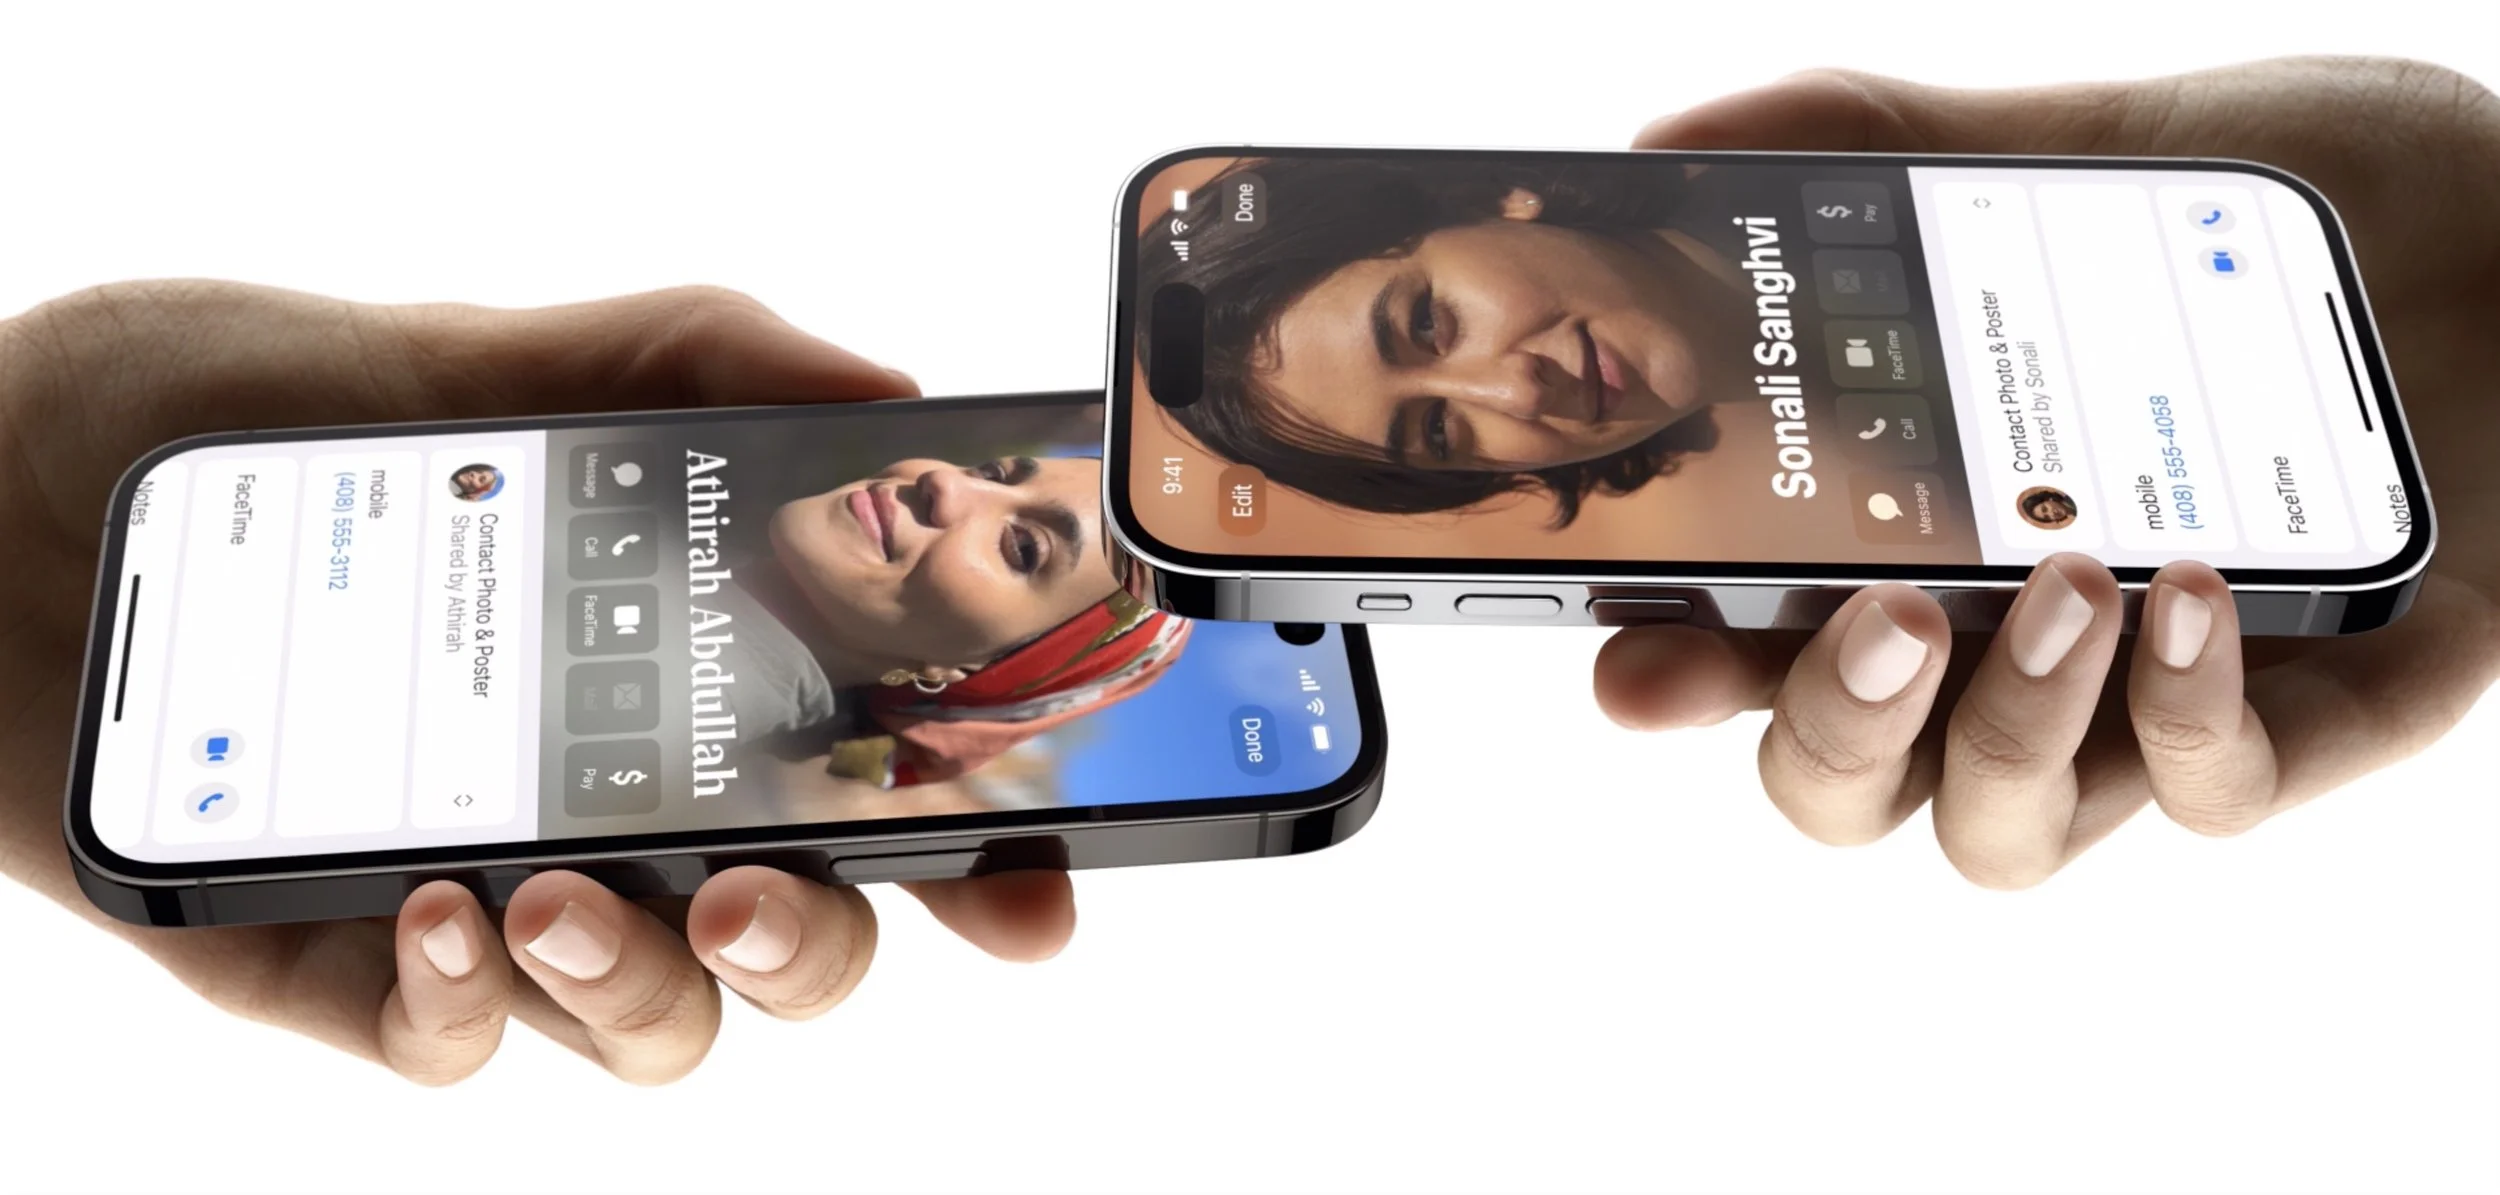
Contact Posters
Although you can share your preferred photo with others for use in Messages, Contacts, and Photos, when you call someone, all they see is your name. In iOS 17, Apple is introducing Contact Posters, which let you pick a photo or Memoji, along your preferred font. Then the Contact Poster will appear whenever you call someone, making it easier for them to identify who’s calling at a glance.

FaceTime Support on Apple TV
Wouldn’t it be nice if you could take a FaceTime call on your living room TV? It wasn’t impossible before, but Apple didn’t make it easy. With tvOS 17 on an Apple TV 4K, you’ll be able to leverage your iPhone or iPad camera and microphone through Continuity Camera to bring FaceTime conversations to the biggest screen in the house. Center Stage will let you move around the room while staying framed onscreen, and gesture-based reactions let callers create onscreen effects. These capabilities will also arrive later this year for other videoconferencing systems like Zoom or Webex, creating another reason to put an Apple TV in the conference room.

Desktop Widgets on the Mac
Widgets have become commonplace on iPhone and iPad Home screens, but on the Mac, they’ve been relegated to Notification Center. With macOS Sonoma, widgets can now migrate to the desktop, where you can position them anywhere. They’re also interactive, enabling you to control music, toggle the lights, and mark reminders as done. Thanks to Continuity, you can add your iPhone widgets to the Mac desktop, even when there’s no Mac app. Your iPhone has to remain nearby or on the same Wi-Fi network. Remember that you can use a hotkey or hot corner to slide all your windows aside to reveal your desktop at any time.

NameDrop for Sharing Phone Numbers
Sharing phone numbers has never been easier with the new NameDrop feature. Just hold your iPhone near someone else’s iPhone or Apple Watch (Series 6 or later, sometime after the initial watchOS 10 release) to exchange contact information—which you select—along with your Contact Poster. Alas, you’ll still have to type in phone numbers for Android users manually.
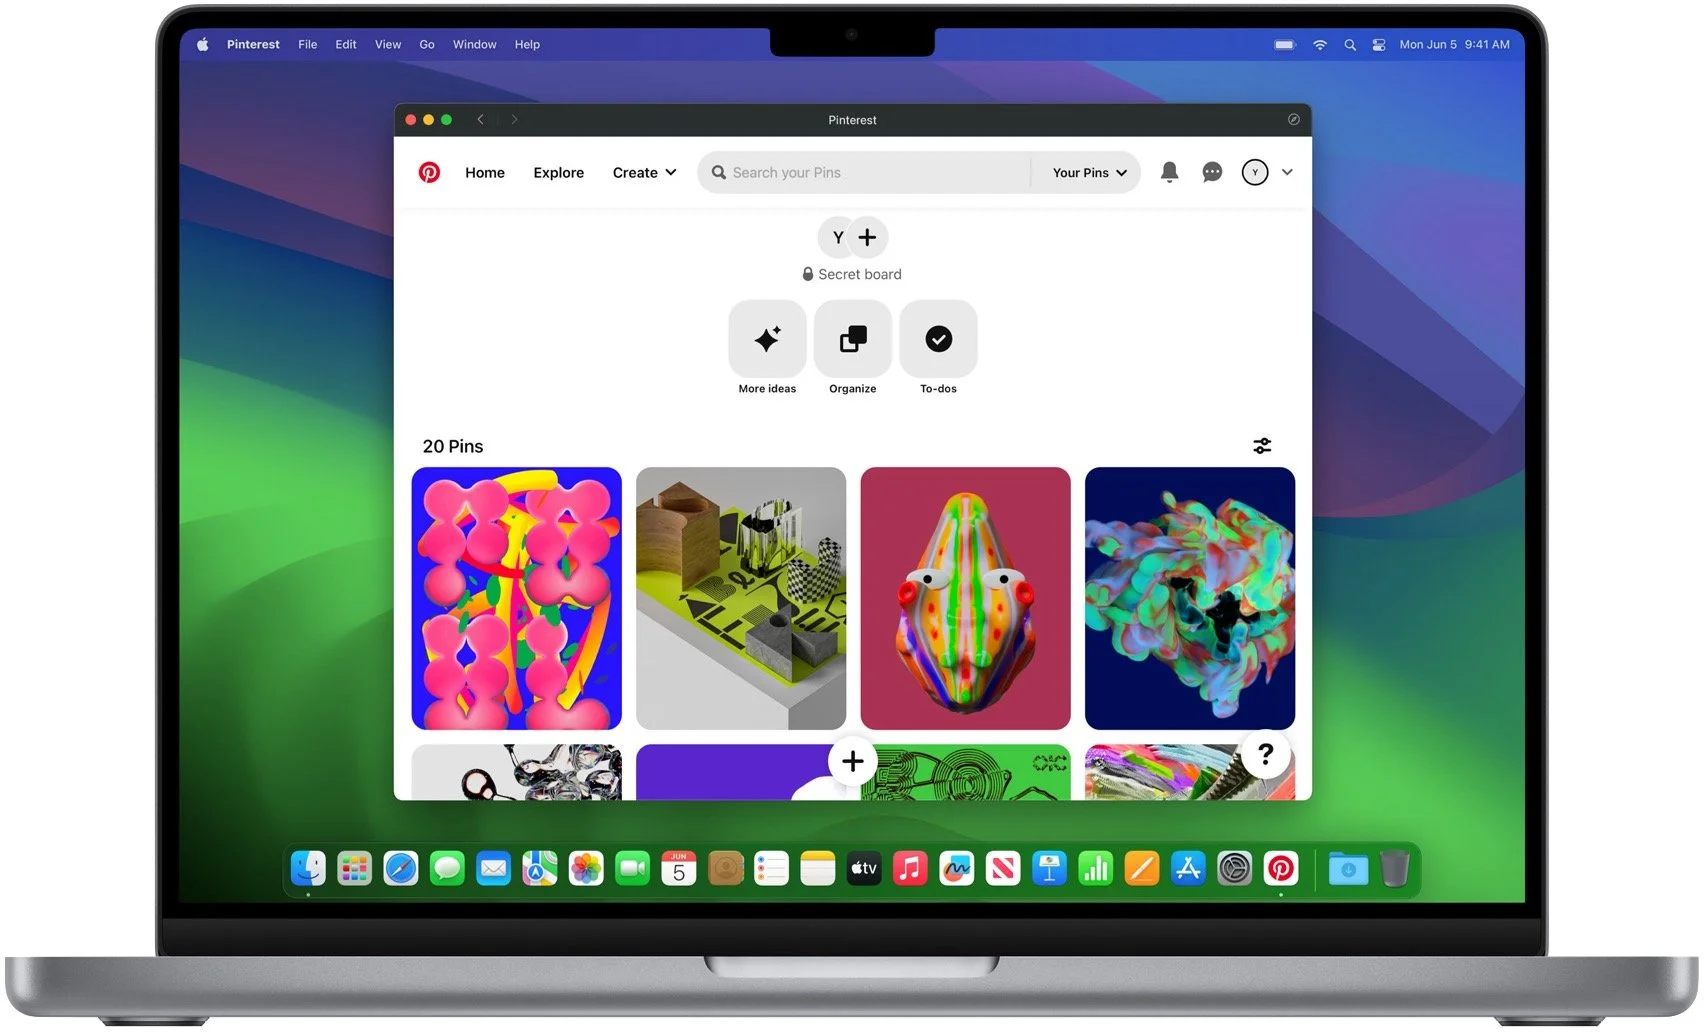
Web Apps in Safari
We all have websites that we use heavily, just like a native Mac app. If there’s no Mac version of the app, Safari in macOS Sonoma will let you add the website to your Dock, where it will look and work like a standalone app with its own window, toolbar, and notifications. (If you’re longing for this capability now, check out Unite from BZG.)
Five More Welcome Features
For more reasons to upgrade once these new operating systems are out and stable, consider the following additional features:
Live Voicemail: While someone is leaving you a message, Live Voicemail transcribes it and displays it onscreen so you can decide if you want to pick up or not.
AirTag sharing: No more awkward notifications when one family member has an AirTag that ends up traveling with other family members.
No more “Hey” with Siri: We can hope Siri becomes better at listening, but at least Apple’s letting us invoke Siri with a single word now.
Simultaneous dictation and keyboard use in macOS: Being able to dictate and edit text with the keyboard simultaneously has been great in iOS 16, and with macOS Sonoma, you’ll be able to enter text on your Mac just as fluidly.
PDF form filling: It will get easier to fill forms in PDFs, with iOS 17, iPadOS 17, and macOS Sonoma automatically filling in your contact information. It’s supposed to work even with scanned PDFs.
Apple usually releases its new operating systems in September or October, and we’ll be writing more about them as we have a chance to test them. Generally speaking, it’s OK to upgrade to everything but macOS shortly after release; with macOS, we recommend caution to ensure all your existing apps and workflows won’t be impacted.
Apple Unveils Vision Pro “Spatial Computer”
And now for something completely different. Apple devoted the final third of its keynote to unveiling a mixed-reality headset it calls Vision Pro. Even though it fits on the user’s head like bulbous ski goggles, Apple prefers to call it a spatial computer. That’s probably to avoid charged terms like metaverse, although the Vision Pro does provide both augmented reality, where digital objects are superimposed on a view of the real world, and virtual reality, where an immersive digital environment blocks out the real world.
Apple said the Vision Pro would ship early next year, starting at $3499. The high price accurately reflects the impressive amounts of technology Apple has shoehorned into the device but puts it out of reach for all but the most inquisitive and flush early adopters. What will the Vision Pro make possible for that money?

The Vision Pro blends digital content with the physical world, providing a three-dimensional interface controlled by the user’s eyes, hands, and voice. Users can display apps as floating windows or bring a Mac’s screen into Vision Pro as an enormous 4K display. Along with controls triggered by eye tracking and hand gestures, plus a virtual keyboard, users can use the Magic Trackpad and Magic Keyboard for faster interaction.

FaceTime calls using the Vision Pro take advantage of the space, putting other callers in life-size tiles and providing a shared screen. Speakers in the headset provide spatial audio, so it sounds like people are speaking from where their tiles are positioned. Vision Pro users don’t show up looking like they’re wearing the headset; instead, they’re represented by a digital avatar Apple calls a Persona. Will it escape the uncanny valley?

The Vision Pro is an easier sell for entertainment, where many people prefer immersive experiences, whether watching a movie on what seems like a 100-foot screen or playing a game where you see nothing but its virtual world. A Digital Crown lets the user control how much of the physical world seeps through around the edges.
If you’re thinking it would be unsettling to be in the same room with someone wearing a Vision Pro, you’re not alone. In an attempt to reduce that sense, a technology called EyeSight makes the device seem transparent—it shows an image of the user’s eyes on a front-facing display for others to see. How effective this will be remains to be seen, but it’s hard to imagine the Vision Pro becoming a fashion accessory.

There’s a great deal more to the Vision Pro, such as its ability to record and play back 3D movies with spatial audio, wrap panorama photos around the user, and use familiar iPhone and iPad apps. Despite the incredible hardware and software that Apple has invented to bring the Vision Pro to fruition, it feels like a technology demo. And it does demo well, judging from reports from people like tech analyst Ben Thompson.
But the Vision Pro is at least 6 months from emerging from Apple’s reality distortion field, and many people are already highly dubious that the company’s vision for the future of computing will do a better job with the real-world tasks we already do with today’s digital devices.
(Featured image by Apple)
“Juice Jacking” Returns to the News but Still Hasn’t Happened
Juice jacking—malware installation or data theft after you plug a phone into a public charger—is in the news again. While the recommended precautions aren’t onerous, there are no documented instances of juice jacking happening in the wild.

Much has been made in the media about a recent FBI warning about “juice jacking,” the theoretical act of installing malware on or stealing data from an iPhone connected to a public charging station. Researchers first demonstrated juice jacking in 2011 at the Defcon security conference.

There’s no harm in following the FBI’s advice, but why raise the topic now? When questioned by the fact-checking site Snopes, the Denver office of the FBI said it was a standard public-service announcement tweet.
More importantly, there’s no indication that there’s any reason to worry. The security site Krebs On Security quoted one of the original juice jacking researchers as saying that he isn’t aware of any public accounts of a juice jacking kiosk existing in a public place outside of a security conference.
Making the risk of juice jacking even less concerning are security changes that Apple has made to iOS and iPadOS. Now, when you connect a device to a USB charger or device that does anything beyond providing power, you’ll see a prompt asking if you trust it. Given that there are no documented instances of juice jacking outside of a demonstration, it’s highly improbable that you’d get such a prompt when connecting to a public charging station, but if that were to happen, tap Don’t Trust and unplug your device immediately.

To block all possibility of juice jacking, you could:
Bring your own USB charger and plug it into a standard wall outlet.
Charge your iPhone from a battery pack and recharge the battery from a public charger.
Use a public wireless Qi charger. No cables, no worries.
Connect a USB data blocker to the end of your charging cable when using a public charger.
Rely on a special USB cable that can only charge, not carry data.
But honestly, just as with warnings about poisoned Halloween candy, these juice-jacking warnings don’t seem to be based on any documented instances. Our take? It’s sensible to bring a USB charger when traveling and carry a battery pack as a backup, but there’s no reason to worry about security when using a public charger. Amusingly, while we were editing this article, Ars Technica published a lengthy piece expanding on everything we’ve just said.
(Featured image by iStock.com/ClaireLucia)
Sidestep MacBook Optimized Battery Charging When Necessary
Has your MacBook’s battery ever been stuck at 80% when you would prefer to have a full charge? We explain what’s happening and how to work around Apple’s optimized battery charging features.

Have you ever run into a situation where the battery icon in your menu bar is stuck at 80% even though your Mac has been plugged in for hours? Luckily, there are sev-eral easy workarounds, but first, let us explain what’s going on.
In the past few years, Apple has added optimized battery charging features to many of its battery-powered products, including the iPhone, the Apple Watch, and the MacBook Air and MacBook Pro. In all cases, Apple’s goal is to increase the lifespan of your devices’ lithium-ion batteries by reducing the amount of time they spend fully charged.
With the iPhone and Apple Watch, Apple achieves this by learning your charging patterns and delaying charging past 80% in certain situations. The optimized charging algorithm then charges the device to full just before you’re likely to unplug it. For most people, that probably happens overnight, so the device is ready in the morning.
With the MacBooks, the background is slightly different. Many people use their MacBooks at desks, often connected to large displays, so they spend a lot of time plugged into power. In the past, that would keep the battery fully charged and generate heat, both of which shorten the lifespan of lithium-ion batteries. So once again, Apple’s optimized battery charging technology tries to hold the battery at 80% and charges it to full only when it thinks you’ll need to use it away from the desk. If you seldom take it anywhere, it could be held at 80% most of the time.
That works best when you have a regular schedule, but it’s easy to end up in a situation where you need to grab your MacBook and head out—such as for an overnight trip—where you won’t be able to recharge easily. If the optimized battery charging algorithm wasn’t expecting that, you could find yourself with a battery that’s only at 80% to start, significantly reducing your battery life.
There are three ways to work around this problem, depending on how troublesome it is for you:
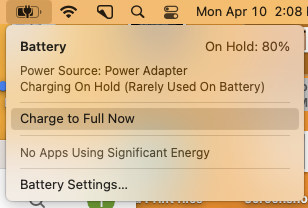
Resume charging: If the optimized battery charging algorithm has paused charging at 80% but you want to leave with a full charge, click the battery icon in the menu bar and choose Charge to Full Now. That will take some time, so make sure you initiate the final charging early enough. This workaround is most helpful if you only occasionally need a full charge.
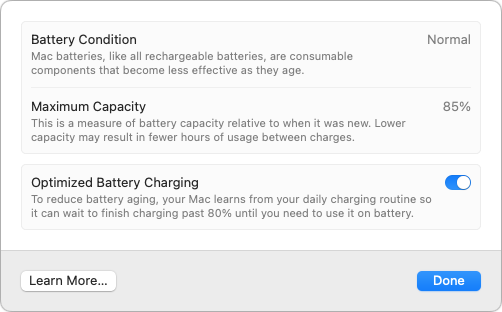
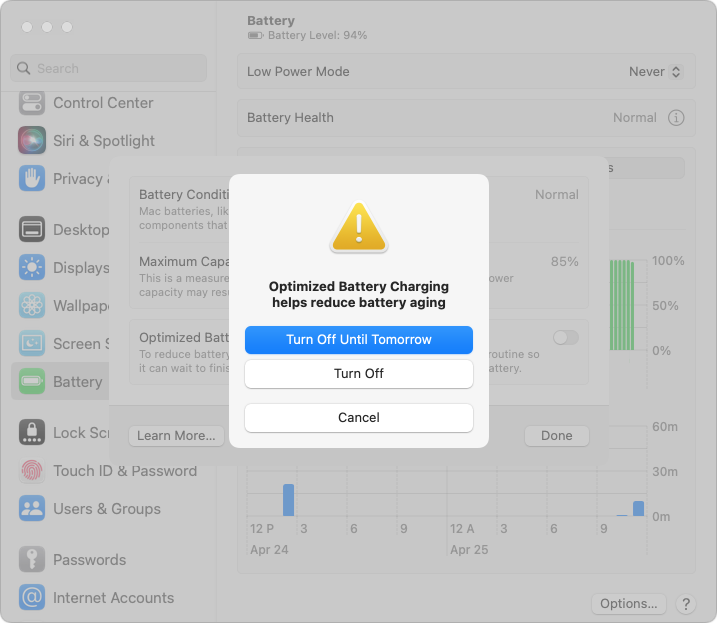
Disable optimized battery charging temporarily: Let’s say you’re on that overnight trip and need to be sure that your MacBook is fully charged for your 6 AM flight home. To ensure you don’t wake up to a partially full battery, you can temporarily disable optimized battery charging. In macOS 13 Ventura, choose System Settings > Battery, click the ⓘ next to Battery Health, turn off the Optimized Battery Charging switch, and click Turn Off Until Tomorrow in the dialog that appears.
In macOS 12 Monterey and earlier, choose System Preferences > Battery, deselect Optimized Battery Charging, and click Turn Off Until Tomorrow.
Disable optimized battery charging permanently: Some people have unpredictable schedules. While the optimized battery charging algorithm may simply throw up its hands and allow your battery to charge fully at all times, if you find yourself continually fighting it, follow the steps above and click Turn Off to disable it permanently. Be aware that this may reduce the overall lifespan of your battery.
If all this seems fussy, it’s because Apple was criticized some years ago when it introduced optimized battery charging for the iPhone without informing users, some of whom were upset by the seemingly unpredictable charging behavior. Apple now makes the controls accessible to users, which is good but adds complexity.
Although we recommend leaving optimized battery charging enabled in most situations, there are times when it’s reasonable to turn it off to ensure you have as much power as possible for the upcoming work session.
(Featured image by iStock.com/Konev Timur)
Make Sure to Back Up iPhone Photos on Your Mac
With new reports of iPhone theft victims being locked out of their iCloud accounts, it’s all the more important that you copy your iPhone photos to a Mac and then back up that Mac.

If your iPhone were to be stolen or suffer an unfortunate accident, would you lose all your precious photos? Those using iCloud Photos are probably shaking their heads smugly, thinking that all those baby and vacation photos are backed up securely in iCloud. iCloud Photos does indeed store a copy of all your photos, but you shouldn’t assume that everything in it is completely protected. Although it’s extremely unlikely that Apple’s systems would fail so that you’d lose anything, the contents of your iCloud account aren’t as safe as would be ideal.
An Aside to Explain Why iCloud Isn’t Perfectly Secure
Recently, Wall Street Journal reporters Joanna Stern and Nicole Nguyen covered a troubling form of crime aimed at iPhone users in an article (paywalled) and accompanying video. Thieves hang out in bars, looking for users who tap in their passcodes instead of using Face ID or Touch ID. Once they’ve learned someone’s passcode with surreptitious shoulder surfing, they grab the iPhone and run. As soon as they’re clear, they use the passcode to change the user’s Apple ID password and enable or reset a recovery key, which prevents the user from employing Find My to locate and lock the iPhone. Worse, with the passcode, they can make purchases with Apple Pay, access all passwords in iCloud Keychain, and use other information on the iPhone to facilitate identity theft. It’s a disaster.
But it gets worse, as the reporters detail in a new Wall Street Journal article (paywalled) and video. By enabling a recovery key, the thief disables Apple’s normal account recovery process for resetting the Apple ID password. In other words, if this were to happen to you, along with all the financial losses and headaches, you would lose access to your iCloud account, possibly forever, and with it, all your photos in iCloud. With luck, Apple will block this attack soon.
For now, follow this commonsense advice to reduce the chances of being victimized:
Pay attention to your iPhone’s physical security in public.
Always use Face ID or Touch ID in public.
If you must enter your passcode in public, conceal it from anyone nearby.
Never share your passcode beyond highly trusted family members.
Backing Up Your iPhone Photos
As with so many other modern ills, good backups go a long way toward minimizing the pain of problems. They won’t prevent someone from stealing your iPhone or locking you out of your account, but if that were to happen, at least you won’t lose all your photos!
There are two possible backup scenarios. Using iCloud Photos and downloading originals to your Mac is easiest but requires that you pay Apple for more storage if you have more than a handful of photos. If you don’t use iCloud Photos, you can just back up your iPhone to your Mac or, better yet, import images into Photos on the Mac and then sync them back. It’s more work and fussier, but doesn’t cost anything.
iCloud Photos: When using iCloud Photos, the trick to protecting your pictures is to sync the originals with your Mac. In Photos > Settings/Preferences > iCloud, select Download Originals to this Mac. The only downside of this approach is that you need enough disk space on your Mac to hold them all; if that’s not the case, you may need to move your system Photos Library to an external hard drive.

iPhone-only photos: If you aren’t using iCloud Photos, the best approach is to connect your iPhone to your Mac using a USB-to-Lightning cable or Wi-Fi and then import new snapshots into Photos on your Mac manually (select the iPhone in the Photos sidebar). It’s helpful to remove the original photos from the iPhone with the Delete Items checkbox after importing so you can manage them solely on the Mac.

Then you can sync all the photos (or just desired ones, if your iPhone is low on space) back to your iPhone using the Finder. First, select the iPhone in a Finder window’s sidebar. Then click Photos in the button bar at the top, and select “Sync photos to your device from Photos” along with “All photos and albums” and “Include videos” in the options below. Finally, click Apply or Sync.

Technically speaking, backing up your iPhone to your Mac without syncing to Photos also backs up your photos, but the only way to get them back is to restore a backup onto an iPhone. It’s much better to have all the photos accessible in Photos too.
Either way, once the photos are on your Mac, you should back up all your data using Time Machine, an Internet service like Backblaze, or a third-party app like Carbon Copy Cloner or SuperDuper. If you’re concerned about the quality of your backups for preserving photos, contact us for advice.
(Featured image by iStock.com/metamorworks)
How to Add Important Metadata to Scanned Photos
Do you have pictures that are difficult to find or make sense of in Apple’s Photos because they lack dates, titles, locations, and faces? That happens regularly with scanned snapshots, so we explain how you can efficiently add metadata.

Photos we take today with our iPhones and other digital cameras automatically have metadata associated with them, information like time and date, camera type, lens and exposure information, and even location (with iPhones and newer cameras). Other metadata, like titles and faces, we have to add manually.
Four of these pieces of metadata are particularly useful:
Dates ensure that photos sort correctly in Photos.
Titles simplify searching and make it easier to group photos.
Locations let you see photos on a map and search by location names.
Faces collect images of individuals automatically after you identify some manually.
Problems crop up when you have old digital photos that lack full metadata and with scanned photos, which seldom have any metadata at all. The lack of metadata hits especially hard if you’ve taken advantage of a service that scans boxes of old snapshots so you have digital versions. Bulk scanning is a great way to protect the images and share them with others, but without appropriate metadata, the images can be nearly incomprehensible to anyone who doesn’t already know who’s in them and when and where they were taken.
Happily, Photos has tools for adding metadata to multiple images at once. If you have a large collection of scanned photos, follow along to learn how to give them the metadata that will make them easier to find and understand in the future.
Before we get started, make sure you know how to select multiple images at once in Photos. There are four basic approaches:
Drag: Click in any blank area, and drag a rectangle around the pictures you want to select. If you drag to the top or bottom of the screen, Photos scrolls to bring more images into view. Dragging is easy, but you can select more than you want.
Shift-click: Select one picture. Then hold down the Shift key and click any other picture to select both of them and all the images in between. Shift-clicking is the fastest and most accurate way to select many contiguous photos.
Command-click: To select an arbitrary set of photos, Command-click each one to select it; another Command-click on a selected image deselects it. Command-clicking is too slow for selecting a lot of photos, but it’s great for removing photos from the selected set if you’ve accidentally added too many with another method.
Select All: If you want to select all the photos in an album, choose Edit > Select All.
Change Dates
Photos scanned by a service will likely come back with the date they were scanned. That’s not helpful, and while it’s hard to know exactly when the photos were taken, if you can get them in at least the correct year, they’ll sort reasonably in Photos. Once you’ve selected the photos you want to adjust, follow these steps:
Choose Image > Adjust Date & Time to bring up the Adjust dialog.
In the Adjusted field, enter the date you want to apply to the selected photos.
Click Adjust.

It’s important to note that this doesn’t change the date and time to what you enter exactly. Instead, it adjusts each photo’s date and time by the amount specified. In all likelihood, the selected photos have slightly different times and possibly dates, so adjusting them by the same amount means they’ll retain their basic order. In the screenshot above, you can see that each photo’s date will move more than 55 years into the past to when that tractor was newer.
Change Titles
No photos, scanned or taken with an iPhone, will automatically have useful title data assigned to them. At best, the title might be the same as the image’s filename, something unhelpful like IMG_3343.JPG. In Photos’ predecessor iPhoto, Apple provided a way of changing the titles of selected photos and appending a sequential number to each image. That way, you could have Niagara Falls Trip 1, Niagara Falls Trip 2, and so on.
That feature is no longer available in Photos. You can still change the titles of selected photos, but all the titles will be the same, without a sequential number. Once you’ve selected the desired images, follow these steps:
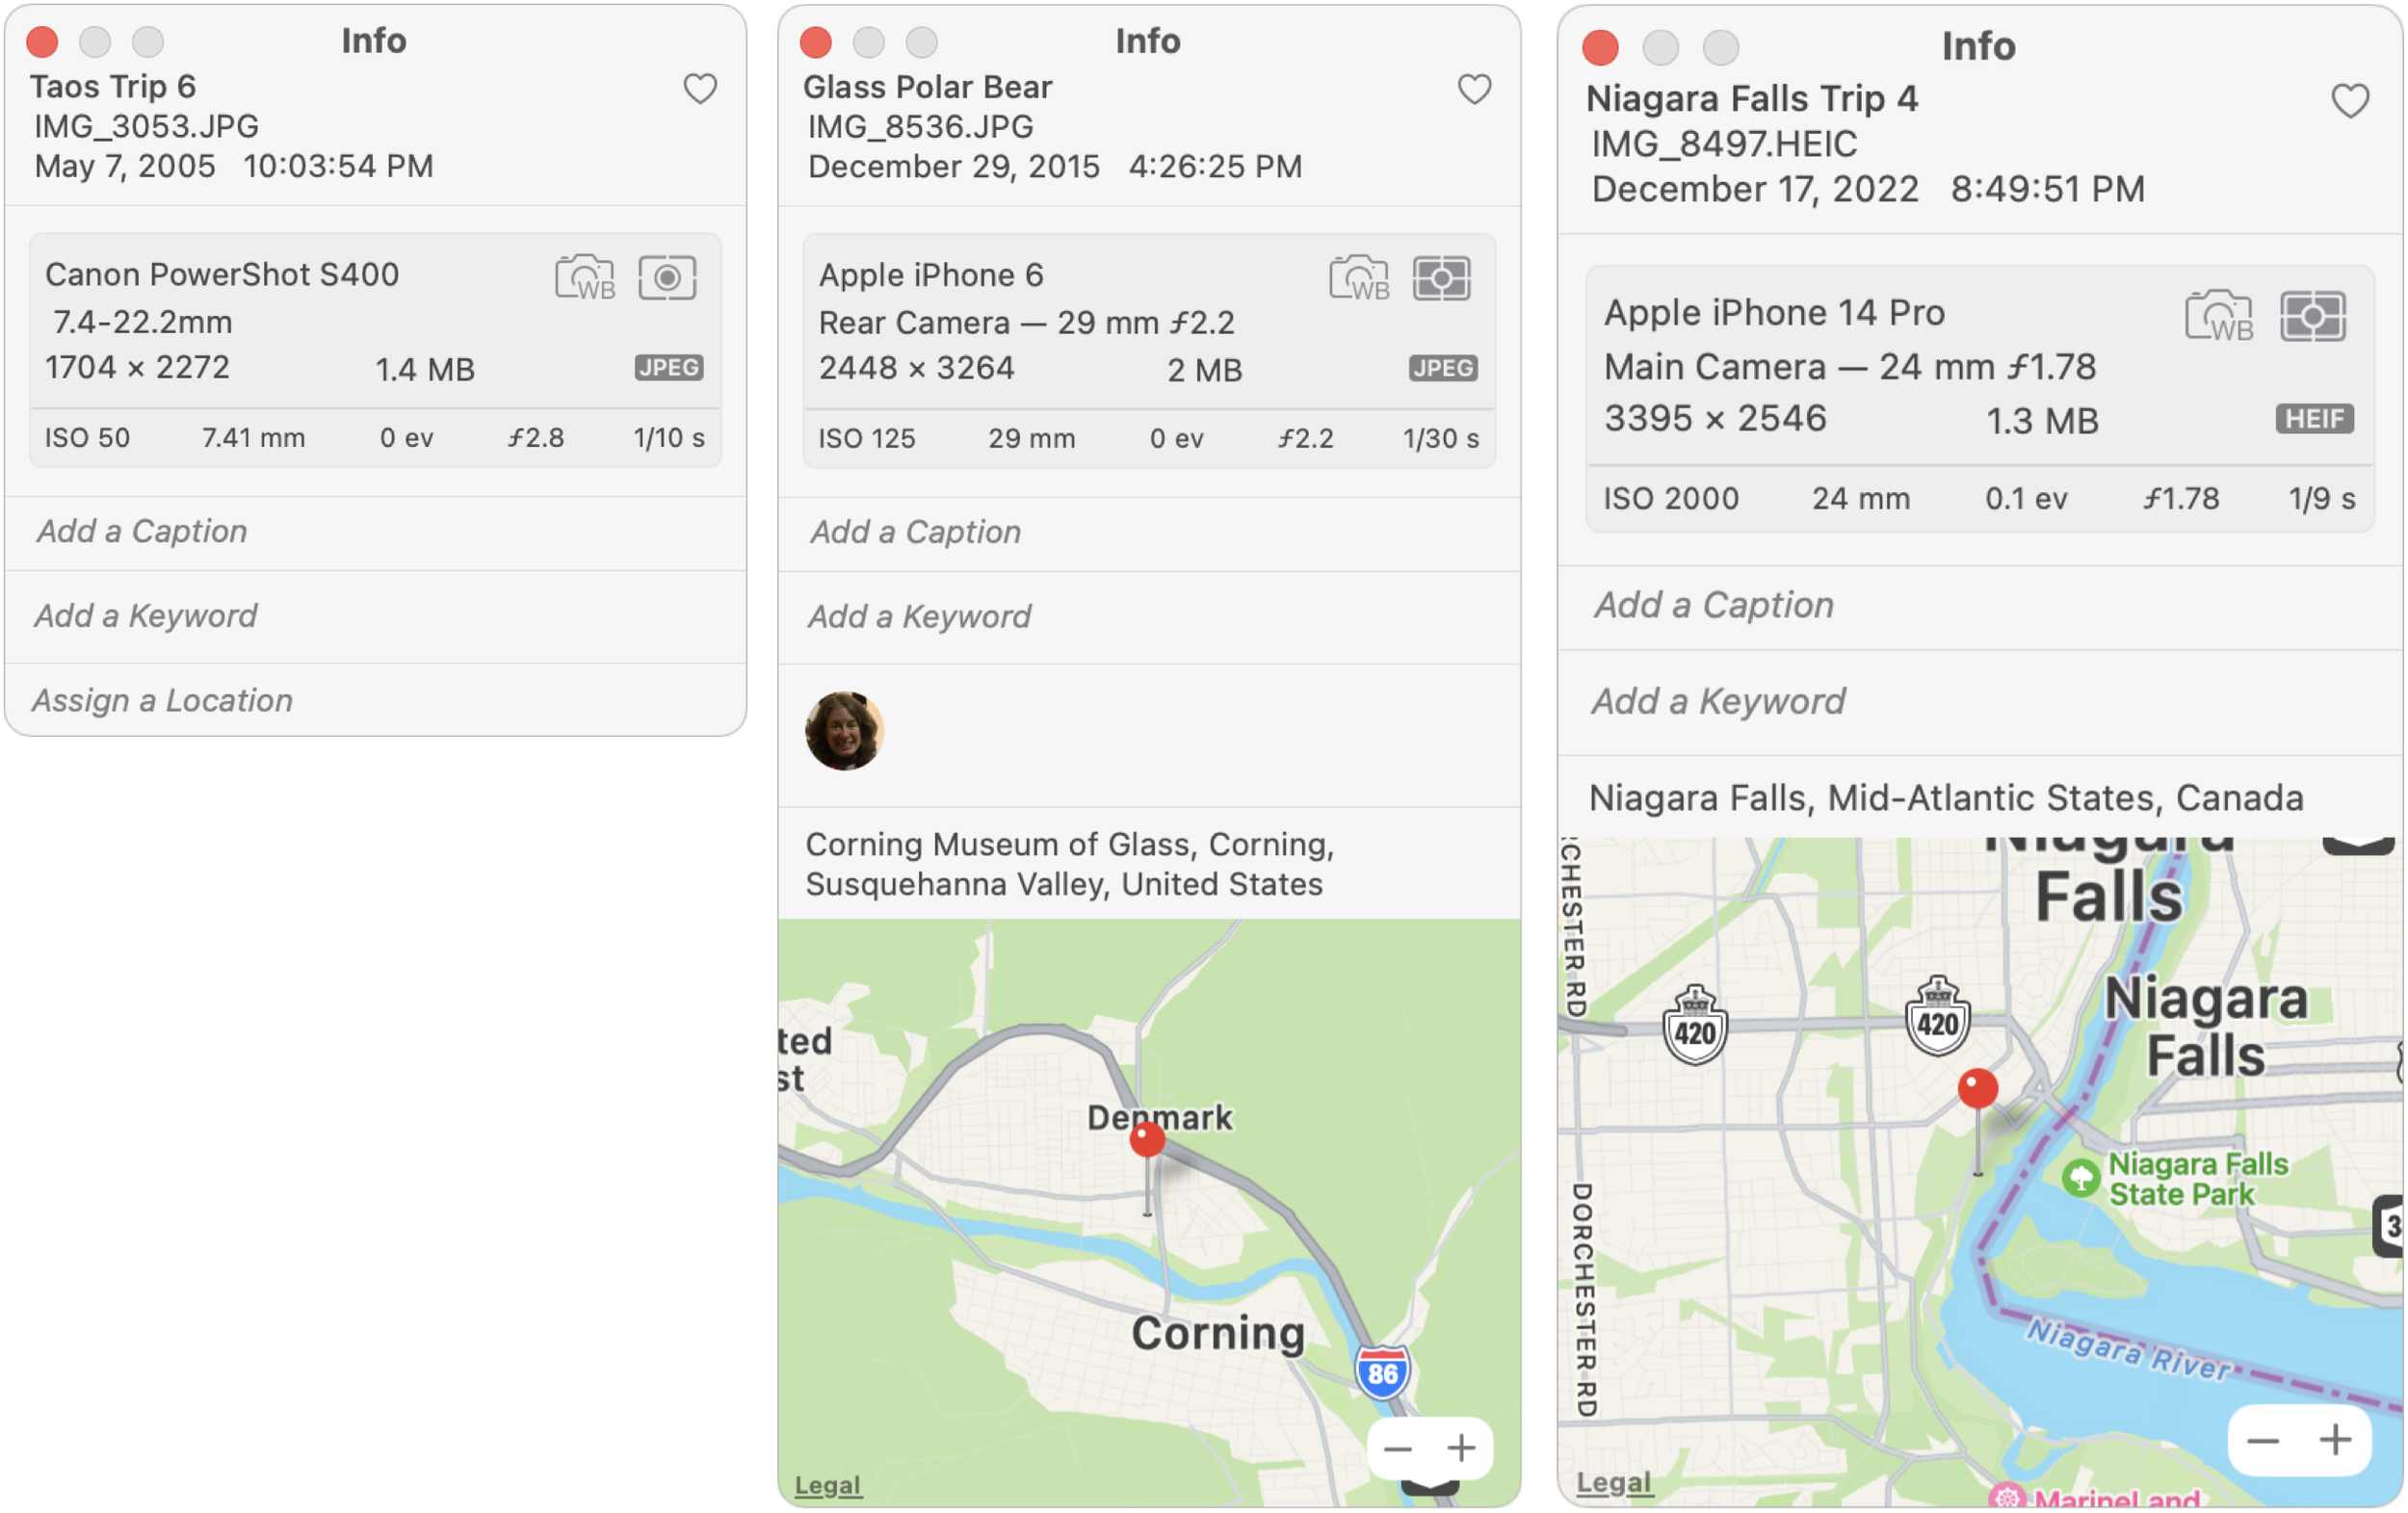
Choose Window > Info to bring up an Info window.
In the field labeled “Various Titles,” enter the desired title.
Press Return to apply the title.

If you desperately want sequential numbers appended to your titles, there is a way of doing it using AppleScript, as explained in this discussion forum post.
Change Locations
Scanned photos and those taken with most digital cameras won’t have location metadata showing where the photo was taken. With many photos, you may not know the precise location—who remembers where that picnic in 1980 was held?—but you can probably specify the city or state/province. The process for adding locations is similar to adding titles.
Choose Window > Info to bring up an Info window.
In the field labeled Assign a Location, start typing the name of the location until you see the correct location appear in the suggestion list below.
Click the desired location to assign it to the selected photos.

If you want to do a lot of geotagging, check out the app HoudahGeo, which provides additional tools for connecting locations with images stored in Photos. It even lets you drag images to spots on a map, which may be faster than typing in locations.
Identify Faces
Though not perfect, the facial recognition feature in Photos is a wonder of modern machine learning. Once you identify someone a few times and then confirm or reject additional suggestions, Photos automatically identifies people as they appear in new photos. It could be particularly effective when importing a large number of old family photos where you might not recognize all the people in a previous generation. For help using facial recognition, refer to Apple’s Photos documentation, but here are the basics. The first task is to identify or create a new person whose face you want Photos to recognize:
1. In the Photos sidebar, click People, and look to see if the person has a thumbnail. If so, move on to the instructions for associating more photos with them.
2. If they don’t have a thumbnail, find a photo of them. If there’s an “unnamed” tag under their face, type their name in the box, selecting the appropriate suggestion if they’re among your contacts.

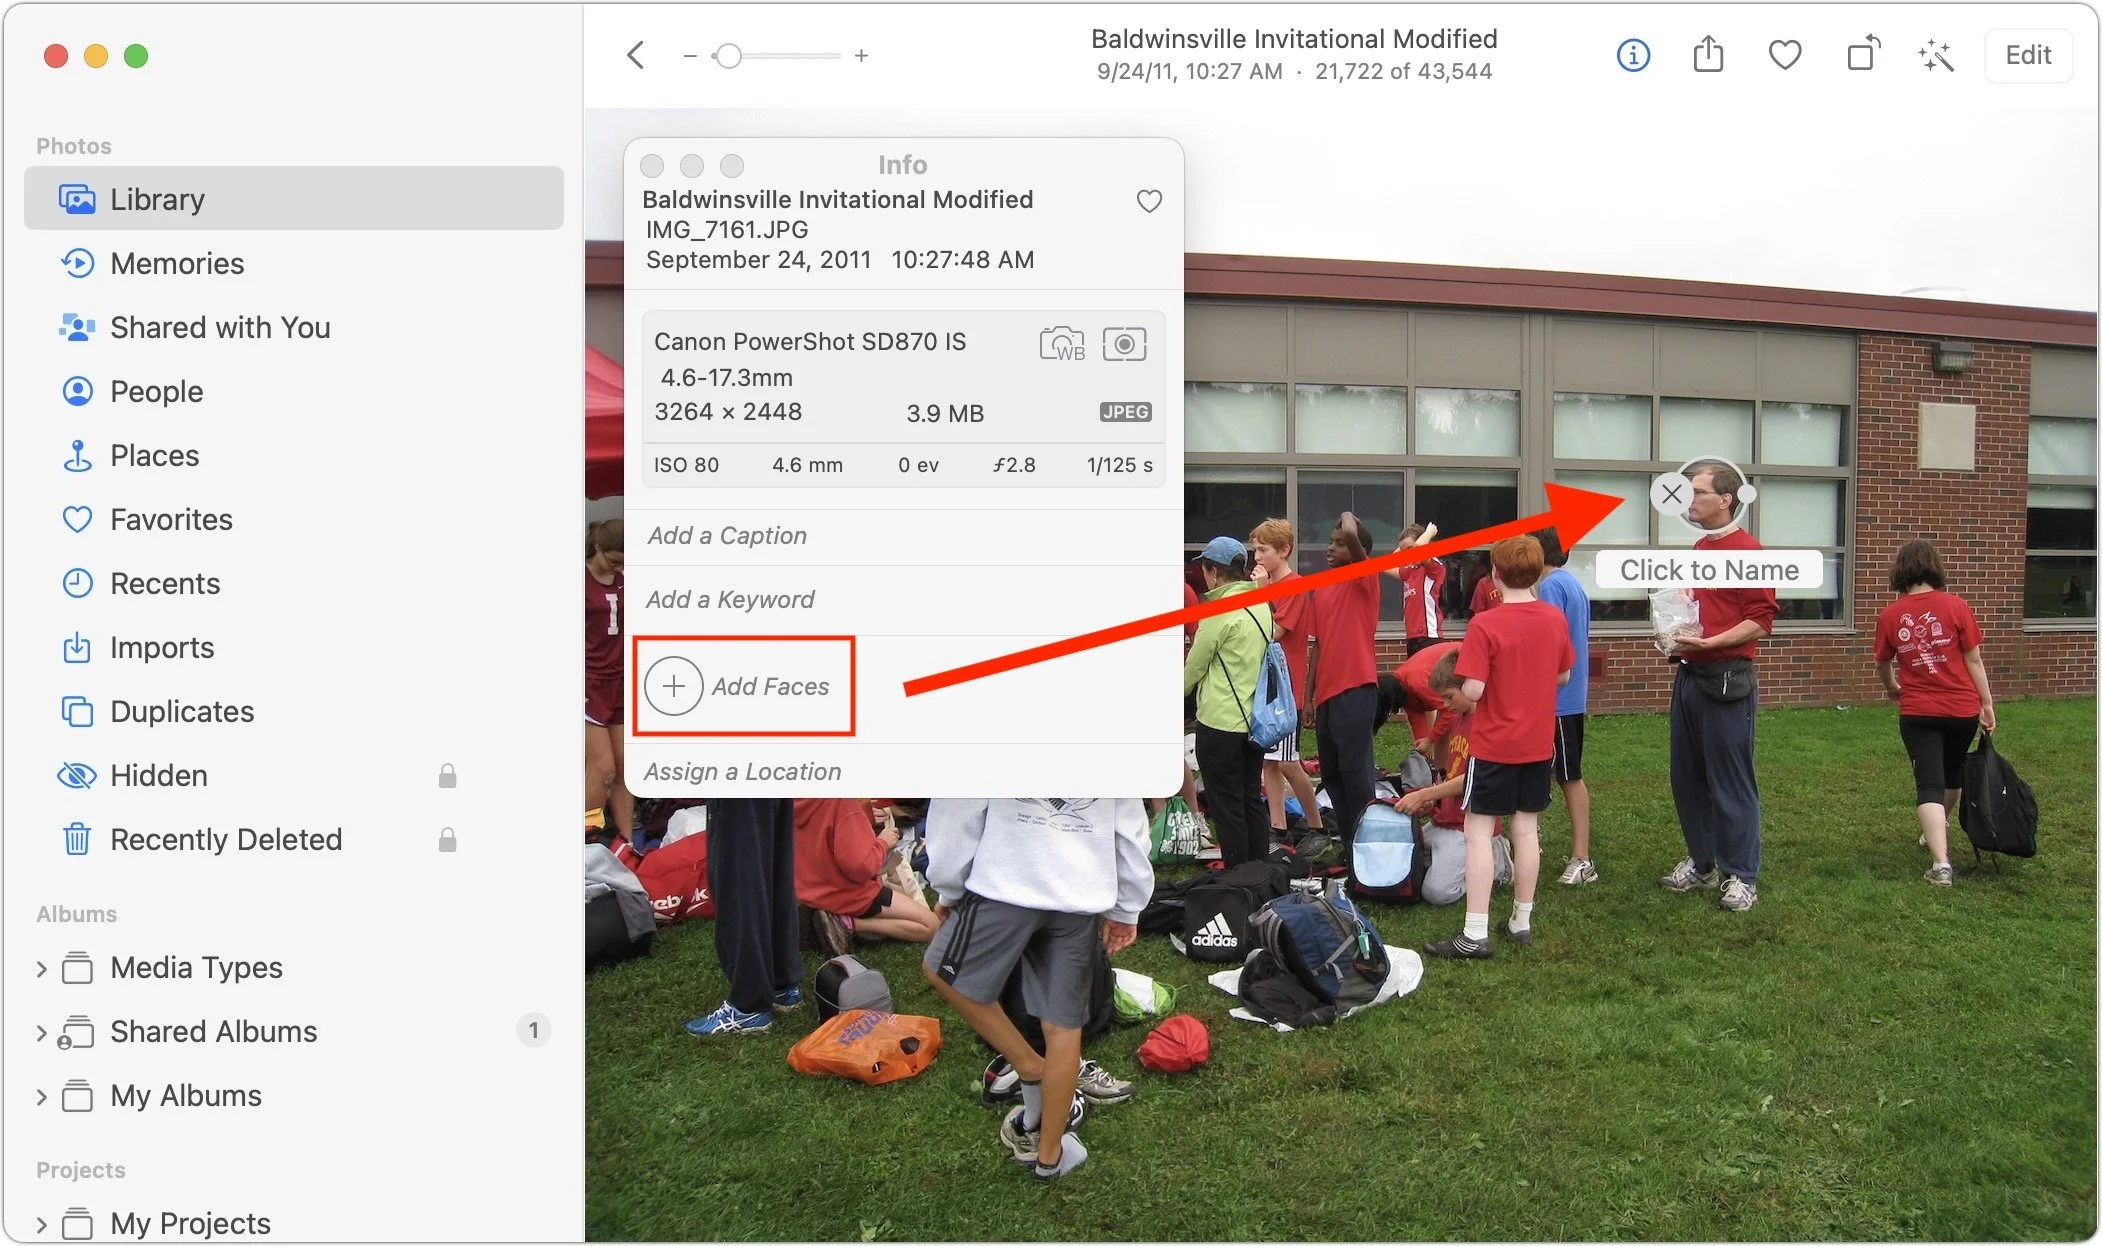
3. When there’s no tag under the person’s face, you’ll have to add one manually. Choose Window > Info to bring up the Info window, click the Add Faces button, click the image again (surprising, but necessary), drag the Click to Name circle over the face of the person to identify, and then type a name in the box.
Once you have identified or created a person for someone whose face you want, there are three ways to train Photos to identify more photos of them. These aren’t exclusive—you’ll want to employ all three. The first approach is generally pretty accurate, the second sometimes grasps at straws, and the third may kickstart more recognition by the other two later on.
In the People album, double-click a person’s face. At the top of the window, Photos may display a banner saying that there are additional photos to review. If it does, click Review, and in the dialog that appears, deselect any photos that aren’t of the person before clicking Done. The banner won’t appear when there are no more photos to check for that person.

In the People album, double-click a person’s face. Scroll to the bottom of the window, and click Confirm Additional Photos. If it has any photos that might be of that person, Photos displays the first one and asks at the top of the screen if the photo is of the desired person. Click Yes or No as appropriate for each photo that appears. Often, identifying a particular face as being associated with the person will add more photos. When you finish, click the Done button at the top of the window.

Scroll through a bunch of photos individually, typing names into the “unnamed” box whenever possible. Those photos will immediately be associated with the person, but then you should leave Photos running in the background for hours or days so it can use that new information to identify more possible faces, which you may have to confirm using the previous two methods.
Identifying faces can be time-consuming, but it can also be somewhat addictive if you like feeling that you know more than the computer. Note that face metadata lives only in Photos itself, so if you were ever to export or share the photos with someone else, you’d have to find a way to convey who was pictured in another way.
With the tools in Photos to change dates, titles, locations, and faces, you can bring order to that large collection of scanned or old photos.
(Featured image by iStock.com/vgabusi)